Sablés
 Print This Recipe
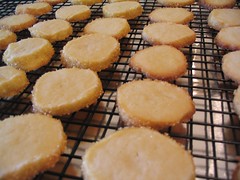
These cookies are buttery and shortbread-ish. And delicious. Have I mentioned how much I love Dorie recipes? Unfortunately, it appears I am not a talented log roller, as these cookies came out a little angled and squared rather than round. Fortunately the funky shape does not affect their amazing taste!
Ingredients
2 sticks (8 ounces) unsalted butter, at room temperature
1/2 cup sugar
1/4 cup confectioners’ sugar, sifted
1/2 teaspoon salt, preferably fine sea salt
2 large egg yolks, at room temperature (plus 1 large egg yolk, for brushing the logs)
2 cups all-purpose flour
Decorating (coarse) sugar
Working with a stand mixer, preferably fitted with a paddle attachment, or with a hand mixer in a large bowl, beat the butter at medium speed until smooth and very creamy. Add the sugars and salt and beat until well blended, about 1 minute. The mixture should be smooth and velvety, not fluffy and airy. Reduce the mixer speed to low and beat in two of the egg yolks, again beating until the mixture is homogeneous.
Turn off the mixer. Pour in the flour, drape a kitchen towel over the stand mixer to protect yourself and the counter from flying flour and pulse the mixer at low speed about 5 times, a second or two each time. Take a peek — if there is still a lot of flour on the surface of the dough, pulse a couple more times; if not, remove the towel. Continuing at low speed, mix for about 30 seconds more, just until the flour disappears into the dough and the dough looks uniformly moist. (If most of the flour is incorporated but you’ve still got some in the bottom of the bowl, use a rubber spatula to work the rest of the flour into the dough.) The dough will not clean the sides of the bowl, nor will it come together in a ball — and it shouldn’t. You want to work the dough as little as possible. What you’re aiming for is a soft, moist, clumpy (rather than smooth) dough. Pinch it, and it will feel a little like Play-Doh.
Scrape the dough out onto a smooth work surface, gather it into a ball and divide it in half. Shape each piece into a smooth log about 9 inches long: it’s easiest to work on a piece of plastic wrap and use the plastic to help form the log. Wrap the logs well and refrigerate them for at least 3 hours, preferably longer. (The dough can be kept in the refrigerator for up to 3 days or frozen for up to 2 months.)
Getting Ready to Bake
Center a rack in the oven and preheat the oven to 350 degrees F. Line two baking sheets with parchment or silicone mats.
Remove a log of dough from the refrigerator, unwrap it and place it on a piece of parchment or wax paper. Whisk the remaining egg yolk until it is smooth, and brush some of the yolk all over the sides of the dough — this is the glue — then sprinkle the entire surface of the log with decorating sugar.
Trim the ends of the roll if they’re ragged, and slice the log into 1/3-inch-thick cookies. (You can make these as thick as 1/2 inch or as thin as — but no thinner than — 1/4 inch.) Place the rounds on the baking sheets, leaving an inch of space between them.
Bake one sheet at a time for 17 to 20 minutes, rotating the baking sheet at the midway point. When properly baked, the cookies will be light brown on the bottom, lightly golden around the edges and pale on top; they may feel tender when you touch the top gently, and that’s fine. Remove from the oven and let the cookies rest a minute or two before carefully lifting them onto a rack with a wide metal spatula to cool to room temperature.
Repeat with the remaining log of dough, making sure the baking sheets are cool before you bake the second batch.
Makes about 50 cookies.
Serving
Serve these with anything from lemonade to espresso.
Storing
The cookies will keep in a tin at room temperature for about 5 days. If you do not sprinkle the sables with sugar, they can be wrapped airtight and frozen for up to 2 months. Because the sugar will melt in the freezer, the decorated cookies are not suitable for freezing.
My Notes
- I used Turbinado (Sugar in the Raw) sugar.
- I put the first batch in for 17 minutes as the recipe says and the cookies came out really dark. The rest of them I baked for about 14 minutes.
Recipe from Baking: From My Home to Yours by Dorie Greenspan.
World Peace Cookies
Print This Recipe
 I know, I know. Everyone else made these months and months ago. I’m late to the party as usual. But better late than never, right? In this case, most definitely!
I knew these cookies would be good before I even took the first batch out of the oven. The sliced dough tasted awesome, my kitchen smelled amazing delicious, and the finished product is out of this world–chocolatey with a bit of salt. Mmmm. If you’re looking for a really easy-to-make yet outstanding chocolate cookie recipe, I highly recommend this one.
And in case you were wondering why they are called World Peace Cookies, according to the cookbook, Dorie’s neighbor said that a daily dose of these cookies “is all that is needed to ensure planetary peace and happiness.” And I concur.
Ingredients
1 1/4 cups all-purpose flour
1/3 cup unsweetened cocoa powder
1/2 teaspoon baking soda
1 stick plus 3 tablespoons (11 tablespoons) unsalted butter, at room temperature
2/3 cup (packed) light brown sugar
1/4 cup sugar
1/2 teaspoon fleur de sel or 1/4 teaspoon fine sea salt
1 teaspoon pure vanilla extract
5 ounces bittersweet chocolate, chopped into chips, or a generous 3/4 cup store-bought mini chocolate chips
Preparation
- Sift the flour, cocoa and baking soda together.
- Working with a stand mixer, preferably fitted with a paddle attachment, or with a hand mixer in a large bowl, beat the butter on medium speed until soft and creamy. Add both sugars, the salt and vanilla extract and beat for 2 minutes more.
- Turn off the mixer. Pour in the dry ingredients, drape a kitchen towel over the stand mixer to protect yourself and your kitchen from flying flour and pulse the mixer at low speed about 5 times, a second or two each time. Take a peek — if there is still a lot of flour on the surface of the dough, pulse a couple of times more; if not, remove the towel. Continuing at low speed, mix for about 30 seconds more, just until the flour disappears into the dough — for the best texture, work the dough as little as possible once the flour is added, and don’t be concerned if the dough looks a little crumbly. Toss in the chocolate pieces and mix only to incorporate.
- Turn the dough out onto a work surface, gather it together and divide it in half. Working with one half at a time, shape the dough into logs that are 1 1/2 inches in diameter. Wrap the logs in plastic wrap and refrigerate them for at least 3 hours. (The dough can be refrigerated for up to 3 days or frozen for up to 2 months. If you’ve frozen the dough, you needn’t defrost it before baking — just slice the logs into cookies and bake the cookies 1 minute longer.)
Getting Ready to Bake
- Center a rack in the oven and preheat the oven to 325 degrees F. Line two baking sheets with parchment or silicone mats.
- Using a sharp thin knife, slice the logs into rounds that are 1/2 inch thick. (The rounds are likely to crack as you’re cutting them — don’t be concerned, just squeeze the bits back onto each cookie.) Arrange the rounds on the baking sheets, leaving about 1 inch between them.
- Bake the cookies one sheet at a time for 12 minutes — they won’t look done, nor will they be firm, but that’s just the way they should be. Transfer the baking sheet to a cooling rack and let the cookies rest until they are only just warm, at which point you can serve them or let them reach room temperature.
Makes about 36 cookies.
Storage
Packed airtight, cookies will keep at room temperature for up to 3 days; they can be frozen for up to 2 months.
My note: I was too lazy to cut up chocolate so I used mini chips instead.
Recipe from Baking: From My Home to Yours by Dorie Greenspan.
Excuses, Excuses
Why I haven’t been trying new recipes lately:

![Pretty [Yummy]](http://farm3.static.flickr.com/2232/1936241028_2c7f23c5c1_m.jpg)
Recipe Index
I installed a plugin that created a recipe index for this blog. You can now see a list of recipes by category without having to scroll through a big mess. I’m still tweaking the HTML and trying to adjust the spacing but hope to have it fixed soon. Enjoy!