2013 in Pictures
Happy New Year!
2013 has been yet another sweet (and savory) year for Nosh With Me. Thanks for reading!
Mini Wonton Lasagna Cups
 Print This Recipe
Mini foods are not only cute (seriously, people always oooh and aaah over them!), but they’re also great for parties. You know what I mean–you’re standing talking to someone, juggling a plate, silverware, and of course a cocktail. It never works, and something always ends up spilling or you stuff your face when the conversation is over.
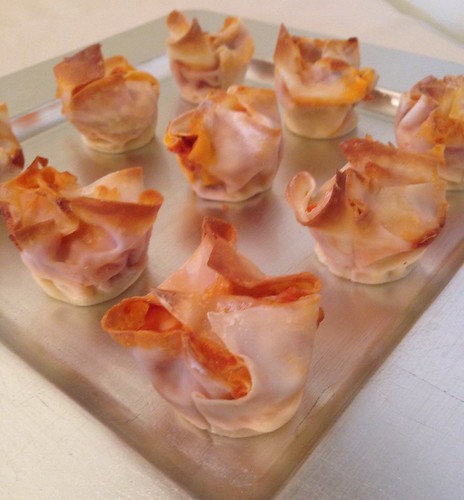
Behold the mini lasagnas! Perfect for parties (or really, anytime), these are baked in a mini muffin tin, so they’re really tiny and can be eaten in two to three bites. No fork and knife required! And they’re simple to make too–no boiling pasta noodles, just use wonton wrappers in their place. Easy peasy, and a huge hit!
Ingredients
1/2 lb ground beef or ground turkey
1 1/2 cups pasta sauce
15 oz ricotta cheese
1 1/2 cups shredded cheese
1/4 teaspoon kosher salt
1/4 teaspoon pepper
48 wonton wrappers (32 full size and 16 cut in half diagonally)
Preparation
Preheat oven to 350 degrees. Brown meat in a large skillet over medium high heat and drain. Add pasta sauce to remaining meat and stir to combine. (You may have some sauce mixture leftover. I did, and just froze it.)
In a large bowl, add the ricotta, 1 cup of shredded cheese, and salt and pepper. Stir to combine.
Coat mini muffin pans with cooking spray, and place a wonton wrapper in each cup.* Top with 1 tsp of the ricotta mixture, followed by 1/2 tsp of the meat sauce. Place a cut wonton wrapper over the sauce, and repeat the layers by adding ricotta cheese, meat sauce, and a sprinkle of shredded cheese. Fold in corners of wonton wrappers.
Bake at 350 degrees for 13 to 15 minutes until the cheese is melted and the wonton wrappers are golden. Allow to cool in the muffin tin for 5-10 minutes before serving.
Makes 32 mini lasagna cups.
*I did every other cup so it’s easier to see the process in the photos, but you don’t have to leave space.
Recipe adapted from a bunch of recipes. Thanks Google!
The Perfect Apple Pie
 Print This Recipe
Over the years, I’ve tried various pie crust recipes–butter only, shortening only, butter and shortening combination–and have finally found the perfect one. The use of both butter and shortening gives this recipe the kind of flaky, buttery crust that apple pie dreams are made of. The filling is layers of apples and delicious goo (as my family refers to it) with just the right amount of sweetness. Perfection.
This recipe is actually a mashup of two recipes I’ve made in the past. I used the filling from one and crust from another, with a little tweaking to make it just right. The crust is foolproof, easy to work with, and versatile–I’ve used it to make lattice crusts as well as cut outs, so have fun with it.

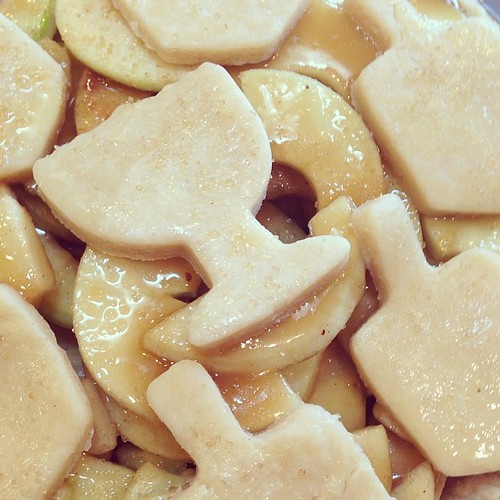
I used dreidel and menorah cut outs for one of the pies. It was Thanksgivukkah after-all! p.s. See that goo? Yum!
During Thanksgiving dinner, this pie was declared “the perfect apple pie” by everyone at the table, so my apple pie recipe search is officially over. I hope you enjoy it as much as we did!
Crust Ingredients
3 cups all-purpose flour
2 tablespoons sugar
3/4 teaspoon salt
3/4 cup (1 1/2 sticks) cold unsalted butter, cut into 1/4-inch pieces
1/4 cup cold vegetable shortening, cut into pieces
1/2 cup cold water
Crust Preparation
Combine the flour, sugar, and salt in a food processor; pulse several times to mix. Remove the lid and scatter the butter pieces over the dry ingredients. Pulse the machine 5 or 6 times to cut in the butter.
Remove the lid and fluff the mixture with a fork, lifting it up from the bottom of the bowl. Scatter the shortening pieces over the flour and pulse the machine 6 or 7 times. Remove the lid and fluff the mixture again.
Drizzle half of the water over the flour mixture and pulse the machine 5 or 6 times. Remove the lid, fluff the pastry, and sprinkle on the rest of the water. Pulse the machine 5 or 6 times more, until the pastry starts to form clumps. Overall, it will look like coarse crumbs. Dump the contents of the processor bowl into a large mixing bowl.
Test the pastry by squeezing some of it between your fingertips. If it seems a little dry and not quite packable, drizzle a teaspoon or so of cold water over the pastry and work it in with your fingertips. Using your hands, pack the pastry into 2 balls, as you would pack a snowball. Make one ball slightly larger than the other; this will be your bottom crust. Knead each ball once or twice, then flatten the balls into ¾-inch-thick disks on a floured work surface. Wrap the disks in plastic wrap and refrigerate for at least 1 hour before rolling. About 10 minutes before rolling, transfer the pastry to the freezer to make it even firmer.
Roll the bottom crust to fit a 9-inch pan and chill for 15 minutes before baking.
Filling Ingredients
1 recipe pastry for a 9 inch double crust pie
1/2 cup unsalted butter
3 tablespoons all-purpose flour
1/4 cup water
1/2 cup white sugar
1/2 cup packed brown sugar
5-6 Granny Smith apples – peeled, cored and sliced
1 tsp cinnamon (optional)
Turbinado sugar for sprinkling
Filling and Assembly
Preheat oven to 350 degrees F.
Pre-bake the bottom crust for 15 minutes, using pie weights on top of a piece of parchment paper.
Peel, core, and slice apples. Add cinnamon and mix. Set aside.
Melt butter in a saucepan then stir in flour to form a paste. Add water, white sugar, and brown sugar, and bring to a boil. Reduce temperature and let simmer.
Place pie plate on cookie sheet (to catch drips while baking). Fill bottom crust with one layer of apples, pour 1/3 of the filling liquid over the apples, then repeat with a second layer. Cover with a lattice top crust (or cut outs) and gently pour the remaining filling liquid over the crust. Sprinkle crust with turbinado sugar.
Bake 20 minutes at 350 degrees F, then reduce the temperature to 325 degrees F. Continue baking for 25 to 45 minutes, or until apples are soft.
Crust recipe adapted from Apple Pie by Ken Haedrich. Filling recipe adapted from All Recipes.


