Lemon Cake
 Print This Recipe
 While I love cookies, I’ve been on a bake-in-a-pan kick lately. It’s always easier to simply slice a finished product than scoop, bake, wait, and repeat when making cookies. And the nice thing about recipes baked in loaf pans is that most of the time, you get two loaves–one to bring to the lucky recipient, and one for the freezer. This is one such recipe. Although, I don’t know if the second loaf will actually make it into the freezer.
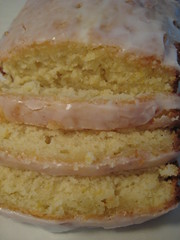
Be warned, there is a whole lot of lemon going on here–lemon zest and lemon juice in the batter, lemon syrup that drenches the baked loaves, and lemon glaze on top. And the recipe is time consuming–there’s a lot of zesting, squeezing, and dish washing, but in the end, it’s worth it. The cake is super incredibly moist, tart, sweet, and delicious. And since I had some time prior to baking, I read all of the reviews to see if there were any tricks I needed to know. One of the reviewers suggested poking holes in the cake so that the syrup would go down into the cake, rather than just collect on the outside. I’m not sure if doing that made any difference, but there was definitely a lovely lemon flavor throughout the entire cake.
The next day: I brought these into work, and by 9:15 a.m. they were gone. Everyone loved them and kept saying how lemony and moist they were. I’m sure I’ll be getting requests for this in the future!
Photos of the process here.
Ingredients
1/2 pound (2 sticks) unsalted butter, at room temperature
2 1/2 cups granulated sugar, divided
4 extra-large eggs, at room temperature (I used large)
1/3 cup grated lemon zest (6 to 8 large lemons)
3 cups flour
1/2 teaspoon baking powder
1/2 teaspoon baking soda
1 teaspoon kosher salt
3/4 cup freshly squeezed lemon juice, divided (I miscalculated and didn’t have enough lemon juice so I squeezed an orange and used that in place of some lemons.)
3/4 cup buttermilk, at room temperature
1 teaspoon pure vanilla extract
Glaze Ingredients
2 cups confectioners’ sugar, sifted (I didn’t sift)
3 1/2 tablespoons freshly squeezed lemon juice
Preparation
- Preheat the oven to 350 degrees F. Grease and flour 2 (8 1/2 by 4 1/4 by 2 1/2-inch) loaf pans. You may also line the bottom with parchment paper, if desired.
- Cream the butter and 2 cups granulated sugar in the bowl of an electric mixer fitted with the paddle attachment, until light and fluffy, about 5 minutes. With the mixer on medium speed, add the eggs, 1 at a time, and the lemon zest.
- Sift together the flour, baking powder, baking soda, and salt in a bowl. In another bowl, combine 1/4 cup lemon juice, the buttermilk, and vanilla. Add the flour and buttermilk mixtures alternately to the batter, beginning and ending with the flour. Divide the batter evenly between the pans, smooth the tops, and bake for 45 minutes to 1 hour, until a cake tester comes out clean.
- Combine 1/2 cup granulated sugar with 1/2 cup lemon juice in a small saucepan and cook over low heat until the sugar dissolves. When the cakes are done, allow to cool for 10 minutes. Remove the cakes from the pans and set them on a rack set over a tray or sheet pan (at this point I poked holes in the cakes); spoon the lemon syrup over them (I ended up using a pastry brush because spooning it didn’t allow it to distribute evenly). Allow the cakes to cool completely.
- For the glaze, combine the confectioners’ sugar and the lemon juice in a bowl, mixing with a wire whisk until smooth. Pour over the tops of the cakes and allow the glaze to drizzle down the sides.
Recipe from Food Network/Ina Garten.
Chocolate Chip Cupcakes/Muffins/Cookies
Print This Recipe
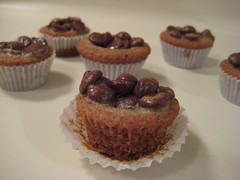 I would probably call these “Blondies with Chocolate Chips” but who am I to change a recipe title? Don’t let the name fool you–aside from the fact they are baked in cupcake tins, they are nothing like a cupcake–they are buttery and chewy like a blondie. And they are quite delicious. So much in fact, one of my coworkers said these may be his new favorite and ranked them up there with cake balls. I know!
As you can see from the picture, mine are ugly. I omitted the nuts in the topping so I was left with a goopy chocolate chip mixture (which tastes delicious just looks sort of blah). Also, I was out of mini chips so I had to use regular size and I think they are entirely too large for the petite size of the cupcake/muffin/cookie. All that aside, I’d still eat them. In fact, I uh, may have had a few.
Photos of the process here.
Cupcake Ingedients
1/2 cup unsalted butter, softened
1/3 cup granulated sugar
1/3 cup packed light brown sugar
1/2 teaspoon vanilla extract
1 large egg
1 cup all-purpose flour
1/2 teaspoon baking soda
1/2 teaspoon salt
Cupcake Preparation
Preheat oven to 350°. Line miniature muffin pans and coat with cooking spray.
Beat butter and sugars until creamy. Add vanilla extract and mix well. Add egg and beat until blended.
In a separate bowl, combine flour, baking soda, and salt. Add to butter mixture, mixing just until combined.
Spoon about 1 & 1/2 teaspoons batter into each muffin cup. Bake for 10-12 minutes.
Topping Ingredients
1/2 cup packed brown sugar
1 large egg
1/8 teaspoon salt
1 cup miniature semisweet chocolate chips
1/2 cup coarsely chopped pecans
1/2 teaspoon vanilla extract
Topping Preparation
Beat brown sugar, egg, and salt until blended. Stir in chocolate chips, pecans, and vanilla.
After cupcakes have been baked, spoon topping mixture over each cupcake. Bake for 8-10 more minutes.
Makes about 3 dozen cupcakes.
Recipe from Bake or Break.
Peanut Butter Torte
Print This Recipe
 This was my first torte, and according to my coworkers, it was delicious! In fact, one of the executives even called it wicked. As for me? Well, I don’t even like mousse-y type stuff and even I thought it was pretty good. Yes, I have a thing with textures and food. I’m weird like that.
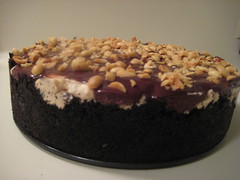 Anyway, while this was easy to make, I found it quite time consuming. Lots of chopping and cleaning up Oreo cookie crumbs–oh wait, that was just me? The end result however, was magnificant. Everyone kept walking by asking if I really made it and said it was almost too pretty to eat.
I made a few modifications to the original recipe by omitting the coffee and nutmeg (hate hate hate nutmeg), and I used at least 30 Oreos for the crust. Other than that, I followed everything else. Photos of the process here.
Ingredients
1 ¼ c. finely chopped salted peanuts (for the filling, crunch and topping)
2 teaspoons sugar
½ teaspoon instant espresso powder (or finely ground instant coffee)
¼ teaspoon ground cinnamon
Pinch of freshly grated nutmeg
½ c. mini chocolate chips (or finely chopped semi sweet chocolate)
24 Oreo cookies, finely crumbed or ground in a food processor or blender
½ stick (4 tablespoons) unsalted butter, melted and cooled
Small pinch of salt
2 ½ c. heavy cream
1 ¼ c confectioners’ sugar, sifted
12 ounces cream cheese, at room temperature
1 ½ c salted peanut butter – crunchy or smooth (not natural; I use Skippy)
2 tablespoons whole milk
4 ounces bittersweet chocolate finely chopped
Preparation
Getting ready: Center a rack in the oven and preheat the oven to 350°F. Butter a 9-inch Springform pan and place it on a baking sheet lined with parchment or a silicone mat.
Toss ½ cup of the chopped peanuts, the sugar, espresso powder, cinnamon, nutmeg and chocolate chops together in a small bowl. Set aside.
Put the Oreo crumbs, melted butter and salt in another small bowl and stir with a fork just until crumbs are moistened. Press the crumbs evenly over the bottom and up the sides of the spring form pan (they should go up about 2 inches on the sides). Freeze the crust for 10 minutes.
Bake the crust for 10 minutes, then transfer it to a rack and let it cool completely before filling.
Working with a stand mixer fitted with the whisk attachment or with a hand mixer in a large bowl, whip 2 cups of the cream until it holds medium peaks. Beat in ¼ cup of the confectioners’ sugar and whip until the cream holds medium-firm peaks. Crape the cream into a bowl and refrigerate until needed.
Wipe out (do not wash) the bowl, fit the stand mixer with the paddle attachment if you have one, or continue with the hand mixer, and beat the cream cheese with the remaining 1 cup confectioners’ sugar on medium speed until the cream cheese is satiny smooth. Beat in the peanut butter, ¼ cup of the chopped peanuts and the milk.
Using a large rubber spatula, gently stir in about one quarter of the whipped cream, just to lighten the mousse. Still working with the spatula, stir in the crunchy peanut mixture, then gingerly fold in the remaining whipped cream.
Scrape the mouse into the crust, mounding and smoothing the top. Refrigerate for at least 4 hours, or overnight; cover with plastic wrap as soon as the mousse firms.
To Finish The Torte: put the chopped chocolate in a heatproof bowl and set the bowl over a saucepan of simmering water. Leave the bowl over the water just until the chocolate softens and starts to melt, about 3 minutes; remove the bowl from the saucepan.
Bring the remaining ½ cup cream to a full boil. Pour the cream over the chocolate and, working with a rubber spatula, very gently stir together until the ganache is completely blended and glossy.
Pour the ganache over the torte, smoothing it with a metal icing spatula. Scatter the remaining ½ cup peanuts over the top and chill to set the topping, about 20 minutes.
When the ganache is firm, remove the sides of the Springform pan; it’s easiest to warm the pan with a hairdryer, and then remove the sides, but you can also wrap a kitchen towel dampened with hot water around the pan and leave it there for 10 seconds. Refrigerate until ready to serve.
Recipe from Baking: From My Home To Yours by Dorie Greenspan.
Paul’s Chocolate Chip Sour Cream Pound Cake
Print This Recipe
Passover ends tonight (my family begins eating chametz at lunch–story for another time) and I wanted to bake something with flour! I had some sour cream leftover from the Passover brownies I made and was in the mood to try a new recipe so I flipped through my new cookbook and decided on this pound cake.
 Speaking of this cookbook, it is a hoot! The author, Judy Bart Kancigor, included photos of family members throughout (including some very cute men–maybe she’ll hook me up!). There’s also an enormous family tree at the beginning so you can see who is related to whom. I love when cookbooks are personalized like that, it’s so much more fun.
OK, back to the cakes. Oddly enough, this is the third pound cake I have made that calls for a tube pan–what happened to the days of pound cakes in loaf pans? Or I am just imaging that? Anyway, I still don’t have a tube pan so I substituted two 9″ loaf pans instead and only baked the loaves for about an hour (during which my kitchen smelled ohsogood!).
These loaves are buttery, rich, and moist (unlike my previous pound cake disappointment) and the chocolate chips are definitely a nice, sweet addition! I can’t wait to bring these into work tomorrow for my coworkers to enjoy.
Photos of the process here.
Ingredients
Unsalted butter or unflavored vegetable cooking spray, for greasing the pan
3 cups all-purpose flour, plus exra for dusting the pan
1/4 teaspoon baking soda
1/2 pound (2 sticks) unsalted butter, at room temperature
2 cups sugar
6 large eggs, at room temperature
1 teaspoon pure vanilla extract
1 cup sour cream, at room temperature
1 1/2 cups (9 ounces) semisweet chocolate chips
Preparation
- Preheat oven to 325 F. Grease a 10-inch tube pan with removable bottom, dust it with flour, and tap out the excess.
- Combine the flour and baking soda in a bowl. Stir well, and set it aside.
- Cream the butter and sugar with an electric mixer on medium-high speed until light and fluffy, 2 to 3 minutes. Add the eggs, one at a time, beating well and scraping the bowl after each addition. Then beat in the vanilla until smooth.
- Reduce the speed to low and add the flour mixture in four additions, alternating the with the sour cream in three additions, beginning and ending with the flour. Fold in the chocolate chips.
- Scrape the batter into the prepared tube pan, and bake on the center oven rack until a cake tester inserted into the center comes out clean, 1 1/4 to 1 1/2 hours. Allow the cake to cool completely in the pan set on a wire rack.
- Run a knife around the center tube and the sides of the pan, and lift the tube from the outer pan. Gently slide the knife between the bottom of the cake and the pan, and lift the cake off the pan. Cut the cake into slices, and serve.
Recipe from Cooking Jewish by Judy Bart Kancigor.
Gooey Chocolate Cakes
Print This Recipe
Yummy!
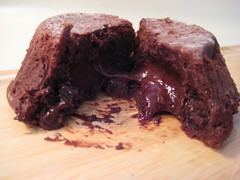 Oh wait, you were expecting more? Well then. These are moist and delicious and gooey and really, the only thing that could have made them better is ice cream. Of which I had none. Alas, that didn’t stop me from eating one while it was still piping hot and oozing chocolate.
Speaking of oozing, prior to making these, I read that other people weren’t getting runny insides. Fortunately for me, they came out beautifully (quite unlike the ugly photo). Also, I made them in the afternoon and brought them to a friend’s house later that night. We just popped them in the microwave for a bit and they were perfect!
Photos of the process here.
Ingredients
1/3 cup all-purpose flour
3 tablespoons unsweetened cocoa powder
1/4 teaspoon salt
5 ounces bittersweet chocolate, 4 ounces coarsely chopped, 1 ounce very finely chopped
1 stick (8 tablespoons) unsalted butter, cut into 8 pieces
2 large eggs, at room temperature
1 large egg yolk, at room temperature
6 tablespoons sugar
Getting Ready
Center a rack in the oven and preheat the oven to 400 degrees F. Butter (or spray – it’s easier) 6 cups of a regular-size muffin pan, preferably a disposable aluminum foil pan, dust the insides with flour and tap out the excess. Put the muffin pan on a baking sheet.
Sift the flour, cocoa and salt together.
Set a heat proof bowl over a saucepan of gently simmering water, put the coarsely chopped chocolate and the butter in the bowl and stir occasionally over the simmering water just until they are melted – you don’t want them to get so hot that the butter separates. Remove the bowl from the pan of water.
In a large bowl, whisk the eggs and yolk until homogenous. Add the sugar and whisk until well blended, about 2 minutes. Add the dry ingredients and, still using the whisk, stir (don’t beat) them into the eggs. Little by little, and using a light hand, stir in the melted chocolate and butter. Divide the batter evenly among the muffin cups and sprinkle the finely chopped chocolate over the batter.
Bake the cakes for 13 minutes. Transfer them, still on the baking sheet, to a rack to cool for 3 minutes. (There is no way to test that these cakes are properly baked, because the inside remains liquid.)
Line a cutting board with a silicone baking mat or parchment or wax paper, and, after the 3-minute rest, unmold the cakes onto the board. Use a wide metal spatula to lift the cakes onto dessert plates.
Serving
These should be served as soon as they are put on plates. The cakes are not meant to be served alone – they need something to play off their warm, gooey, soooooo chocolaty interior. Ice cream is the most obvious choice and, to my mind, the best in terms of texture and, of course, temperature. Any chocolate-friendly flavor will be good. Circling the cakes with crème anglaise is another good idea and, for those for whom too much is not enough, circling the cakes with crème anglaise and running a ring of bittersweet chocolate sauce through the custard is an even better idea.
Storing
Although the whole point of a warm, runny cake is to eat it when it is warm and runny, the cake is still delicious, but different, the following day. If you wrap the cooled cakes in plastic wrap and keep them at room temperature, the next day the texture of the center of the cake (the part that was once gooey) will remind you of ganache. Eating the cake will be like enjoying a bonbon: it will be firm on the outside and creamy within.
My Notes
I used a disposable aluminum muffin tin. I also used semi-sweet instead of bittersweet chocolate.
Recipe from Baking: From My Home To Yours by Dorie Greenspan.