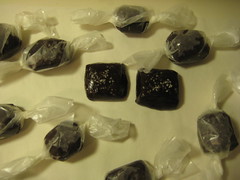
Salted Chocolate Caramels
 Print This Recipe
 I was slightly terrified when I first started this recipe, for two reasons: 1. Hot sugar and I have gotten into fights many times in the past, and I usually end up burned (literally); and 2. The reviews were all over the place. Yet I still made them; I guess I was feeling brave.
And fortunately for me, the caramels were a success. I heeded the advice of some of the reviewers and boiled the mixture to soft ball stage rather than 255 °F like the recipe states, as people were ending up with a glass-like texture by heating that high. (Mine were a little soft after they cooled, but seemed to firm up a bit overnight.) The caramels are chewy but not sticky, and have a nice bite as they don’t stick to your teeth. Flavorwise, the chocolate is not overpowering, and the salt makes these a perfect salty/sweet treat!
(Yes, a thermometer is required to make these. There’s no need for an expensive one, I’ve been using this model for years.)
Photos of the process here.
Ingredients
2 cups heavy cream
10 1/2 oz fine-quality bittersweet chocolate (no more than 60% cacao if marked), finely chopped
1 3/4 cups sugar
1/2 cup light corn syrup
1/4 cup water
1/4 teaspoon salt
3 tablespoons unsalted butter, cut into tablespoon pieces
2 teaspoons flaky sea salt such as Maldon (I used coarse sea salt because that’s all I had)
Vegetable oil for greasing
Preparation
- Line bottom and sides of an 8-inch straight-sided square metal baking pan with 2 long sheets of crisscrossed parchment.
- Bring cream just to a boil in a 1- to 1 1/2-quart heavy saucepan over moderately high heat, then reduce heat to low and add chocolate. Let stand 1 minute, then stir until chocolate is completely melted. Remove from heat.
- Bring sugar, corn syrup, water, and salt to a boil in a 5- to 6-quart heavy pot over moderate heat, stirring until sugar is dissolved. Boil, uncovered, without stirring but gently swirling pan occasionally, until sugar is deep golden, about 10 minutes. Tilt pan and carefully pour in chocolate mixture (mixture will bubble and steam vigorously). Continue to boil over moderate heat, stirring frequently, until mixture registers soft ball stage (235-240°F) on thermometer, about 15 minutes. Add butter, stirring until completely melted, then immediately pour into lined baking pan (do not scrape any caramel clinging to bottom or side of saucepan). Let caramel stand 10 minutes, then sprinkle evenly with sea salt. Cool completely in pan on a rack, about 2 hours.
- Carefully invert caramel onto a clean, dry cutting board, then peel off parchment. Turn caramel salt side up. Lightly oil blade of a large heavy knife and cut into 1-inch squares.
Notes:
- If desired, additional sea salt can be pressed onto caramels after cutting.
- Caramels keep, layered between sheets of parchment or wax paper, in an airtight container at cool room temperature 2 weeks.
- Caramels can be wrapped in 4-inch squares of wax paper; twist ends to close.
Recipe adapted from Epicurious.
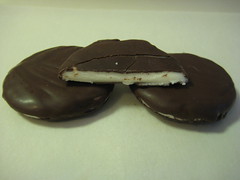
Peppermint Patties
Print This Recipe
 I came across this this recipe and immediately got it in my head that I would make peppermint patties for my dad, nevermind the fact that I had no dipping chocolate in the house. So, off I went to Surfas, where I also bought THREE POUNDS OF SKOR BITS (why? I don’t know) and returned home ready to make candies, only to discover I was out of corn syrup. Not about to go to the market now, I searched the web and came across a corn syrup-less recipe and decided to give it a go.
These are minty, chewy, and delicious and taste just like a York peppermint patty. Would I make them again? Hell no. While I love to eat chocolate, I am horrible at dipping things in it. In fact, I ended up using a pastry brush to brush the chocolate on because I had trouble digging the first patty out of the chocolate after it fell in. So you see, I have absolutely no chance of ever having a career as a chocolatier. Unless ugly dipping styles become popular, then I’d be highly successful.
Ugly photos of the messy process here.
Ingredients
3/4 cup sweetened condensed milk
1 1/2 teaspoons peppermint extract
3 1/2 cups confectioners’ sugar
3 cups semisweet chocolate chips or dipping chocolate
2 teaspoons shortening (I used dipping chocolate so I omitted this)
Preparation
In a large mixing bowl, combine condensed milk and peppermint extract. Beat in enough confectioners’ sugar, a little at a time, to form a stiff dough that is no longer sticky. Form into 1 inch balls, then place on waxed paper and flatten with fingers to form patties. Let patties dry at room temperature two hours, turning once.
In double boiler over low heat, melt chocolate with shortening, stirring often. Dip patties, one at a time, into chocolate by laying them on the tines of a fork and lowering the fork into the liquid. (Or say screw that and use a brush to coat them, like I did.) Let cool on waxed paper until set.
Recipe adapted from All Recipes.
Thin Mint Fudge
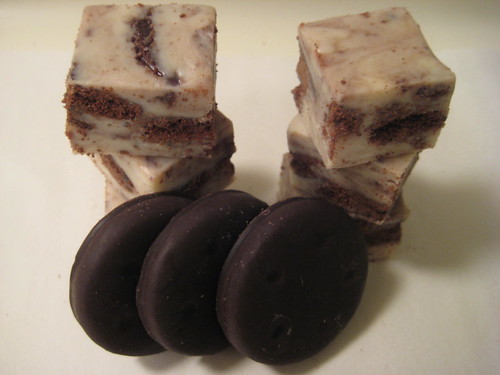
Remember the Cookies and Cream Fudge? Same idea, different cookies.
Peanut Butter Crispy Bars
Print This Recipe
 Every now and then I try a recipe and the result is so good that I need to immediately wrap it up in four layers and stick it in the back of the freezer, all in an attempt to not eat the entire pan while standing at my counter. Not that I would ever think of doing such a thing. Never. These bars are that good. They have a candied crisped rice base (think Rice Krispie treats but flatter and denser) with a peanut butter/chocolate center, and are finished with a dark chocolate top layer. Yes, they are drool worthy.
However, I did run into a few problems: The base ended up really hard in some places and really soft in others which I suspect was a result of me not working fast enough getting it into the pan, although I thought I was doing it rather quickly. This made cutting them difficult because it was difficult to get the knife through those parts. Any advice? The other issue I ran into was the chocolate began to melt a little as I cut them, which made for a really ugly cut. I think the next time I will use tempered chocolate for the top layer.
Photos of the process here.
Ingredients for the crispy crust
1 3/4 cups crisped rice cereal
1/4 cup sugar
3 tablespoons light corn syrup
3 tablespoons unsalted butter, melted
Ingredients for the milk chocolate peanut butter layer
5 ounces good-quality milk chocolate, coarsely chopped
1 cup creamy peanut butter
Ingredients for the chocolate icing
3 ounces dark chocolate (60 to 72% cocoa), coarsely chopped
1/2 teaspoon light corn syrup
4 tablespoons (1/2 stick) unsalted butter
Preparation
Make the crispy crust
Lightly spray a paper towel with nonstick cooking spray and use it to rub the bottom and sides of an 8-inch square baking pan.
Put the cereal in a large bowl and set aside.
Pour 1/4 cup water into a small saucepan. Gently add the sugar and corn syrup (do not let any sugar or syrup get on the sides of the pan) and use a small wooden spoon to stir the mixture until just combined. Put a candy thermometer in the saucepan. Cook over medium-high heat and bring to a boil; cook until the mixture reaches the soft ball stage, 235 degrees F.
Remove from the heat, stir in the butter, and pour the mixture over the cereal. Working quickly, stir until the cereal is thoroughly coated, then pour it into the prepared pan. Using your hands, press the mixture into the bottom of the pan (do not press up the sides). Let the crust cool to room temperature while you make the next layer.
Make the milk chocolate peanut butter layer
In a large nonreactive metal bowl, stir together the chocolate and the peanut butter. Set the bowl over a saucepan of simmering water and cook, stirring with a rubber spatula, until the mixture is smooth. Remove the bowl from the pan and stir for about 30 seconds to cool slightly. Pour the mixture over the cooled crust. Put the pan in the refrigerator for 1 hour, or until the top layer hardens.
Make the chocolate icing
In a large nonreactive metal bowl, combine the chocolate, corn syrup, and butter.
Set the bowl over a saucepan of simmering water and cook, stirring with a rubber spatula, until the mixture is completely smooth. Remove the bowl from the pan and stir for 30 seconds to cool slightly. Pour the mixture over the chilled milk chocolate peanut butter layer and spread into an even layer. Put the pan into the refrigerator for 1 hour, or until the topping hardens.
Cut into 9 (Nine? They are nuts! You can easily get 18 from this) squares and serve. The bars can be stored in the refrigerator, covered tightly, for up to 4 days.
Recipe from Baked: New Frontiers in Baking.
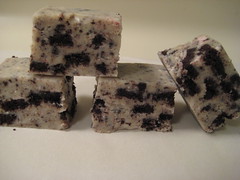
Cookies and Cream Fudge
Print This Recipe
I started 2009 off with a cold that unfortunately turned into bronchitis. And I’ve been at home coughing, trying to relax and shake this thing for entirely too long. Consequently, I got bored and decided to make something. I am a horrible when it comes to just relaxing–I get antsy way too easily.
 Now, I realize I probably shouldn’t be baking, but I’m bored and my coworkers are desperate. The holidays are over so that means no more parties and no more packages from vendors, which in turn means no junk food at the office and serious withdrawals. One of my coworkers even said he’d risk getting sick if it meant he’d get his fix of sweets. Seriously.
My big weekend highlight thus far has been my trip to Trader Joe’s today. I noticed the Candy Cane Joe Joe’s, and after hearing people rave about them every winter, finally decided to pick up a box. And maybe it’s just me, but I don’t understand the love these things get. Call me a purist, but I don’t need candy canes in my filling. Anyway, knowing I wouldn’t eat the cookies, I decided to make something with them. After going through my pantry, I figured I should probably use the condensed milk that would expire soon, so I went to the Eagle website and found this recipe.
The fudge, although I hesitate to call it that, because the texture is nowhere close to smooth and creamy, is good. Unfortunately, I think the mint flavor of the cookies is overwhelming, so if I were to make these again, I’d probably use just regular Oreos. Then again, we’ll see what my daring coworkers have to say about these treats on Monday.
Photos of the process here.
Ingredients
3 (6-ounce) packages white chocolate baking squares (I used white chocolate chips)
1 (14-ounce) can EAGLE BRAND® Sweetened Condensed Milk (NOT evaporated milk)
1/8 teaspoon salt
3 cups (about 20 cookies) coarsely crushed chocolate creme-filled sandwich cookies
Preparation
- In heavy saucepan, over low heat, melt white chocolate squares, EAGLE BRAND® and salt. Remove from heat; stir in crushed cookies.
- Spread evenly into wax-paper-lined 8-inch square pan. Chill 2 hours or until firm.
- Turn fudge onto cutting board; peel off paper and cut into squares. Store leftovers covered in refrigerator.
Recipe from Eagle Brand.