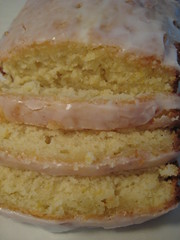
Lemon Cake
 Print This Recipe
 While I love cookies, I’ve been on a bake-in-a-pan kick lately. It’s always easier to simply slice a finished product than scoop, bake, wait, and repeat when making cookies. And the nice thing about recipes baked in loaf pans is that most of the time, you get two loaves–one to bring to the lucky recipient, and one for the freezer. This is one such recipe. Although, I don’t know if the second loaf will actually make it into the freezer.
Be warned, there is a whole lot of lemon going on here–lemon zest and lemon juice in the batter, lemon syrup that drenches the baked loaves, and lemon glaze on top. And the recipe is time consuming–there’s a lot of zesting, squeezing, and dish washing, but in the end, it’s worth it. The cake is super incredibly moist, tart, sweet, and delicious. And since I had some time prior to baking, I read all of the reviews to see if there were any tricks I needed to know. One of the reviewers suggested poking holes in the cake so that the syrup would go down into the cake, rather than just collect on the outside. I’m not sure if doing that made any difference, but there was definitely a lovely lemon flavor throughout the entire cake.
The next day: I brought these into work, and by 9:15 a.m. they were gone. Everyone loved them and kept saying how lemony and moist they were. I’m sure I’ll be getting requests for this in the future!
Photos of the process here.
Ingredients
1/2 pound (2 sticks) unsalted butter, at room temperature
2 1/2 cups granulated sugar, divided
4 extra-large eggs, at room temperature (I used large)
1/3 cup grated lemon zest (6 to 8 large lemons)
3 cups flour
1/2 teaspoon baking powder
1/2 teaspoon baking soda
1 teaspoon kosher salt
3/4 cup freshly squeezed lemon juice, divided (I miscalculated and didn’t have enough lemon juice so I squeezed an orange and used that in place of some lemons.)
3/4 cup buttermilk, at room temperature
1 teaspoon pure vanilla extract
Glaze Ingredients
2 cups confectioners’ sugar, sifted (I didn’t sift)
3 1/2 tablespoons freshly squeezed lemon juice
Preparation
- Preheat the oven to 350 degrees F. Grease and flour 2 (8 1/2 by 4 1/4 by 2 1/2-inch) loaf pans. You may also line the bottom with parchment paper, if desired.
- Cream the butter and 2 cups granulated sugar in the bowl of an electric mixer fitted with the paddle attachment, until light and fluffy, about 5 minutes. With the mixer on medium speed, add the eggs, 1 at a time, and the lemon zest.
- Sift together the flour, baking powder, baking soda, and salt in a bowl. In another bowl, combine 1/4 cup lemon juice, the buttermilk, and vanilla. Add the flour and buttermilk mixtures alternately to the batter, beginning and ending with the flour. Divide the batter evenly between the pans, smooth the tops, and bake for 45 minutes to 1 hour, until a cake tester comes out clean.
- Combine 1/2 cup granulated sugar with 1/2 cup lemon juice in a small saucepan and cook over low heat until the sugar dissolves. When the cakes are done, allow to cool for 10 minutes. Remove the cakes from the pans and set them on a rack set over a tray or sheet pan (at this point I poked holes in the cakes); spoon the lemon syrup over them (I ended up using a pastry brush because spooning it didn’t allow it to distribute evenly). Allow the cakes to cool completely.
- For the glaze, combine the confectioners’ sugar and the lemon juice in a bowl, mixing with a wire whisk until smooth. Pour over the tops of the cakes and allow the glaze to drizzle down the sides.
Recipe from Food Network/Ina Garten.
Chocolate Roll-Out Cookies
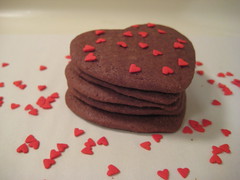
For the past couple of years, I’ve used this sugar cookie recipe to make Valentine’s Day cookies. This year, I wanted to make some for the chocolate lovers too.
I found this recipe on Epicurious and heeded the warnings in the reviews regarding the dough so I was ready for a battle. And what a battle it was! I took the dough out of the fridge and after 30 minutes it was still rock hard. I let it sit for about 30 minutes more and then it was at least slightly pliable. I had to work it with my hands to get it close to roll-able, and even then I had to roll it out between two sheets of plastic wrap so it wouldn’t stick to the rolling pin.
The flavor is not intensely chocolaty, but it definitely satisfies. And I rolled the dough thin enough so the cookies have a nice exterior crunch. Flavor wise, these are good. But I’m not sure if the flavor outweighs the pain they were to roll out. We’ll see what my guinea pigs say when I bring them into work tomorrow.
Ingredients
2 1/2 cups all purpose flour
1/4 cup unsweetened cocoa powder
1/2 teaspoon baking powder
1/2 teaspoon salt
1/4 teaspoon baking soda
1/2 teaspoon ground cinnamon (optional)
3 ounces bittersweet chocolate, chopped
1 cup (2 sticks) butter, room temperature
1 1/3 cups sugar
1 large egg
1/2 teaspoon vanilla extract
Sprinkles or other sugar decorations (optional)
Royal Icing (optional)
Preparation
Sift first 5 ingredients and cinnamon, if desired, into medium bowl. Stir chocolate in metal bowl set over saucepan of simmering water until melted and smooth. Set aside. Using electric mixer, beat butter in large bowl at medium speed until smooth and creamy, about 2 minutes. Add sugar and beat until mixture is pale and fluffy, about 2 minutes. Add egg; beat until well blended, about 1 minute. Reduce speed to low and beat in vanilla and chocolate. Add flour mixture and beat on low speed just to blend. Gather dough into ball; divide in half. Form each half into ball and flatten into disk. Wrap disks separately in plastic and chill until firm, at least 4 hours. DO AHEAD: Can be made 2 days ahead. Keep chilled. Let stand at room temperature 30 minutes before rolling out.
Position rack in center of oven; preheat to 350°F. Line 2 baking sheets with parchment paper.
Working with 1 disk at a time, roll out dough between 2 sheets of waxed paper to 1/8-inch thickness for smaller (2-inch) cookies and 1/4-inch thickness for larger (3- to 4-inch) cookies. Using waxed paper prevents you from adding too much flour, which will make the cookies tough.
Using decorative cookie cutters, cut out cookies. Cold dough is much easier to work with. If it gets warm as you’re cutting out the cookies, place the dough—waxed paper and all—in the freezer for about 5 minutes.
Use an offset spatula to peel away the excess dough and transfer the cookies to parchment-lined baking sheets, spacing 1 inch apart. Gather scraps, roll out dough, and cut more cookies, repeating until all dough is used. If not icing cookies, decorate with sprinkles or other sugar toppings, if desired.
Bake 1 sheet at a time until cookies are firm on top and slightly darker around edges, about 9 minutes for smaller cookies and up to 12 minutes for larger cookies. Line baking sheets with fresh parchment as needed. Cool completely on rack. Decorate cookies with royal icing if desired. DO AHEAD: Cookies can be made 4 days ahead. Store between sheets of waxed paper in airtight containers.
Recipe from Epicurious.
Brown Sugar Shortbread
Print This Recipe
As some of you may know, I’m losing my job at the end of March. (Anyone want to hire a writer? I use my coworkers as recipe testers!) My company was acquired, a bunch of us were given termination dates, blah blah blah. Needless to say, everyone at the office has been super stressed. And when you’re stressed, you crave sweets. Right?
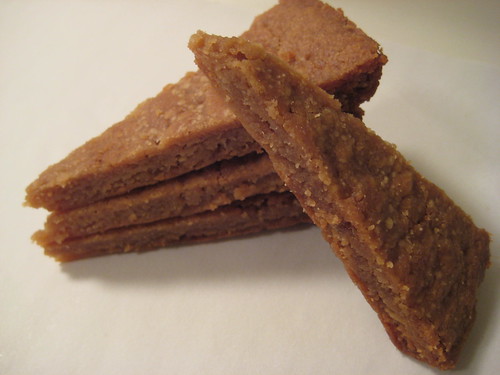
Right. And that’s where this recipe comes in. Brown sugar, butter, flour, and salt–it can’t get much easier than that. And we all know anything that has brown sugar and butter as the first two ingredients can only be delicious. And to make these even better, they are chewy on the inside, crispy on the ends, rich, and have just a hint of salt.
Since this recipe made two pans, I added a teaspoon of wattleseed to the second half. This gave the shortbread a slightly nutty flavor, and cut down on the sweetness a bit (not that it needs any cutting down.)
Photos of the process here.
– – –
Note from the LA Times: This recipe makes enough dough for 2 pans of cookies, so you can try a pan of each variety if you’d like. Because they’re baked in pans, the wedge cookies will retain more moisture, giving the cookies a chewy texture. Conversely, the bar cookies will be crisp because they are baked on an open, flat sheet.
Ingredients
1 cup (2 sticks) unsalted butter, room temperature
1 cup light brown sugar (I used dark because that’s all I had)
3/4 teaspoon salt
2 1/4 cups flour
Preparation
Heat the oven to 325 degrees. In a stand mixer or medium bowl with electric beaters, beat the butter, sugar and salt until creamy, about 2 minutes, being careful not to overmix. Gradually beat in the flour, working in the last one-half cup with your hands if necessary (the dough will be stiff). Divide the dough in half.
- To make chewy wedge-shaped cookies, butter 2 (8-inch) metal cake pans and line with parchment. Butter the parchment and press each half of the dough into a pan. Smooth the top with the bottom of a buttered measuring cup. Prick the dough with a fork in a decorative concentric circle pattern. Refrigerate the pans, uncovered, for 30 minutes.
- To make crispy bar cookies, shape each dough half into a 10-by-4-inch rectangle on a lightly floured board. Run a blunt knife or your fingers along the edges to straighten them (it doesn’t have to be perfect). Carefully lift each rectangle onto a buttered baking sheet, lifting both edges with your hands. With a blunt knife, score each one once lengthwise without cutting all the way through. Score crosswise 11 times to make 24 rectangles. Prick each one several times with a fork. Refrigerate the sheets, uncovered, for 30 minutes.
Bake both the wedge and bar shortbread until lightly brown along the edges, 25 to 30 minutes. Remove and cool for 5 minutes, then slice the shortbread while still warm (if the cookies are allowed to cool before slicing, they will crumble). Unmold the wedge shortbread by running a knife around the edge of the pan to loosen the cookies from the sides. Gently flip the pan over, then slice the shortbread into 12 wedges. Slice the bar cookies all the way through the scored marks before moving to a cooling rack.
Recipe from the LA Times.
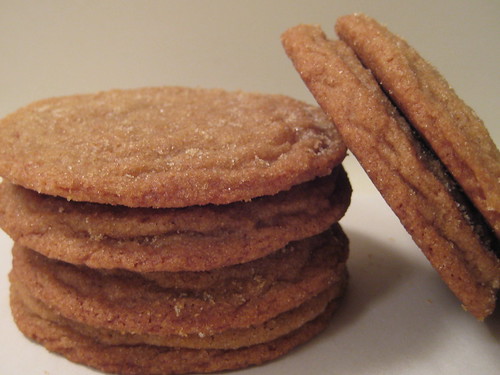
Brown Sugar Cookies
Print This Recipe
I think I’m in love. With a cookie.
It may not be the most handsome cookie around, but the taste makes up for what it’s lacking in looks. Imagine: chewy on the inside, crispy on the outside, and a rich and caramely flavor in every bite. My coworkers are going to love me (and their sugar high) tomorrow.
Perhaps someone well versed in the science of baking can tell me what the browned butter does to the cookie. Aside from the obvious, adding amazing flavor. And also, why is the salt added with the brown sugar rather than with the rest of the dry ingredients?
Just a note: My butter took around six minutes to brown, so don’t worry if three minutes go by and you’re wondering if you screwed up; you didn’t.
Photos of the process here.
Ingredients
14 tablespoons unsalted butter (1 3/4 sticks)
1/4 cup granulated sugar (about 1 3/4 ounces)
2 cups packed dark brown sugar (14 ounces)
2 cups unbleached all-purpose flour plus 2 tablespoons (about 10 1/2 ounces)
1/2 teaspoon baking soda
1/4 teaspoon baking powder
1/2 teaspoon table salt
1 large egg
1 large egg yolk
1 tablespoon vanilla extract
Preparation
Heat 10 tablespoons of the butter in a pan over medium-high heat until melted. Continue to cook the butter until it is browned a dark golden color and smells nutty, about 1 to 3 minutes. Transfer the browned butter to a bowl and stir the rest of the butter into the hot butter until it melts- let this rest for 15 min.
Preheat oven to 350 degrees F. In a baking dish, mix granulated sugar and a ¼ cup of the brown sugar until combined well; set this mixture aside to roll dough balls in.
Mix flour, baking soda, and baking powder in a bowl. Add 1 ¾ cup brown sugar and salt to cooled butter and mix until there are no lumps. Add egg, yolk, and vanilla to butter mixture and mix well, then add flour and mix until just combined.
Roll dough into balls about 1 ½ inches in diameter, and roll balls in brown sugar and white sugar mixture. Place balls about 2 inches apart on parchment lined baking sheets.
Bake sheets one at a time until cookies are puffy and lightly browned, about 12- 14 minutes. (It says the cookies will look slightly raw between some of the cracks and seem underdone, but be careful not to over bake.) Cool on sheet for about 5 minutes and then transfer to a rack to cool.
Recipe from Cook’s Illustrated via South in Your Mouth.
Peanut Butter Crispy Bars
Print This Recipe
 Every now and then I try a recipe and the result is so good that I need to immediately wrap it up in four layers and stick it in the back of the freezer, all in an attempt to not eat the entire pan while standing at my counter. Not that I would ever think of doing such a thing. Never. These bars are that good. They have a candied crisped rice base (think Rice Krispie treats but flatter and denser) with a peanut butter/chocolate center, and are finished with a dark chocolate top layer. Yes, they are drool worthy.
However, I did run into a few problems: The base ended up really hard in some places and really soft in others which I suspect was a result of me not working fast enough getting it into the pan, although I thought I was doing it rather quickly. This made cutting them difficult because it was difficult to get the knife through those parts. Any advice? The other issue I ran into was the chocolate began to melt a little as I cut them, which made for a really ugly cut. I think the next time I will use tempered chocolate for the top layer.
Photos of the process here.
Ingredients for the crispy crust
1 3/4 cups crisped rice cereal
1/4 cup sugar
3 tablespoons light corn syrup
3 tablespoons unsalted butter, melted
Ingredients for the milk chocolate peanut butter layer
5 ounces good-quality milk chocolate, coarsely chopped
1 cup creamy peanut butter
Ingredients for the chocolate icing
3 ounces dark chocolate (60 to 72% cocoa), coarsely chopped
1/2 teaspoon light corn syrup
4 tablespoons (1/2 stick) unsalted butter
Preparation
Make the crispy crust
Lightly spray a paper towel with nonstick cooking spray and use it to rub the bottom and sides of an 8-inch square baking pan.
Put the cereal in a large bowl and set aside.
Pour 1/4 cup water into a small saucepan. Gently add the sugar and corn syrup (do not let any sugar or syrup get on the sides of the pan) and use a small wooden spoon to stir the mixture until just combined. Put a candy thermometer in the saucepan. Cook over medium-high heat and bring to a boil; cook until the mixture reaches the soft ball stage, 235 degrees F.
Remove from the heat, stir in the butter, and pour the mixture over the cereal. Working quickly, stir until the cereal is thoroughly coated, then pour it into the prepared pan. Using your hands, press the mixture into the bottom of the pan (do not press up the sides). Let the crust cool to room temperature while you make the next layer.
Make the milk chocolate peanut butter layer
In a large nonreactive metal bowl, stir together the chocolate and the peanut butter. Set the bowl over a saucepan of simmering water and cook, stirring with a rubber spatula, until the mixture is smooth. Remove the bowl from the pan and stir for about 30 seconds to cool slightly. Pour the mixture over the cooled crust. Put the pan in the refrigerator for 1 hour, or until the top layer hardens.
Make the chocolate icing
In a large nonreactive metal bowl, combine the chocolate, corn syrup, and butter.
Set the bowl over a saucepan of simmering water and cook, stirring with a rubber spatula, until the mixture is completely smooth. Remove the bowl from the pan and stir for 30 seconds to cool slightly. Pour the mixture over the chilled milk chocolate peanut butter layer and spread into an even layer. Put the pan into the refrigerator for 1 hour, or until the topping hardens.
Cut into 9 (Nine? They are nuts! You can easily get 18 from this) squares and serve. The bars can be stored in the refrigerator, covered tightly, for up to 4 days.
Recipe from Baked: New Frontiers in Baking.