Aunt Helen’s Mandelbrot
 Print This Recipe
Use a wooden spoon and lots of elbow grease were the words of advice I received from Aunt Helen when she heard I was going to make her mandelbrot recipe. Do not use a 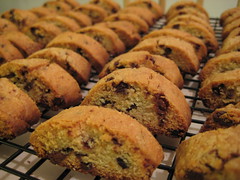 mixer, she reminded me. So with wooden spoon and mixing bowl at the ready, I made mandelbrot. However, before I give you the recipe, here are two important bits of history:
1. My grandma Freda (my mom’s mom) died before I was born and I am named after her. (In Judaism, you name babies after people who are deceased, as a way of keeping their memory alive.) Anyway, my grandma’s sister, Helen, was very close to my mom, and consequently, was like a grandmother to my sister and me. We’d celebrate holidays together, and every year on our birthdays, Aunt Helen would give us a batch of her homemade mandelbrot (with nuts for my parents, with chocolate chips for my sister and me). When I was 11, we moved out to California and Aunt Helen continued to bake the mandelbrot, shipping it to us across the country. Sure, there were a lot of crumbs, but it was always still delicious. To this day, Aunt Helen still mails us mandelbrot on our birthdays.
Of course, this recipe was passed down to my mom, and now, to me. The only difference between their batches and mine is theirs have a lot more burned pieces, although I do believe that’s by choice.
2. Mandelbrot (aka mandelbrodt or mandel bread) is a twice baked cookie made with oil. In Yiddish, mandel means almond (or according to Aunt Helen, nut) and brot means bread. Traditionally, it is made with nuts and sprinkled with cinnamon and sugar. I however, prefer it sans nuts and with chocolate chips. It’s often described as Jewish biscotti but to me, it’s a lot thicker and crumbles quite easily. And there’s no right or wrong time to eat mandelbrot–I’ve been known to have a few pieces for breakfast while other people enjoy dunking it in coffee for dessert.
Photos of the process here.
Ingredients
3 eggs
1 cup sugar
1 tsp. vanilla
1 cup oil
3 cups flour
1/2 tsp. salt
1/2 tsp. baking powder
1 cup chocolate chips
Preparation
- Mix eggs and sugar with a wooden spoon. Add vanilla and mix.
- Mix the flour, salt, and baking together. Add to the egg mixture, alternating with the oil, four times.
- Add chocolate chips and mix. Batter will be stiff. (She’s not kidding, it’s stiff!)
- Refrigerate overnight, or at least three hours. (Aunt Helen recommended overnight.)
- Roll into four logs, approximately 1 1/2″ in diameter.
- Bake at 350 for 35-45 minutes, remove from oven, and immediately slice into 1″ pieces. (Both my mom and Aunt Helen said it’s very important to not let the logs cool because they will crack when you slice them.)
- Place cookies on their side on cookie sheet and bake 10-15 minutes more.
Recipe from Aunt Helen.
Tarantula Cookies
Print This Recipe
So, let me first say these are very, very, very, very, time consuming to make. And they’re really messy. You’ll probably be finding spider pieces all over your kitchen for months. But if you like spooky chocolate spiders, you’ve found the right recipe!
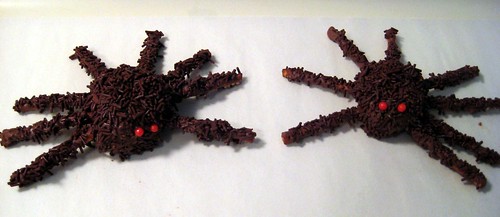
These were a hit at work, although most people referred to them as “cute” rather than spooky. But still, a fun Halloween treat.
Happy Halloween!
Ingredients
2 cups all-purpose flour
1/2 teaspoon baking powder
1/2 teaspoon salt
1/8 teaspoon baking soda
10 tablespoons unsalted butter, softened
1/2 cup light brown sugaar
1/4 cup granulated sugar
1 egg
1 teaspoon vanilla extract
2 tablespoons unsweetened cocoa powder
1 bag (8 ounces) thin, short pretzel sticks
1 large bag (11 1/2 ounces) milk chocolate chips
2 tablespoons vegetable oil
Chocolate sprinkles
Small red candies
Preparation
- Preheat oven to 350°F.
- In a medium mixing bowl, combine the flour, baking powder, salt, and baking soda. Set aside.
- In a large mixing bowl, beat together the butter, brown sugar, and granulated sugar until light and fluffy. Add the egg and vanilla and beat until well blended.
- Gradually add the flour mixture and cocoa powder. Beat to form a smooth dough.
- Roll a tablespoon-sized ball of dough, and place it on a baking sheet. Arrange eight pretzel sticks around the ball like spokes on a wheel. Press the tips of the pretzel sticks firmly into the dough ball. Continue with the rest of the pretzels and dough.
- Bake until cookies start to brown around edges, about 7-10 minutes.
- Lift the cookies from the baking sheets with a spatula, and place on wire cooling racks. Let cool completely. Place the racks on sheets of aluminium foil or waxed paper.
- In a double boiler (or the microwave), melt the chocolate chips with vegetable oil.
- Pour the melted chocolate over each cookie. Coat with chocolate sprinkles. Press in two red candy eyes on the front of the head. Eeek!
Recipe from Epicurious.
M&M Cookies
Print This Recipe
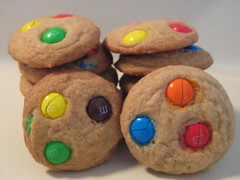 Did you miss me? I still can’t believe it’s been a month since I’ve posted a recipe here, especially considering I’ve been baking like a crazy person lately. Unfortunately it was just tried and true recipes as I didn’t want to experiment for Rosh Hashana and Yom Kippur break-the-fast desserts. Speaking of Rosh Hashana, my mom bought a Costco-sized bag of M&Ms to fill candy dishes with when we had 40 (!!) people for dinner at our house for the holiday. Fortunately for me, there was a ton of candy left and I took it home so I could make these cookies.
As a kid, I always loved the chewy, buttery M&M cookies from the bakery. While these do not live up to my childhood memories, they are good nonetheless and I know my coworkers will gobble them up in no time tomorrow.
Photos of the process here.
Ingredients
1 cup packed brown sugar
1/2 cup white sugar
1 cup butter
2 eggs
1 1/2 teaspoons vanilla extract
2 1/2 cups all-purpose flour
1 teaspoon baking soda
1 teaspoon salt
1 1/2 cups candy-coated milk chocolate pieces
Preparation
- In a large bowl, mix sugar, eggs, shortening, and vanilla thoroughly. Add flour, salt, and baking soda to creamed mixture. Blend well. Add 3/4 cup of M&M candies.
- Drop dough by teaspoonful onto cookie sheet. Slightly push a few candies on top of each dough ball with remaining candies.
- Bake at 350 degrees F (175 degrees C) for 9 to 11 minutes, to your liking.
Recipe adapted from All Recipes.
Burger Bites
Print This Recipe
At least once a week, someone will email or ask me if I have any easy recipes they can do with their kids. Because really, who better to ask than a 34-year-old single woman with no children, right?
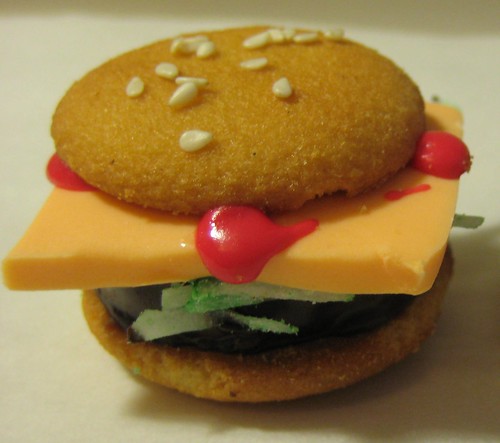
But I digress. Here is that recipe. The thing to keep in mind while making these is DON’T WASTE TIME. If you don’t follow Jenn’s instructions precisely, the buns won’t stick to the burgers. (Er, the Nilla Wafers won’t stick to the peppermint patties.) You’ve been warned.
Photos of the process here.
Ingredients
1 bag peppermint patties
1 box Nilla Wafers
1/2 cup shredded coconut
2 drops green food coloring
sesame seeds
water
Preparation
Place 24 Nilla Wafers “round side” down, on a cookie sheet then top them with a peppermint patty. Preheat oven to 350 degrees. Set aside 24 more Nilla Wafers to act as the top of the “bun.”
Place coconut in a bowl with a sealed lid or a ziplock bag. Add the food coloring and couple of drops of water. Seal the container and shake until the coconut is tinted green and looks like lettuce.
Put the topped Nilla Wafer/open faced patties in the oven for only about 1-1/2 minutes, check them to see that they are glossy and not melted.
Take them out of the oven and IMMEDIATELY top with tinted coconut.
Then immediately put the burger “tops” on, pushing a bit to secure them to the patty.
Brush a few drops of water on the top of the bun (or use clean fingers) then sprinkle with sesame seeds.
Recipe from my friend and fellow blogger, Jenn.
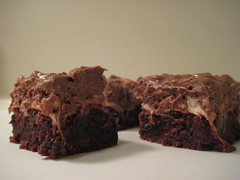
Marshmallow Crunch Brownie Bars
Print This Recipe
 Wow.
Wow.
That one word basically sums up these brownies. They are amazing and gooey and crunchy and moist and could easily translate to, “I’m sorry I was a shmuck,” “I love you,” “Will you marry me,” “I think you’re cool and can’t wait until our next date,” or in this case, “I obviously like my coworkers.” Who knew brownies could be so expressive?
Keep in mind, the deliciousness does come at a price–these are a bit time consuming and dirty a lot of bowls, but they are so worth it in the end! What could be better than a brownie topped with marshmallows topped with melted peanut butter and chocolate with Rice Krispies mixed in?
Brownie Ingredients
4 ounces unsweetened chocolate
2/3 cup (1 1/2 sticks) unsalted butter
1 ¼ cups semisweet chocolate chips, divided
1 1/3 cups all-purpose flour
1 tsp baking powder
½ tsp salt
4 large eggs, room temperature
2 cups granulated sugar
2 tsp vanilla extract
Topping Ingredients
7 ounces mini marshmallows
1 ½ cups milk chocolate chips
1 cup Jif peanut butter
1 TBSP unsalted butter
1 ½ cups Rice Krispies
Preparation
Preheat oven to 350F. Grease a 9×13-inch baking pan.
In a medium saucepan, melt the chocolate, butter, and ¾ cup of the semisweet chocolate chips on medium heat. Stir occasionally while melting. Set aside and cool for 5 minutes. In a medium bowl, sift the flour, baking powder, and salt. Set aside. In a large bowl, place the eggs and whisk thoroughly. Add in the sugar and vanilla. Stir the melted ingredients into the egg mixture, mixing well. Stir in the dry sifted ingredients and mix well. Fold in the remaining ½ cup semisweet chocolate chips.
Pour the batter into the prepared pan, and even with a spatula. Bake for 25 to 30 minutes, or until a cake tester inserted into the corner of the pan comes out with moist crumbs.
Remove the brownies from the oven, and immediately sprinkle the marshmallows over them. Return the pan to the oven for 3 more minutes.
While the brownies are baking, place the chocolate chips, peanut butter, and butter in a medium saucepan. Cook over low heat, stirring constantly until melted. Remove from heat, add the cereal,and mix well. Allow this to cool for 3 minutes or so.
Spread the mixture evenly over the marshmallow layer. Refrigerate until chilled before cutting.
Makes 12 3×3-inch bars. (I cut them a lot smaller and easily got a few dozen bars.)
Recipe from Culinary Concoctions.