Oatmeal Mini Pieces Cookies
 Print This Recipe
 I discovered these mini Reese’s Pieces at the market last week and immediately decided I had to buy them. I wasn’t sure what I wanted to do with them though, so when I noticed the recipe on the bag I figured I’d give it a try. I’m glad I did–these are cookies E.T. would devour in a heartbeat.
And as much as I wish E.T. could have eaten them, I was pretty satisfied that my new coworkers (yes, I got a job–a two month freelance gig, but it’s a job!) gobbled them up well before lunch. And I can’t blame them. The cookies are the perfect texture–chewy on the inside, crispy on the outside, and have wonderful flavor and crunch from the Reese’s Pieces. I’ll definitely be making these again!
Ingredients
2/3 cup shortening
1/2 cup light brown sugar
1/3 cup granulated sugar
1 egg
1/2 teaspoon vanilla
1 cup flour
1/2 teaspoon baking soda
1/2 teaspoon salt
2 tablespoons milk
1 1/2 cups oatmeal
1 1/3 cups Reese’s pieces (10 oz pkg)
Preparation
- Heat oven to 350 degrees. Lightly grease cookie sheet.
- Cream shortening, brown sugar, granulated sugar in large bowl until fluffy. Beat in egg and vanilla. Stir together flour, baking soda, salt. Add alternately with milk to sugar mixture. Stir in oats and candy pieces.
- Drop by scant 1/4 cupfuls or #16 scoop onto prepared pan. (I used a medium size cookie scoop.)
- Bake 12 to 15 minutes or until lightly browned. Cool 10 minutes on cookie sheet. Remove from cookie sheet to wire rack. Cool completely. About 1 dozen cookies. (I got about two dozen using the smaller scoop.)
Recipe adapted from bag of mini Reese’s Pieces.
– – –
Don’t forget you can still win free butter!
Milk’s Ooey-Gooey Double-Chocolate Cookies
 Print This Recipe
 There’s an amazing bakery/restaurant a couple of miles from my apartment (and also directly across the street from my former Weight Watchers meeting location, how cruel) called Milk. They serve all sorts of salads and sandwiches, but what they do best are desserts, specifically ice cream treats and cookies. My favorite is their coffee toffee crunch ice cream sandwich–a huge scoop of their homemade coffee toffee crunch ice cream sandwiched between enormous Parisian macarons. And if I ever become successful at making macarons, you better believe I’ll put ice cream between them.
In the meantime, I decided to give another Milk favorite a try. These cookies live up to their name–they’re ooey, gooey, and very, very chocolatey. Unfortunately, mine came out kinda ugly and looking absolutely nothing like the ones at the store or in the picture, but they taste pretty damn good and will satisfy any chocolate craving! I’m not a milk drinker, but these cookies were so rich they were screaming “drink milk!” to me. I also think eating them warm with ice cream would suffice too (you can get them like that at the shop).
Photos of the process here. Also, I doubled the recipe because I’m bringing them to a party.
Ingredients
1/4 pound (4 ounces) unsweetened chocolate
4 tablespoons ( 1/2 stick) butter
3 eggs
2 teaspoons vanilla extract
1 cup sugar
1/2 cup flour
2 tablespoons cocoa powder
1/2 teaspoon baking powder
1/2 teaspoon salt
1 pound bittersweet chocolate (chunks or chips)
Preparation
- In a bowl set over a pot of simmering water, melt the unsweetened chocolate and butter. Remove from the heat and cool slightly.
- In the bowl of a mixer with a paddle attachment, or in a large bowl using a fork, combine the eggs, vanilla and sugar. Mix just until incorporated and set aside.
- Sift together the flour, cocoa powder, baking powder and salt into a medium bowl. Set aside.
- Add the melted chocolate to the egg mixture and mix just until combined. Stir in the sifted dry ingredients and mix just until combined, then stir in the bittersweet chocolate.
- Cover the batter with plastic wrap and refrigerate for at least 1 hour to chill thoroughly. Heat the oven to 350 degrees.
- Divide the dough into 18 portions. Grease your hands (to prevent the dough from sticking) and shape the portions into balls. Place the balls on a greased, parchment-lined sheet pan, leaving 2 to 3 inches between each.
- Bake until the edges of the cookies are just set and the center is still soft, 10 to 12 minutes, rotating the pan halfway through. Place the cookies, still on the parchment, on a rack and cool completely before serving. They will be very soft.
Yields 18 cookies.
Recipe adapted from Milk, via the LA Times.
Chocolate Chip Shortbread
 Print This Recipe
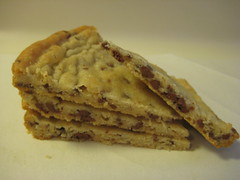
 Hey there! I’m here and still enjoying funemployment (while looking for a job). Since I don’t have my 100+ guinea pigs at an office anymore, I haven’t been trying out new recipes, hence the lack of posts. And in addition to not wanting to eat three dozen cookies by myself, it’s been super hot here and the thought of turning on my oven made me cringe. Fortunately, the weather has cooled down (a tiny bit) and I decided to give a simple recipe a shot.
This shortbread is good, but not spectacular. My favorite is still the brown sugar version I made earlier in the year. Like good shortbread should be, these cookies aren’t very sweet, are chewy, and have crispy ends. However, I feel like they’re missing something–maybe more salt. Disappointing!
Ingredients
1/2 cup butter, softened
1/2 cup sugar
1 teaspoon vanilla
1 cup flour
1/4 teaspoon salt
1/2 cup miniature semisweet chocolate chips (I was out of mini chips so I chopped up regular sized ones)
Preparation
- Preheat oven to 375 degrees.
- Beat butter and sugar until light and fluffy.
- Beat in vanilla and add flour and salt.
- Stir in chips.
- Divide dough in half.
- Press each half into an ungreased 8 inch round pan.
- Bake 12 minutes or until edges are golden.
- Score each shortbread with sharp knife into 8 even wedges, but do not cut all the way through.
- Leave in pans and cool on racks for 10 minutes.
- Invert onto racks and cool completely.
- Break into wedges.
Recipe from Recipezaar.
Caramel Crunch Bars
 Print This Recipe
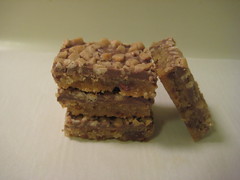
I know it’s a weird thing to say, but I’m not sure how I feel about these bars. You’re probably thinking “shortbread base, chocolate and toffee top, what’s not to like?” and so am I, kinda. But I liken these bars to a so-so date. (Stay with me here.)
 Like a so-so date, these bars are nice and sweet and pretty attractive. I could see myself having one and saying, “Eh, that was OK, but I’m not sure I want another.” And I could also see myself eying them on a tray and thinking, “You know, one more wouldn’t be so bad.” Like a date that you’re unsure about. Get it? Come on, I know you single ladies understand what I’m trying to say here.
Update: These were a huge hit and I think even better the second day. Go figure.
Anyway, fortunately for me, these bars are around 1,000,000 points each so the bulk of them are in the freezer while the rest are going with me tomorrow to force feed the girls at my eyebrow place. And finally, Dorie suggests using these to make ice cream sandwiches. I think she may be on to something there.
Base Ingredients
1 ½ cup all-purpose flour
1 tsp. instant espresso powder or finely ground instant coffee (I omitted this)
½ tsp salt
¼ tsp ground cinnamon (I omitted this)
2 sticks (8oz) unsalted butter, at room temperature
½ cup light brown sugar
¼ cup sugar
1 tsp pure vanilla extract
3 oz. bittersweet or premium milk chocolate, finely chopped
Topping Ingredients
6 oz. bittersweet or premium milk chocolate, finely chopped
¾ cup Heath toffee bits
Preparation
Getting Ready: Center a rack in the oven and preheat the oven to 375 degrees F. Lightly butter a 9×13 inch baking pan, line the pan with foil and butter the foil. Put the pan on a baking sheet.
To make the base: Whisk together the flour, coffee, salt and cinnamon.
Working with a stand mixer, preferably fitted with a paddle attachment, or a hand mixer in a large bowl, beat the butter at medium speed until smooth, about 3 minutes. Add the sugars and beat for another three minutes or until the mixture is light and creamy. Beat in the vanilla and turn off the mixer. Add all the dry ingredients, cover the stand mixer with a kitchen towel (so you and your kitchen don’t get showered in flour) and pulse the mixer on and off at low speed about 5 times, at which point a peek at the bowl should reveal that it’s safe to turn the mixer to low and mix, uncovered, just until the dry ingredients are almost incorporated. Add the chopped chocolate and mix only until the dry ingredients disappear. If the chocolate isn’t evenly mixed, finish the job by hand with a spatula. You’ll have a very heavy, very sticky dough. Scrape the dough into the buttered pan and, with the spatula and your fingertips, cajole it into a thin, even layer. (I cajoled using an offset spatula.)
Bake for 20 to 22 minutes, or until the base is bubbly – so bubbly that you can almost hear it percolating – and puckery. It will look as though it is struggling to pull away from the side of the pan. Transfer the pan to a rack and turn off the oven.
To make the topping: Scatter the chocolate evenly over the top of the hot base and pop the pan back into the oven for 2 to 3 minutes, until the chocolate is soft. Remove from oven and immediately spread chocolate over bars, using offset spatula or the back of a spoon. Sprinkle the toffee bits over the chocolate and press them down lightly with your fingertips (again, I used the offset spatula because hot desserts and my fingers do not get along well). Place the baking pan on a rack to cool to room temperature.
If, by the time the bars are cool, the chocolate has not set, refrigerate them briefly to firm the chocolate.
Carefully lift out of the pan, using foil edges as handles, and transfer to a cutting board. Trim the edges if they seem a bit thick. Cut about 54 bars, each about 2 inches by 1 inch, taking care not to cut through the foil.
Recipe from Baking: From My Home to Yours by Dorie Greenspan.
Whoopie Pies*
 Print This Recipe
 It’s official, I’m back to counting points (if you don’t know points are, consider yourself lucky). But have no fear, I will still be making yummy treats, I just won’t be eating
 any as many of them, and I hope to find some tasty lower fat/calorie recipes as well. Speaking of lower fat, I first saw this recipe about six years ago when I did WW for the first time, but wasn’t as into baking back then so I never tried it. Fortunately, the recipe was just a Google search away.
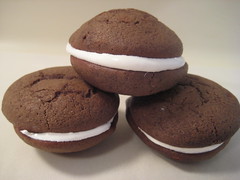
These cookies were simple to make, quite good, and have a nice mild chocolate flavor (and not at all bad for two points!). And while marshmallow fluff adds a little bit of sweetness, it also caused a whole lot of problems. First, I was using my small cookie scoop to scoop the fluff on the cookies when the scoop broke. The spring popped out, it made a horrible noise, and it ended up in a few pieces. Who knew fluff was so sticky and stiff? Secondly, after adding the fluff and sandwiching the cookies, they all started to tilt (they aren’t flat after all), causing the fluff to leak out, thus making a huge mess and some ugly looking cookies. (I know WW chose fluff to help keep the fat and calorie count down, but there must be another option that won’t spread and leak. Any suggestions?)
*I understand these are not true Whoopie Pies. They are simply a Weight Watchers version of them. If you have an issue with the name, complain to Weight Watchers, not me. Thanks in advance.
Ingredients
1 cup all-purpose flour
1/4 cup unsweetened cocoa powder
1 teaspoon baking soda
1/4 teaspoon salt
1/2 cup sugar
1/4 cup vegetable shortening
1 egg white
1/2 cup 1% low-fat milk (I used buttermilk because that’s all I had in the house)
3/4 cup marshmallow cream
Preparation
- Preheat oven to 425°F.
- Combine the flour, cocoa, baking soda and salt in a small bowl.
- With an electric mixer on medium speed, beat the sugar, shortening and egg white in a medium bowl until fluffy and well blended (about 2 minutes).
- Stir in the flour mixture, then add the milk until just blended.
- Drop the dough (it will be a cross between cake batter and cookie dough in consistency) by spoonfuls onto large, ungreased baking sheets (I used Silpats), making 36 cookies.
- Bake until top springs back when lightly touched (5-7 minutes).
- Cool completely on the sheets on a rack.
- Spoon 2 tsp. marshmallow fluff and spread on the bottoms of half of the cookies.
- Top with remaining cookies.
Yields 18 cookies (I got 15). Store in an airtight container for up to 3 days.