Frosted Brownies Topped with Chocolate Peanut Butter Krispies
 Print This Recipe
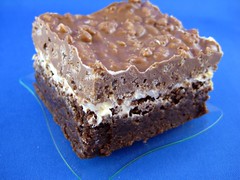 When I saw this recipe I immediately thought I would love these brownies, because really, what’s not to love? Brownies, frosting, chocolate, peanut butter, Rice Krispies. YUMMY, right? Well, I don’t know what’s wrong with me because I thought they were too sweet. I know, I didn’t think that was possible either.
With that said, the brownies were enormously popular at my office. Everyone loved and raved about them all day, so I have to declare them a hit. If I were to make them again (stranger things have happened), I may try subbing marshmallow fluff for the frosting because the frosting seemed a little out of place.
Finally, this recipe is great for scratch bakers or those who are BFFs with Betty Crocker. I used a fabulous brownie recipe (minus the salted caramel part) but if you are in a rush, you can use a mix. Since I hate making frosting (I end up with powdered sugar everywhere), I used store bought. Easy enough.
Ingredients
Brownies (9×13 pan, homemade or from a mix)
Vanilla frosting (homemade or from a can)
3 cups crisp rice cereal
1 cup cup Peanut Butter
12 ounces chocolate chips
Preparation
Bake brownies and let cool completely. Frost brownies and refrigerate.
In a saucepan over low heat, melt peanut butter and chocolate, stirring constantly. Add chocolate mixture to cereal. Spread mixture over frosted brownies. Refrigerate for one hour until set. Cut into bars.
Recipe adapted from Hoosier Homemade.
Sweet & Salty Brownies
Print This Recipe
There are two kinds of people: those who like cakey brownies and those who like fudgey brownies. If you like fudgey brownies, these are the brownies for you. If you’re like me and prefer cakey brownies, make this recipe instead.
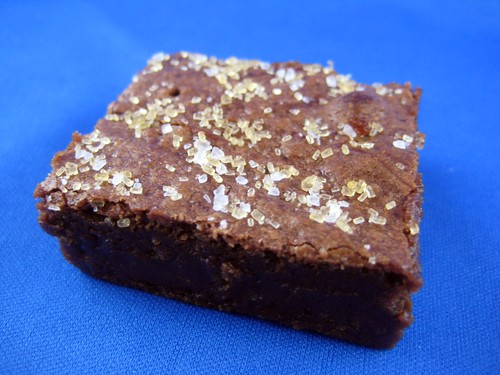
I suppose the one good thing about not liking fudgey brownies is that I won’t be tempted to eat them at the office tomorrow. Anyway, if the recipe looks familiar, it’s because it’s basically the original Baked Brownie, minus the espresso powder, with an added middle layer of salted caramel, and topped with fleur de sel and coarse sugar. I’m kind of sad I didn’t like this more.
I feel the need to add that these brownies were an enormous hit at my office, and I received more than one email begging me to “TAKE THE BROWNIES AWAY” because they are so good. Like I said, some people are fudgey, some people are cakey. Less calories for me!
Photos of the process.
Salted Caramel Ingredients
1 cup sugar
2 tablespoons light corn syrup
1/2 cup heavy cream
1 teaspoon fleur de sel
1/4 cup sour cream
Brownie Ingredients
1 1/4 cups all-purpose flour
1 teaspoon salt
2 tablespoons dark unsweetened cocoa powder (I used black cocoa)
11 ounces dark chocolate (60-72%), chopped
2 sticks unsalted butter, cut into cubes
1 1/2 cups sugar
1/2 cup firmly packed light brown sugar
5 large eggs, room temperature
2 teaspoons vanilla extract
Ingredients for Sprinkling
1 1/2 teaspoons fleur de sel
1 teaspoon coarse sugar
Caramel Preparation
In a medium saucepan, combine the sugar and corn syrup with 1/4 cup water, stirring them together carefully so you don’t splash the sides of the pan. Cook over high heat until an instant-read thermometer reads 350 degrees F, or until the mixture is amber in color, 5-7 minutes. Remove from the heat, slowly add the cream and then the fleur de sel. Whisk in the sour cream. Set aside to cool.
Brownie Preparation
Preheat oven to 350 degrees F.
Butter the sides and bottom of a glass 9 x 13 inch pan. Line the bottom with a sheet of parchment paper and butter the parchment.
In a medium bowl, whisk together the flour, salt, and cocoa powder.
Place the chocolate and butter in the bowl of a double boiler set over a pan of simmering water and stir occasionally until the chocolate and butter are completely melted and combined. Turn off the heat, but keep the bowl over the water of the double boiler, and add both the sugar. Whisk until completely combined and remove the bowl from the pain. The mixture should be at room temperature.
Add three eggs to the chocolate mixture and whisk until just combined. Add the remaining eggs and whisk until just combined. Add the vanilla and stir until combined. Do not overbeat the batter at this stage or your brownies will be cakey.
Sprinkle the flour mixture over the chocolate. Using a spatula, fold the dry ingredients into the wet ingredients until there is just a trace amount of the flour mixture visible.
Pour half of the brownie mixture into the pan and smooth the top with a spatula. Drizzle about 3/4 cup of the caramel sauce over the brownie layer in a zigzag pattern. (There will be sauce leftover. I may or may not have eaten it with a spoon.) Use an offset spatula to spread the caramel evenly across the brownie layer. In heaping spoonfuls, scoop the rest of the brownie batter over the caramel layer. Smooth the brownie batter gently to cover the caramel layer.
Bake the brownies for 30 minutes, rotating the pan halfway through the baking time and check to make sure they are done by sticking a toothpick into the center of the pan. The brownies are done when a few moist crumbs are stuck to the toothpick.
Remove the brownies from the oven and immediately sprinkle the fleur de sel and coarse sugar over the top.
Cool the brownies completely before cutting and serving. The brownies can be stored, tightly wrapped at room temperature, for up to 4 days.
Recipe adapted from Baked Expectations via If You Give a Girl a Cookie.
Buttermilk Cake Squares
Print This Recipe
 The recipe calls these squares of deliciousness brownies; however, being the brownie expert I am, and having sampled one or two or three or a lot, I feel the need to clarify: These are not brownies, they are moist, chocolately, yummy pieces of cake topped with frosting you just plop on top of a warm pan of
 brownies cake. I’m guessing they were named brownies because they’re baked in a pan and cut into squares, but don’t let that fool you. These are cake squares. Yes, that is the official terminology.
Did I mention these cake squares are pretty damn good? Like, really good? Especially when they’re still warm? Well, they are. And they’re super easy to make! A few ingredients on the stove, a few in the mixing bowl (including flour and sugar together, weird, I know!), combine everything, then add in two more things. And the frosting? No need to spread and make it look pretty. It kind of glides all over the warm cake all on its own.
Photos of the process here.
Cake Ingredients
2 cups all-purpose flour
2 cups sugar
1 teaspoon baking soda
1/4 teaspoon salt
1 cup water
1 cup butter
1/3 cup unsweetened cocoa powder
2 eggs
1/2 cup buttermilk or sour milk
1-1/2 teaspoon vanilla
Chocolate-Buttermilk Frosting
In a medium saucepan combine 1/4 cup butter, 3 tablespoons unsweetened cocoa powder, and 3 tablespoons buttermilk or sour milk. Bring mixture to boiling. Remove from heat. Add 2-1/4 cups powdered sugar and 1/2 teaspoon vanilla. Beat with an electric mixer on medium to high speed until smooth. If desired, stir in 3/4 cup coarsely chopped pecans.
Cake Preparation
- Preheat oven to 350 degrees F. Grease a 15x10x1-inch or a 13x9x2-inch baking pan; set aside. In a medium bowl, combine flour, sugar, baking soda, and salt; set aside.
- In a medium saucepan combine water, butter, and cocoa powder. Bring mixture just to boiling, stirring constantly. Remove from heat. Add the cocoa mixture to the flour mixture. Beat with an electric mixer on medium speed until combined. Add the eggs, buttermilk, and vanilla. Beat for 1 minute (batter will be thin). Pour batter into prepared baking pan.
- Bake about 25 minutes for the 15x10x1-inch pan, about 35 minutes for the 13x9x2-inch pan, or until a wooden toothpick inserted in the center comes out clean.
- Pour warm Chocolate-Buttermilk Frosting over the warm brownies, spreading evenly. Cool completely in pan on a wire rack. Cut into bars.
The recipe claims to make 24 pieces, but those would be huge squares.
Recipe from Better Homes and Gardens.
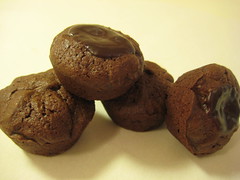
Barcelona Brownies
Print This Recipe
 When I was offered a copy of Rose’s Heavenly Cakes, I jumped at the chance to take it. It’s written by Rose Levy Beranbaum (think The Cake Bible) so I knew would be filled with amazing recipes, and each recipe has a photo which is something I love. I hate not knowing what the finished product is supposed to look like. Another perk–she lists both volume and weight measurements in her cookbook!
I’ve already decided the next recipe I’m going to try is the Apple Caramel Charlotte because it is just so stunning. You can see a short video of Rose discussing her book and basic baking tips here. OK, on to the brownies.
If you’re a chocolate fan then these brownies are for you. They’re rich, yet light and moist and the ganache “plugs” are a delicious treat, but totally optional. If you don’t want to fill the inside with ganache you can always use it on top instead. The original recipe calls for a financier mold, but I used a mini muffin tin and it worked out just fine. I ended up with 24 brownies.
Photos of the process here.
Ganache Ingredients
2 ounces bittersweet chocolate, coarsely chopped
1/3 cup heavy cream at room temperature
Brownie Ingredients
2/3 cup pecans, broken or chopped medium-coarse (I omitted these)
9 tablespoons unsalted butter
2 ounces bittersweet chocolate, preferably no higher than 62% cocoa mass
6 scant tablespoons unsweetened cocoa, preferably fine quality Dutch-processed (I used Hershey)
3/4 cup plus 1 1/2 tablespoons sugar
2 large eggs
1 1/2 teaspoons vanilla
2 ounces cream cheese, cut in pieces
1/2 cup all purpose flour
pinch of salt
Ganache Preparation
Melt the chocolate in a microwave, using 15 seconds bursts on high power and stirring several times, or in a double boiler over hot but not simmering water, stirring occasionally. Add the cream and stir gently until the mixture is smooth and dark. If necessary (if the cream was too cold and the mixture not entirely smooth), return it to the heat until totally fluid and uniform in color.
Brownie Preparation
- Prepare financier molds, preferably silicone (I used mini muffin pans), with baking spray with flour or shortening and flour.
- 20 minutes or longer before baking, set an oven rack in the lower third of the oven and preheat the oven to 325°F.
- Place the pecans on a cookie sheet and toast them, stirring occasionally, for about 7 minutes or until very lightly browned. Cool completely.
- In a double boiler over hot water or microwave-proof bowl, melt the butter and chocolate, stirring 2 or 3 times.
- Beat in the cocoa, then the sugar, beating until it is incorporated. (If you are doing this by hand, use a whisk.) Beat in the eggs and vanilla. When incorporated, beat in the cream cheese until only small bits remain. Add the flour and salt and mix only until the flour is fully moistened. Stir in the nuts and scrape the batter into a piping bag or freezer-weight zipseal bag. (You can use a spoon but it’s a lot faster and easier to use a pastry bag or zipseal bag with one corner cut.) (I’m lazy and didn’t feel like cleaning the pastry bag so I used a small cookie scoop.)
- If using a silicone mold, set it on a baking sheet and pipe the batter into the cavities, filling them about three-quarters full (1.5 ounces/45 grams in each). With a small off-set spatula or the back of a spoon, smooth the tops.
- Bake for 12 to 15 minutes or until the batter has set. The batter will puff and rise a little above the top of the cavities but sinks slightly on cooling. An instant read thermometer should register about 194 F. and if pressed lightly with a finger tip they will spring back.
- As soon as the brownies are removed from the oven, grease the end of a wooden chopstick or dowel (1/4 inch diameter) and insert it into the brownie, at 3 evenly-spaced intervals, all the way to the bottom, twisting slightly as you insert and withdraw it. Fill the holes with the ganache until slightly rounded above the surface of the brownie.
- Place the pan on a wire rack and cool completely. The ganache will sink in as it cools and more ganache can be added, to fill in any depressions, as long as the brownie is still warm enough to melt it. (If necessary, you can set the brownies under a lamp to heat the ganache puddles and make them smooth.) If making the optional ganache plugs, allow it to sit at room temperature until the puddles are firm to the touch. Then invert the mold of if using silicone, push each out with your finger pressed against the bottom of the mold. (If not making the ganache the brownies can be removed after 10 minutes of cooling.)
- Store wrapped airtight in plastic wrap and stored in an airtight container: 1 week at room temperature, 1 month refrigerated, or several months frozen. Try eating them frozen or chilled if you like a chewy brownie, room temperature for a softer creamier texture.
Recipe adapted from Rose’s Heavenly Cakes.