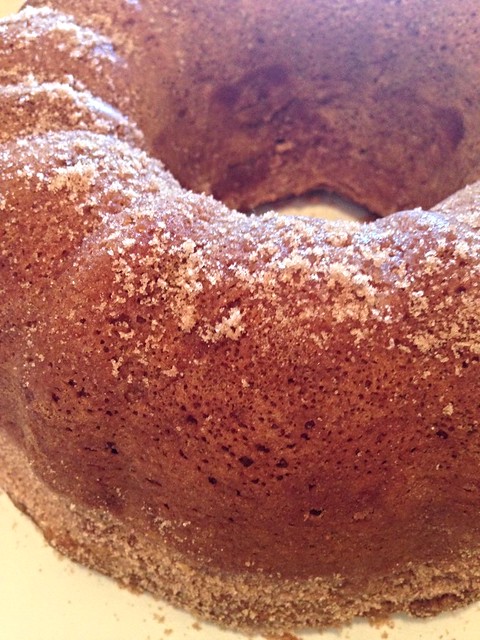
Lemon Pound Cake with Lemon Essential Oil

I love lemon pound cake, and the more lemon juice or zest, the better! So when my friend Leah asked if I was interested in baking something and including an essential oil, I immediately said yes to the lemon oil! The oil is cold-pressed from the rinds of lemons, so it smells absolutely amazing and adds even more lemon flavor to a recipe. And, in addition to being an antioxidant, it has lots of other benefits.
The cake is good. It’s very moist and has a nice texture, and the glaze adds a nice lemony punch. If I were to make it again, I’d probably add a tablespoon more lemon juice to the cake, just because I like lemon desserts really tart.

You can purchase the lemon essential oil (or any other essential oil!) here.
Cake Ingredients
1 cup unsalted butter (2 sticks), at room temperature, plus more for the pan
2 1/2 cups all-purpose flour, spooned and leveled, plus more for the pan
1 teaspoon kosher salt
1/2 teaspoon baking soda
1/2 teaspoon baking powder
3 cups granulated sugar
2 tablespoons finely grated lemon zest
4 tablespoons lemon juice
6 drops lemon essential oil
6 large eggs, at room temperature
1 cup plain full-fat Greek yogurt
Glaze Ingredients
2 tablespoons lemon juice
2 drops lemon essential oil
1 cup confectioners sugar
Preparation
Heat oven to 325° F. Butter and flour a 12-cup Bundt pan. In a medium bowl, whisk together the flour, salt, baking soda, and baking powder.
Using an electric mixer, beat the butter, granulated sugar, and lemon zest on medium-high until light and fluffy, 3 to 4 minutes. Beat in 4 tablespoons of the lemon juice and 6 drops of the lemon essential oil, then the eggs, one at a time, scraping down the sides of the bowl as necessary.
Reduce mixer speed to low. Add half the flour mixture, then the yogurt, and then the remaining flour mixture. Mix just until combined (do not overmix).
Transfer the batter to the prepared pan and bake until a toothpick inserted in the center comes out clean, 65 to 75 minutes. Cool the cake in the pan for 30 minutes, then turn it out onto a wire rack to cool completely.
In a small bowl, whisk together the confectioners sugar, 2 drops of the lemon essential oil, and 1 tablespoon of lemon juice until smooth, adding the remaining lemon juice as necessary to create a thick, but pourable glaze. Pour glaze over cooled cake.
Recipe adapted from Real Simple.
Snickerdoodle Bundt Cake
I’ve made this cake twice in the last week, it’s that good and tastes like a really soft snickerdoodle cookie. The outside has a slightly crunchy texture from the cinnamon and sugar, and the inside is super moist and crumbly. To make it even better, it doesn’t require much prep and is simple to make. And, it tasted even better then next day!
Ingredients
2 teaspoons ground cinnamon + 1 cup white sugar
2 1/2 cups all-purpose flour
1 teaspoon baking powder
1/2 teaspoon baking soda
1/2 teaspoon kosher salt
1 cup unsalted butter, room temperature
1 cup white sugar
1 cup light brown sugar
3 eggs, room temperature
2 teaspoon vanilla extract
1 cup full-fat sour cream, room temperature
Preparation
In a small bowl, combine 1 cup of sugar and 2 teaspoons of cinnamon. Mix together and set aside.
Preheat oven to 325F. Butter a 9″ bundt pan. Gently dust the entire inside of the pan using 1/4 to 1/2 of the sugar and cinnamon mixture. Save the remaining sugar and cinnamon mixture and set aside.
Sift together the flour, baking powder, baking soda and salt. Set aside.
Beat the butter on medium speed for one minute. Add the white sugar and mix for 3 minutes, until light and fluffy. Scrape down the bowl and blade and add the brown sugar then mix for 2 minutes until the mixture looks light brown and uniform in color. Add the eggs one at a time, beating each for 1 minute. Stir in the vanilla. Add the flour mixture alternately with the sour cream; beat well.
Spread half of the batter into the prepared pan. Sprinkle with 1/4 to 1/3 of a cup of the cinnamon sugar mixture over top the cake. Spread the rest of the batter into the pan and sprinkle any remaining sugar mixture over the top.
Bake in the preheated oven for 55 to 65 minutes, or until a toothpick inserted into the cake comes out clean. Allow to cool for 10 minutes before inverting onto a wire rack to cool completely.
Recipe from Dozen Flours.
One Bowl Chocolate Cake
 Print This Recipe
I love baking, but doing the dishes is a whole other story. When I find complex recipes that I know I must try, I tend to break up the steps and get as much stuff done in advance so I don’t have to wash and rewash dishes all day.
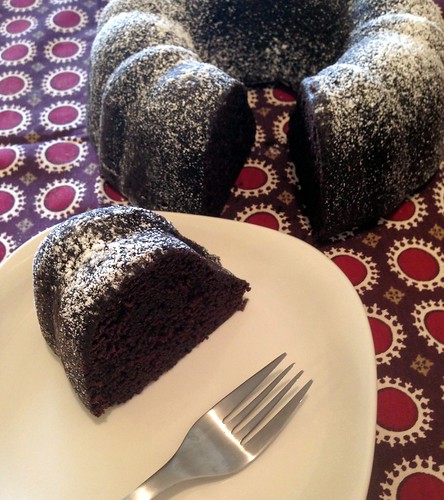
So when I discover recipes like Hershey’s amazingly moist one-bowl chocolate cake, I have to share the details with everyone. Not only is it super easy to make, I used one bowl, two measuring cups, two measuring spoons, and a spatula. That’s it! The only thing that makes this recipe even better is that you can use it to make layer cakes, a bundt cake, a 9 x 13 cake, or cupcakes! It’s the perfect chocolate cake recipe, and each time I make it, I receive tons of compliments.

This time, I made a bundt because I hate frosting cakes and it’s amazing what a little dusting of powered sugar can do to elicit ooohs and aaahs. (It’s true, I made this for a New Year’s Eve party and everyone raved about it.) But I’ve also made this as cupcakes and layers cakes, I love that it’s so veratile.
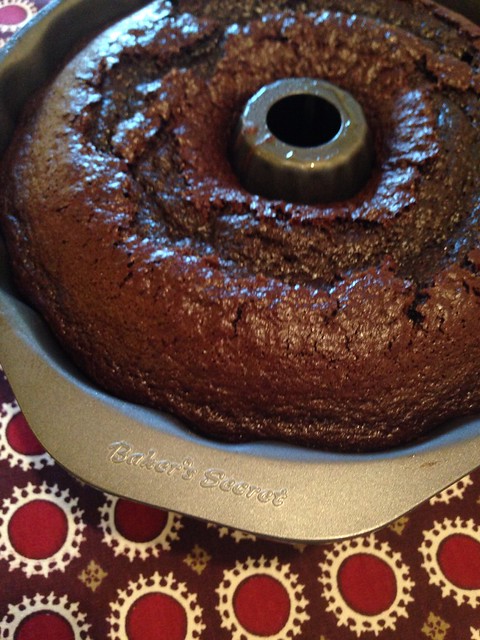
Disclosure: I received a bundt pan from Baker’s Secret.
Ingredients
2 cups sugar
1-3/4 cups all-purpose flour
3/4 cup cocoa
1-1/2 teaspoons baking powder
1-1/2 teaspoons baking soda
1 teaspoon salt
2 eggs
1 cup milk
1/2 cup vegetable oil
2 teaspoons vanilla extract
1 cup boiling water
Preparation
Quick note about temperature: If you’re using a dark pan, you should lower the temperature 25°. If you’re using glass or a light pan, leave it as the recipe says. Here you can see the two different colored pans–since I used the dark Baker’s Secret pan, I lowered the temp. (Side note: The Baker’s Secret pan has HANDLES. Do you know how much easier it is to hold and flip a bundt pan with handles? Pure brilliance!)

Heat oven to 350°F. Grease and flour appropriate baking pan(s). (See below for variations.)
Stir together sugar, flour, cocoa, baking powder, baking soda and salt in large bowl. Add eggs, milk, oil and vanilla; beat on medium speed of mixer 2 minutes. Stir in boiling water (batter will be thin). Pour batter into prepared pan(s).
Pan Variations
12 cup Bundt pan: Bake 50 to 55 minutes. Cool 15 minutes; remove from pan to wire rack. Cool completely. Dust with powered sugar.
Two 9″ round cake pans: Bake 30 to 35 minutes or until wooden pick inserted in center comes out clean. Cool 10 minutes; remove from pans to wire racks. Cool completely. Frost.
One 9×13 baking pan: Bake 35 to 40 minutes or until wooden pick inserted in center comes out clean. Cool completely. Frost.
Three 8″ round cake pans: Bake 30 to 35 minutes or until wooden pick inserted in center comes out clean. Cool 10 minutes; remove from pans to wire racks. Cool completely. Frost.
Recipe from Hershey’s.
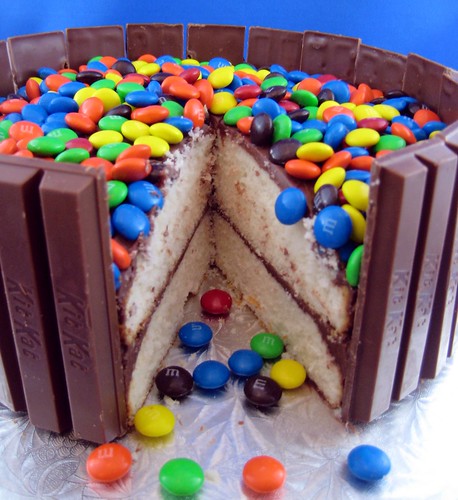
Kit Kat Cake
Print This Recipe
Cake decorating has never been my strong suit. In fact, I really suck at it. Following my trip to the Wilton Food Blogger Workshop a couple of years ago, I became more confident with the piping bag, but trust me when I say that you don’t want me decorating a birthday cake for you anytime soon. And yes, this is why the only kinds of cakes you usually see on this blog are cupcakes or bundt cakes; they’re so much easier to decorate!
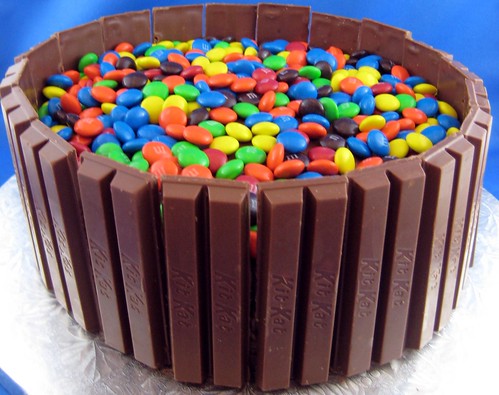
However, I’ve been seeing this Kit Kat cake online for years and immediately thought this was something I could do. So for those of you lacking in the cake decorating skills department like me, this is the cake for you! Added bonus: Everyone thinks it looks so cool and colorful, and with National Cake Day coming up later this month (November 26), you now have an excuse to make it!

Because I wasn’t sure how this would turn out, I initially made it using *gasp* cake mix and canned frosting, but you can use your favorite cake and frosting recipes instead. I recommend using chocolate frosting as it will be less noticeable in the gaps between the Kit Kats.
Ingredients
Two 8″ or 9″ cakes, any flavor
Frosting
12.60 ounce bag of M&Ms (or any candy you want to top it with)
11-12 full size (not snack size) packages Kit Kats)
Preparation
Using a cake leveler or serrated knife, level cakes so the tops are no longer domed. (If you are using a serrated knife, it helps to freeze the cake first.)
Separate each Kit Kat so you have sections of two Kit Kats. (I put them in the fridge first so they wouldn’t melt while I was handling them.)
Frost the top of one cake, then place the second cake on top of it. Frost the top of the second cake and the sides of the stacked cakes.
Place the Kit Kats around the frosted cake, as close together as possible.
You can also tie a ribbon around the cake to keep the Kit Kats from moving. Pour the M&Ms on the top of the cake. Slice and serve!
Jewish Apple Cake
Print This Recipe
Rosh Hashanah at my parents’ house means at least 15 people (we used to have around 50!) over for dinner. And each year, I try to make something new, but usually end up with my old favorites. Since we had such a small group this year, and I didn’t have to make a gazillion different things, I decided to go with a new recipe for apple cake.

On Rosh Hashanah, you wish your friends and family a happy and sweet new year, and apples (dipped in honey) are a traditional food, as is apple cake. This recipe by Deb’s mom is definitely sweet and made everyone happy. In fact, a couple of guests told me this is one of their favorite things I have ever baked. It’s super moist, and that was even after making it ahead and freezing. And an added bonus: It’s made with oil so it’s so dairy free.
Ingredients
6 apples (I used Fuji)
1 tablespoon cinnamon
5 tablespoons sugar
2 3/4 cups flour, sifted
1 tablespoon baking powder
1 teaspoon salt
1 cup vegetable oil
2 cups sugar
1/4 cup orange juice
2 1/2 teaspoons vanilla
4 eggs
Preparation
Preheat oven to 350 degrees. Grease a tube pan. Peel, core and chop apples into chunks. Toss with cinnamon and sugar and set aside.
Stir together flour, baking powder and salt in a large mixing bowl. In a separate bowl, whisk together oil, orange juice, sugar and vanilla. Mix wet ingredients into the dry ones, then add eggs, one at a time. Scrape down the bowl to ensure all ingredients are incorporated. (My batter was really thick at this point. Don’t panic.)
Pour half of batter into prepared pan. Spread half of apples over it. Pour the remaining batter over the apples and arrange the remaining apples on top. Bake for about 1 1/2 hours, or until a tester comes out clean.
Recipe from Smitten Kitchen.