Caramel Crunch Bars
 Print This Recipe
I know it’s a weird thing to say, but I’m not sure how I feel about these bars. You’re probably thinking “shortbread base, chocolate and toffee top, what’s not to like?” and so am I, kinda. But I liken these bars to a so-so date. (Stay with me here.)
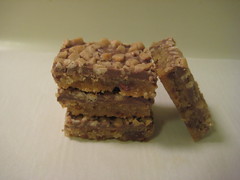 Like a so-so date, these bars are nice and sweet and pretty attractive. I could see myself having one and saying, “Eh, that was OK, but I’m not sure I want another.” And I could also see myself eying them on a tray and thinking, “You know, one more wouldn’t be so bad.” Like a date that you’re unsure about. Get it? Come on, I know you single ladies understand what I’m trying to say here.
Update: These were a huge hit and I think even better the second day. Go figure.
Anyway, fortunately for me, these bars are around 1,000,000 points each so the bulk of them are in the freezer while the rest are going with me tomorrow to force feed the girls at my eyebrow place. And finally, Dorie suggests using these to make ice cream sandwiches. I think she may be on to something there.
Base Ingredients
1 ½ cup all-purpose flour
1 tsp. instant espresso powder or finely ground instant coffee (I omitted this)
½ tsp salt
¼ tsp ground cinnamon (I omitted this)
2 sticks (8oz) unsalted butter, at room temperature
½ cup light brown sugar
¼ cup sugar
1 tsp pure vanilla extract
3 oz. bittersweet or premium milk chocolate, finely chopped
Topping Ingredients
6 oz. bittersweet or premium milk chocolate, finely chopped
¾ cup Heath toffee bits
Preparation
Getting Ready: Center a rack in the oven and preheat the oven to 375 degrees F. Lightly butter a 9×13 inch baking pan, line the pan with foil and butter the foil. Put the pan on a baking sheet.
To make the base: Whisk together the flour, coffee, salt and cinnamon.
Working with a stand mixer, preferably fitted with a paddle attachment, or a hand mixer in a large bowl, beat the butter at medium speed until smooth, about 3 minutes. Add the sugars and beat for another three minutes or until the mixture is light and creamy. Beat in the vanilla and turn off the mixer. Add all the dry ingredients, cover the stand mixer with a kitchen towel (so you and your kitchen don’t get showered in flour) and pulse the mixer on and off at low speed about 5 times, at which point a peek at the bowl should reveal that it’s safe to turn the mixer to low and mix, uncovered, just until the dry ingredients are almost incorporated. Add the chopped chocolate and mix only until the dry ingredients disappear. If the chocolate isn’t evenly mixed, finish the job by hand with a spatula. You’ll have a very heavy, very sticky dough. Scrape the dough into the buttered pan and, with the spatula and your fingertips, cajole it into a thin, even layer. (I cajoled using an offset spatula.)
Bake for 20 to 22 minutes, or until the base is bubbly – so bubbly that you can almost hear it percolating – and puckery. It will look as though it is struggling to pull away from the side of the pan. Transfer the pan to a rack and turn off the oven.
To make the topping: Scatter the chocolate evenly over the top of the hot base and pop the pan back into the oven for 2 to 3 minutes, until the chocolate is soft. Remove from oven and immediately spread chocolate over bars, using offset spatula or the back of a spoon. Sprinkle the toffee bits over the chocolate and press them down lightly with your fingertips (again, I used the offset spatula because hot desserts and my fingers do not get along well). Place the baking pan on a rack to cool to room temperature.
If, by the time the bars are cool, the chocolate has not set, refrigerate them briefly to firm the chocolate.
Carefully lift out of the pan, using foil edges as handles, and transfer to a cutting board. Trim the edges if they seem a bit thick. Cut about 54 bars, each about 2 inches by 1 inch, taking care not to cut through the foil.
Recipe from Baking: From My Home to Yours by Dorie Greenspan.
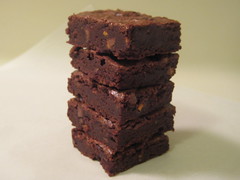
Fudgy Brownies
Print This Recipe
 Hi there! Remember me? I’m the one that used to bake all kinds of fat and calorie filled desserts and force my coworkers to taste them at 8:00 a.m., before they even got their first cup of coffee of the day.
Yeah, about that. I’m trying to lose weight. And I have no coworkers because I’m currently unemployed. And well, that combination makes it hard to make decadent desserts every week, because there’s no one to force feed two dozen brownies to on a regular basis. And I have no willpower, so keeping them in the house is out of the question. Duh.
Enter these brownies. They are chocolaty. And rich. And fudgy. But the best part? Around 100 calories and 3 grams of fat. And let me tell you, a little goes a long way. One of these brownies and I’m happy. OK fine, I ate the corner of a second one and immediately put the rest in the freezer. Remember that willpower thing I mentioned before? Still don’t have it.
Ingredients
3/4 cup all-purpose flour
2/3 cup confectioners’ sugar
3 tablespoons unsweetened cocoa powder, American-style or Dutch-process
3 ounces semisweet or bittersweet chocolate (50-72% cacao), coarsely chopped, plus 2 1/2 ounces chopped into mini chip-size pieces (I chopped up some caramel-chocolate swirl chips), divided
1 1/2 tablespoons canola oil
1/4 cup granulated sugar
1 1/2 tablespoons light corn syrup blended with 3 tablespoons lukewarm water
2 teaspoons vanilla extract
1/8 teaspoon salt
1 large egg
1/3 cup chopped toasted walnuts (I omitted these)
Preparation
- Position rack in center of oven; preheat to 350°F. Line an 8-inch-square baking pan with foil, letting it overhang on two opposing sides (I used parchment). Coat with cooking spray.
- Sift flour, confectioners’ sugar and cocoa together into a small bowl. Combine the 3 ounces coarsely chopped chocolate and oil in a heavy medium saucepan; place over the lowest heat, stirring, until just melted and smooth, being very careful the chocolate does not overheat. Remove from the heat and stir in granulated sugar, corn syrup mixture, vanilla and salt until the sugar dissolves. Vigorously stir in egg until smoothly incorporated. Gently stir in the dry ingredients. Fold in the walnuts (if using) and the remaining 2 1/2 ounces chopped chocolate just until well blended. Turn out the batter into the pan, spreading evenly.
- Bake the brownies until almost firm in the center and a toothpick inserted comes out with some moist batter clinging to it, 20 to 24 minutes. Let cool completely on a wire rack, about 2 1/2 hours (hahaha, that’s funny).
- Using the overhanging foil as handles, carefully lift the brownie slab from the pan. Peel the foil from the bottom; set the slab right-side up on a cutting board. Using a large, sharp knife, trim off any dry edges. Mark and then cut the slab crosswise into fifths and lengthwise into fourths. (In other words, cut the brownie slab into 20 pieces.) Wipe the blade with a damp cloth between cuts.
Recipe adapted from Eating Well.
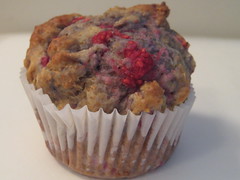
Low(er) Fat Lemon-Raspberry Muffins
Print This Recipe
 As I’ve mentioned before, I’m watching what I eat (I’ve lost 4 pounds thus far, yay!) and am always looking for good low(er) fat and low(er) calorie recipes that don’t have weird ingredients in them. Fortunately, I stumbled upon this recipe.
The muffins are moist, flavorful, filled with fruit, and only four points each! (Update: These got a thumbs down the next day from my family. Oh well.) Also, I found it interesting that the recipe calls for grinding the sugar (or in my case, Splenda blend) with the lemon zest. I think I may try that next time I make sugar cookies.
Ingredients
1 lemon
1/2 cup sugar
1 cup nonfat buttermilk (I could only find low-fat)
1/3 cup canola oil
1 large egg
1 teaspoon vanilla extract
1 cup white whole-wheat flour or whole-wheat pastry flour (see Shopping Tip)
1 cup all-purpose flour
2 teaspoons baking powder
1 teaspoon baking soda
1/4 teaspoon salt
1 1/2 cups fresh or frozen (not thawed) raspberries
Preparation
- Preheat oven to 400°F. Coat 12 large (1/2-cup) muffin cups with cooking spray or line with paper liners.
- Zest one lemon. (If you don’t have a Microplane zester, treat yourself to one!) Combine the zest and sugar in a food processor; pulse until the zest is very finely chopped into the sugar. Add buttermilk, oil, egg and vanilla and pulse until blended.
- Combine whole-wheat flour, all-purpose flour, baking powder, baking soda and salt in a large bowl. Add the buttermilk mixture and fold until almost blended. Gently fold in raspberries. Divide the batter among the muffin cups.
- Bake the muffins until the edges and tops are golden, 20 to 25 minutes. (Mine took about 18 minutes.) Let cool in the pan for 5 minutes before turning out onto a wire rack. Serve warm.
Recipe from Eating Well.
– – –
In blog news, you can now receive email updates of new blog posts!
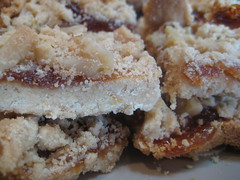
Passover Apricot Bars
Print This Recipe
 Because the Passover Mandelbrot recipe was such a hit, I decided to try another Passover treat from the same cookbook. And since we already had so many chocolate desserts, I was happy to find this apricot one. (If you don’t like apricot, substitute with any flavor preserves.)
The bar has a buttery cookie base with a chewy fruit center and crumbly top. It got rave reviews at the seder, and I think it will definitely become part of the Passover dessert rotation for years to come.
Ingredients
1/2 pound (2 sticks) unsalted nondairy margarine or butter, at room temperature plus extra for greasing the baking pan
1 cup sugar
Yolks of 2 large eggs
2 teaspoons grated lemon zest
1 teaspoon vanilla
1/4 teaspoon salt
2 cups matzoh cake meal
1 jar (12 ounces) apricot preserves
3/4 cup chopped walnuts
Preparation
- Preheat the oven to 325 F. Grease a 13 x 9-inch glass (I used aluminum) baking pan.
- Cream the margarine (or butter) and sugar with an electric mixer on medium speed until light and fluffy, about 2 minutes. Add the egg yolks and continue beating until well combined, scraping the bowl as necessary. Then add the lemon zest, vanilla, and salt. Reduce the speed to medium-low and add the cake meal, beating until combined.
- Press about two-thirds of the mixture over the bottom of the prepared baking pan and bake on the center oven rack for 20 minutes. Remove the pan from the oven and spread the preserves evenly over the crust. Sprinkle the walnuts over the preserves, and crumble the remaining dough over the top. Bake until the topping feels set and is beginning to turn golden, 30-35 minutes (mine was done in about 20). (Check the bottoms. They should be just beginning to turn golden too.) Cool in the baking pan set on a wire rack. Then cut into squares and serve.
Recipe adapted from Cooking Jewish.
Passover Mandelbrot
Print This Recipe
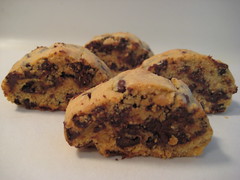 Passover mandelbrot is usually something my mom makes, but this year I decided to give a new recipe a whirl. Unlike Aunt Helen’s (non-Passover) Mandelbrot, this one is made using a mixer rather than a bowl and wooden spoon, but let’s just not tell her that, OK? Thanks!
This recipe was easy to make and work with, and the end result is crispy, chocolately, and pretty damn good! (Of course, the real test will be when we taste test them against my mom’s recipe. Stay tuned.) I left mine in the oven for about an hour once it was turned off, but if you don’t want yours so crispy, just take them out earlier.
Ingredients
1/2 pound unsalted butter or nondairy margarine, at room temperature
2 cups sugar
6 large eggs, at room temperature
1 teaspoon vanilla
2 1/2 cups matzoh cake meal
3/4 cup potato starch
4 cups (two 12-ounce bags) semisweet chocolate chips
Preparation
- Preheat the oven to 350 F. Line a baking sheet with parchment paper or spray it.
- Cream the butter and sugar with an electric mixer on medium speed until smooth and creamy, about 2 minutes. Beat in the eggs, one at a time, scraping the bowl several times. Then beat in the vanilla Reduce the speed to low, and add the cake meal and potato starch. Scrape the bowl, and blend just until thoroughly combined. Stir in the chocolate chips. (If the dough feels too sticky to handle even with floured hands, cover it with plastic wrap and refrigerate until it is stiff, 30 minutes to several hours.)
- Divide the dough into four portions. Flour your hands with cake meal, and form each portion into a log the length of the baking sheet. Space the logs evenly on the prepared baking sheet, and bake on the center oven rack until they are golden and the tops are firm to the touch, about 30 minutes.
- Remove the baking sheet from the oven and let the logs cool for three minutes. Then, using a serrated knife, cut each log on the diagonal into 3/4-inch thick slices. Place the slices, cut side down, on the baking sheet and bake on the center oven rack until golden brown, 10 minutes. Turn the cookies onto the unbaked side. Turn the oven off and put the baking sheet back in the oven. Leave it there for 15 to 30 minutes for softer mandelbrot, longer for crisper ones. Let the mandelbrot cool completely on the sheet set on a wire rack before serving.
Recipe from Cooking Jewish.