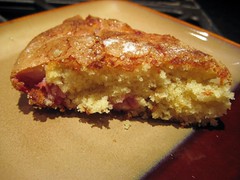
Strawberry Buttermilk Cake
 Print This Recipe
 I was down in San Diego visiting my parents for Memorial Day weekend when this recipe showed up in my Google Reader. It was 9 at night and my parents, sister, and I were all sitting around watching TV, stuffed from dinner and a party earlier in the day. I made this cake thinking we would taste it before bed and eat some of it the next day.
Which we did. Actually, we finished it the next day. And made two more as well. Oh yes, it was that much of a hit! The second time around, I made it a lot healthier by making a few substitutions: I replaced the butter with applesauce (tablespoon for tablespoon), the sugar with Splenda, and the flour with whole wheat flour. And it still got two thumbs up from everyone! It’s light, moist, delicious, and incredibly simple to make.
Notes: Since I was baking at my parents’ house and didn’t have my cake pans, I used a pie pan and it turned out just fine. I also made my own buttermilk (using Lactaid!) by adding 1/2 tablespoon of vinegar to the 1/2 cup milk and let it sit for 10 minutes. And finally, you can substitute any berry you wish.
Ingredients
1 cup all-purpose flour
1/2 teaspoon baking powder
1/2 teaspoon baking soda
1/4 teaspoon salt
1/2 stick unsalted butter, softened
2/3 cup plus 1 1/2 tablespoons sugar, divided
1/2 teaspoon pure vanilla extract
1/2 teaspoon finely grated lemon zest (optional)
1 large egg
1/2 cup well-shaken buttermilk
1 cup fresh strawberries (you can use any berry you want)
Preparation
Preheat oven to 400°F with rack in middle. Butter and flour a 9-inch round cake pan.
Whisk together flour, baking powder, baking soda, and salt and set aside. In a larger bowl, beat butter and 2/3 cup (146 grams) sugar with an electric mixer at medium-high speed until pale and fluffy, about two minutes, then beat in vanilla and zest, if using. Add egg and beat well.
At low speed, mix in flour mixture in three batches, alternating with buttermilk, beginning and ending with flour, and mixing until just combined.Spoon batter into cake pan, smoothing top. Scatter raspberries evenly over top and sprinkle with remaining 1 1/2 tablespoons sugar.
Bake until cake is golden and a wooden pick inserted into center comes out clean, 20 to 25 minutes (mine were all done in about 18 minutes). Cool in pan 10 minutes, then turn out onto a rack and cool to warm, 10 to 15 minutes more. Invert onto a plate (I skipped this part and just cut, sliced, and served–much easier).
Recipe adapted from Smitten Kitchen.
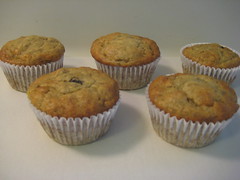
Low Fat Banana Muffins
Print This Recipe
 I’ve read about how applesauce can be used in baked goods in place of fats such as eggs, oil, and butter but hadn’t tried the substitution until now. And I’m happy to report it’s a good substitution!
Of course, these muffins are not meant to replace my favorite banana bread. They are simply a low fat alternative, and even with the chocolate chips they are still only three points each. They’re easy (no need for a mixer!), moist and flavorful, and lighter than I was expecting after reading some of the reviews.
The lightness may be because I made muffins rather than a loaf (I like wrapping them individually then freezing them so I can defrost one at a time). I made the mistake of using paper liners, and the muffins completely stuck to them so I suggest spraying a muffin tin with Pam and forgoing the liners.
Photos of the process here.
Ingredients
4 very ripe bananas
1 1/2 cups all-purpose flour
3/4 cup white sugar (I used Splenda Sugar Blend)
1 teaspoon vanilla extract
1 teaspoon baking soda
1/2 teaspoon baking powder
1 egg
4 tablespoons applesauce (I made my own)
1/2 cup chocolate chips, optional
Preparation
- Mash bananas in a bowl.
- Add all other ingredients and mix well.
- Pour into greased loaf pan.
- Bake at 350 degrees for 13-15 minutes if making muffins (or 50 to 60 minutes if making a loaf), or until toothpick inserted into center of cake comes out clean.
Yields 16 muffins or one loaf.
Recipe adapted from Recipe Zaar.
Applesauce
Print This Recipe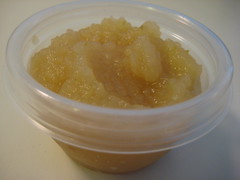
I hate applesauce. Mushed apples and water? Blech. I like my apples crisp with a nice crunch when I bite into them. So when I noticed the apples in my fridge (yes, I keep apples in the fridge) were going soft, I knew I had to do something with them. And since I had over-ripe bananas in the freezer, I figured this was the perfect time to make applesauce to use in a low fat banana muffin recipe (coming soon!) I had bookmarked earlier in the week.
I scoured the Internet for applesauce recipes and with the help of Rachel over at Coconut & Lime (she’s so patient!), I got to work. I was pleasantly surprised to learn applesauce is extremely easy to make (and not so surprised to find that I still don’t like it). I didn’t add much sugar since I knew I was going to bake with it, but if you’re planning to eat it and are using tart apples, throw it in. Also, I divided it into small individual Glad containers which I froze to use in future recipes.
Ingredients
4 apples (I used Fujis)
1/2 cup water
1/4 cup sugar, optional
1/2 teaspoon cinnamon, optional
Preparation
- Peel, core, and slice apples.
- In a saucepan over medium heat, combine apples, water, sugar, and cinnamon. Cover and cook for 20-30 minutes, or until the apples are soft enough to mash.
- Mash with a fork (or pulse in a food processor like I did).
Yields approximately three cups.
The Baked Brownie
Print This Recipe
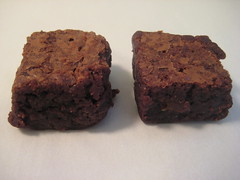 A few weeks ago I had lunch with my friend Jenn who was kind enough to bring me some of the Baked brownies she had just made. Of course, as soon as I got home I ate one and stuck the rest in the freezer where they proceeded to stay for oh, two days. These brownies are so good, even straight out of the freezer!
This meant I needed to dust off my copy of the Baked cookbook that has been sitting on a shelf collecting dust. What better time to try a new recipe than when it’s 80 degrees outside? Yeah, that’s how good these brownies are. Mine were slightly underbaked so they were chewy and fudgy, but I’m not complaining!
Ingredients
1-1/4 cups flour
1 teaspoon salt
2 Tablespoons dark cocoa powder (I used Hershey, shh don’t tell the Baked guys)
11 ounces quality dark chocolate (60-72%), chopped coarsely (I used semi-sweet chips, again, this is between you and me)
8 ounces butter (2 sticks), cut into 1 inch cubes
1 tsp instant espresso powder (I omitted this)
1-1/2 cups sugar
1/2 cup light brown sugar
5 large eggs, room temperature
2 teaspoons vanilla extract
Preparation
- Preheat oven to 350 degrees.
- Butter the sides and bottom of a glass or light colored metal pan 9x13x2 pan. (I lined it with foil and sprayed with Pam.)
- In a medium bowl, whisk together the flour, the salt, and cocoa powder.
- Configure a large sized double boiler. Place the chocolate, the butter, and the instant espresso powder in the bowl of the double boiler and stir occasionally until the chocolate and butter are completely melted and combined. Turn off the heat, but keep the bowl over the water of the double boiler and add both sugars. Whisk the sugars until completely combined and remove the bowl from the pan. Mixture should be room temperature.
- Add three eggs to the chocolate/butter mixture and whisk until just combined. Add the remaining eggs and whisk until just combined. Add the vanilla and stir until combined. Do not over beat the batter at this stage or your brownies will be cakey.
- Sprinkle the flour/cocoa/salt mix over the chocolate. Using a spatula (DO NOT USE A WHISK) fold the dry into the wet until there is just a trace amount of the flour/cocoa mix visible.
- Pour the mixture into the pan and smooth the top with your spatula. Bake the brownies for 30 minutes (rotate the pan half-way through baking) and check to make sure the brownies are completely done by sticking a toothpick into the center of the pan. The brownies are done when the toothpick comes out with a few moist crumbs.
- Cool the brownies completely before cutting and serving.
Yields 24 brownies.
Recipe from Baked: New Frontiers in Baking.
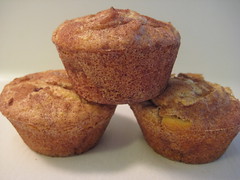
Snickerdoodle Muffins
Print This Recipe
 I bookmarked this recipe a couple years ago, after a friend sent me a link to a blog post about a food blogger who received an email from a reader asking for a refund because she tried this recipe on the blog and didn’t like it. I kid you not.
While I have received emails and comments from people not liking a recipe and calling it a waste of money, I have never been asked for a refund. (I just don’t understand some people!)
These muffins are good–they’re moist, fluffy, and taste like a snickerdoodle, but look like a muffin. While they’re easy to make, they are a little messy but definitely worth it. And they’re also a nice change from everyday chocolate chip or berry muffins.
Photos of the process here.
Ingredients
2 sticks unsalted butter
1 cup sugar
2 tsp vanilla
2 eggs
¾ tsp baking soda
¾ tsp baking powder
¾ tsp cream of tarter
¾ tsp freshly grated nutmeg
1 and ¼ cup sour cream
2 and ¼ cups all purpose flour
plus 1 cup sugar and 2 TBSP cinnamon mixed together for rolling
Preparation
- Cream the butter and sugar until soft about 3 to 5 minutes. Add in the vanilla. Add in the eggs one at a time and mix until each is incorporated.
- In a separate bowl, mix together the flour, baking soda, baking powder, and cream of tarter.
- Add the flour mixture and the sour cream alternately to the egg-butter mixture in three additions. Start with the flour and end with the flour. Scrape the bowl occasionally.
- Using an ice cream scoop (I used a large cookie scoop), scoop out muffin batter one at a time and drop into a shallow bowl filled with the cinnamon sugar mixture. Roll the muffin around in the mixture until it is covered completely in cinnamon sugar. Place muffin into a greased muffin tin. Depending on the size of your tins, you should get about 12 to 14 muffins (I got 18).
- Bake them for approximately 20-22 minutes in a 350F degree oven or until they are golden brown.
Recipe from Culinary Concoctions by Peabody.