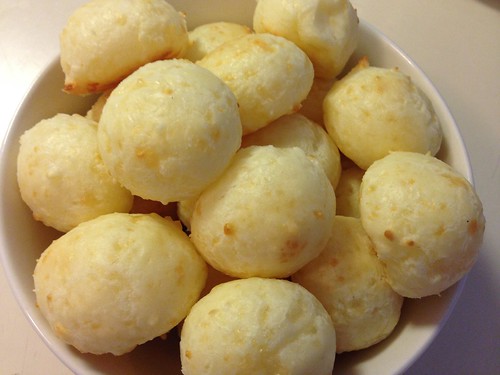
Pão de Queijo (Brazilian Cheese Bread)
 Print This Recipe
When I was in high school, we had to read The Jungle by Upton Sinclair. If you read the book, you can probably guess where this is going. I quickly gave up red meat, and haven’t eaten it to this day. I do eat poultry, but I toy with the idea of going vegetarian.
I bring this up because on one of my first few dates with my ex-boyfriend, he took me to Fogo de Chao, a Brazilian steakhouse where the servers walk around with meat on skewers. (Hmm, dating red flag?) They had one chicken option and of course, it was wrapped in bacon. However, they also have a ridiculously good salad/side bar and pao de queijo, tiny cheese rolls made with tapioca flour. I was probably the restaurant’s favorite customer ever, because I ate mainly veggies and bread; they made a ton of money off me.
Fortunately for me, there’s another Brazilian restaurant, Bossa Nova, in my neighborhood. They also have pao de queijo, and they even have chicken, sans bacon! I’ve gone regularly over the years and recently became obsessed with their cheese bread. So much in fact, that I decided to give a recipe a whirl.
This recipe was super easy, and the puffs were delicious and pretty close to the restaurants’ versions. I probably wouldn’t make these without a stand mixer and cookie scoop, but if you have both of those, you’re good to go!
And, because these are made with tapioca flour, they’re kosher for Passover (and also gluten free). This is a life changer!
Ingredients
1 cup whole milk
1/2 cup vegetable oil
1 teaspoon salt
2 cups (10 ounces) tapioca flour or sour cassava flour
2 eggs
1 1/2 cups shredded Parmesan cheese
Preparation
Preheat the oven to 450°F. Line a baking pan with parchment and set aside.
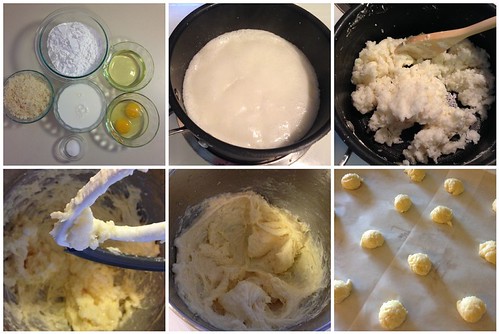
Combine the milk, oil, and salt in the saucepan. Whisking occasionally, bring to a gentle boil over medium heat. Remove from heat as soon as you see big bubbles coming through the milk.
Add the tapioca flour to the saucepan and stir until the tapioca flour is completely incorporated. The dough will be grainy and gelatinous.
Transfer the dough to the bowl of a stand mixer fitted with a paddle attachment. Beat the dough for a few minutes at medium speed until it smooths out and has cooled enough that you can hold your finger against the dough for several seconds. (If the dough is too warm, there’s a chance your eggs may scramble, so take your time here!)
Whisk the eggs together in a small bowl. With the mixer on medium, beat the eggs into the dough in two additions. Wait until the first addition has been fully incorporated into the dough before adding the second. Scrape down the sides of the bowl as needed.
With the mixer on medium, beat in the cheese until fully incorporated. The resulting dough will be very sticky, stretchy, and soft with a consistency between cake batter and cookie dough.
Using a cookie scoop or tablespoon, scoop rounded portions of the dough into mounds on the parchment-lined baking sheet. Space the mounds an inch or two apart. Dip your scoop in water to prevent sticking.
Transfer the sheet with the puffs to the oven and immediately turn down the heat to 350°F. Bake for 20-30 minutes, until the puffs have puffed, the outsides are dry, and they are just starting to color. Cool briefly and eat. Leftover puffs can be kept in an airtight container for up to a week and re-crisped in a warm oven or toaster oven.
Yields: I used a small OXO cookie scoop and got around three dozen puffs.
Recipe from The Kitchn.
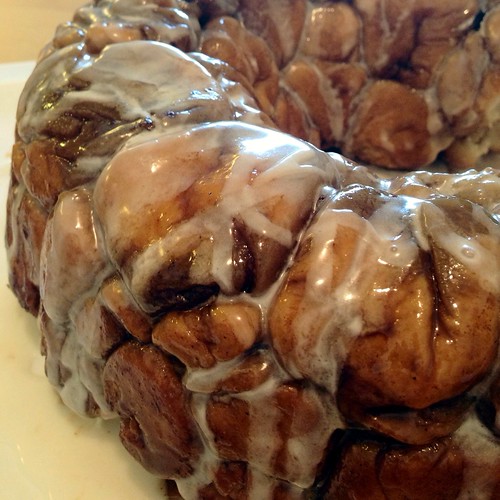
Monkey Bread
Print This Recipe
As I’ve mentioned before, growing up we pretty much ate non-sugared cereal or bagels for breakfast. On weekends, my mom would sometimes make French toast or German pancakes with apples and cinnamon and sugar, but things like cinnamon rolls and monkey bread were never a breakfast food for us. Then, during high school, I got a job at a Mrs. Fields bakery called La Petite Boulangerie. I opened the store every weekend morning and was there while the baker made the cinnamon rolls and sticky buns. What a delicious smell.
And that was the beginning of my demise. That cinnamon roll is a weird shape? Guess we’ll have to eat it for breakfast. That sticky bun was a little too burnt? Save it to take home to my dad. My love of sticky cinnamon and sugar began.
This monkey bread is similar to a sticky bun, minus the nuts, with a glaze. Since it’s 64 pieces of dough in a Bundt pan, it’s easy to tear apart and eat with your fingers, and sticky and gooey just like it should be. If you’re planning on making this, just remember it’s a yeast dough with two rises, so it does take a while to make but is so worth it!
Dough Ingredients
4 tablespoons butter, divided, 2 tablespoons softened and 2 tablespoons melted
1 cup milk, warm (about 110 degrees)
1/3 cup water, warm (about 110 degrees)
1/4 cup granulated sugar
2 1/4 teaspoons instant yeast (I used rapid rise yeast)
3 1/4 cups all-purpose flour, plus extra for work surface
2 teaspoons salt
Brown Sugar Coating Ingredients
1 cup packed light brown sugar
2 teaspoons ground cinnamon
8 tablespoons butter (1 stick), melted
Glaze Ingredients
1 cup confectioners sugar
2 tablespoons milk
Preparation
Butter a Bundt pan with the 2 tablespoons softened butter. Use a pastry brush or a paper towel or anything that will really help get inside all of those nooks and crannies. Set aside.
In a large measuring cup, mix together the milk, water, melted butter, sugar, and yeast. Mix the flour and salt together in a standing mixer fitted with dough hook. Turn the machine to low and slowly add the milk mixture. After the dough comes together, increase the speed to medium and mix until the dough is shiny and smooth, 6 to 7 minutes. If you think the dough is too wet (i.e. having a hard time forming a cohesive mass), add 2 tablespoons flour at a time and mix until the dough comes together (it should still be on the sticky side, just not overly wet). Coat a large bowl with nonstick cooking spray. Place the dough in the bowl and turn to coat lightly with the cooking spray. Cover the bowl with plastic wrap and let the dough rise until doubled, 1-2 hours (alternately, you can preheat the oven to 200 degrees, turning it off once it reaches 200 degrees and place the covered bowl in the oven to speed up the rising time).
For the sugar coating, while the dough is rising, mix the brown sugar and cinnamon together in a bowl. Place the melted butter in a second bowl or shallow pie plate. Set aside.
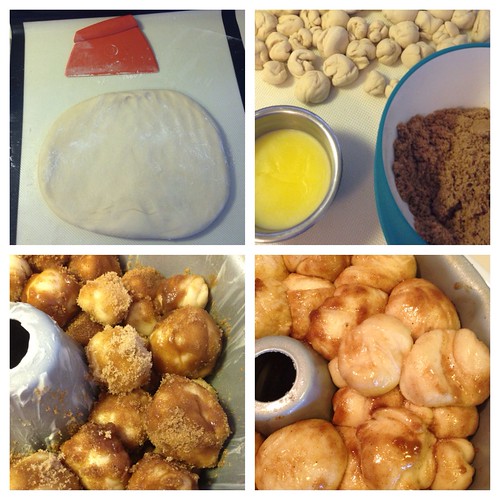
To form the bread, gently remove the dough from the bowl and press it into a rough 8-inch square. Using a bench scraper or knife, cut the dough into 64 pieces.
Roll each dough piece into a ball (it doesn’t have to be perfect, just get it into a rough ball-shape). Working one at a time, dip the balls in melted butter, allowing excess butter to drip back into the bowl or pie plate. Roll the dipped dough ball in the brown sugar mixture, then layer the balls in the Bundt pan, staggering the seams where the dough balls meet as you build layers.
Cover the Bundt pan tightly with plastic wrap and let the monkey bread rise until puffy and they have risen 1-2 inches from the top of the pan, 1-2 hours (again, you can use the warm oven approach to speed this up).
Heat the oven to 350 degrees F (remove the pan from the oven if you placed it there to rise). Unwrap the pan and bake until the top is deep brown and caramel begins to bubble around edges, 30 to 35 minutes. Cool the monkey bread in the pan for 5 minutes (any longer and the bread will be too sticky and hard to remove!), then turn out on a platter or large plate and allow to cool slightly, about 10 minutes.
For the glaze, while the bread cools, whisk the confectioners’ sugar and milk together in a small bowl until the mixture is smooth. Using a whisk, drizzle the glaze over the warm monkey bread, letting it run over the top and sides of the bread. Serve warm.
Recipe from Mel’s Kitchen Cafe.
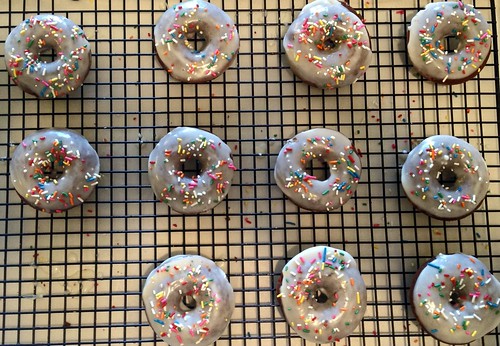
Baked Chocolate Doughnuts with Vanilla Glaze
Print This Recipe
A couple of Sundays ago, I woke up at 8 a.m. instead of my normal 10 a.m. (Hey, I like to sleep in on the weekends!) With no plans aside from laundry until the afternoon, and no AP flour to be found but tons of cake flour, I decided baked doughnuts using cake flour were on my morning agenda.

As expected with baked doughnuts, these taste nothing like the real thing, but are an easy way to feel less guilty about basically eating cake for breakfast. Not too dense, with a rich chocolate flavor, these were easy to make and the perfect Sunday morning treat.
Doughnut Ingredients
1 3/4 cup cake flour
1/3 cup cocoa powder
3/4 cup granulated sugar
2 teaspoons baking powder
1/2 teaspoon salt
3/4 cup milk
2 eggs, lightly beaten
2 tablespoons canola oil
1 teaspoon vanilla extract
Doughnut Preparation
Preheat the oven to 325.
Combine the flour, cocoa powder, sugar, baking powder and salt and whisk together.
Stir in the milk, eggs, oil and vanilla until well combined.
Transfer the batter to a large plastic bag and cut one corner off. Pipe the batter into greased doughnut pans, filling 2/3 of the way.
Bake for 8 to 10 minutes or until springy. Allow to cool in the pans for five minutes, then transfer to a wire rack.
Glaze Ingredients
1/4 cup milk
1 teaspoon clear vanilla extract
2 cups confectioners’ sugar, sifted
Glaze Preparation
Warm the milk and vanilla in a medium saucepan set over low heat.
Add the confectioners’ sugar and whisk slowly until well combined.
Remove from heat and set over a bowl of warm water (you may have to reheat over low heat occasionally).
Dip doughnuts in glaze and place on rack to set.
Doughnut recipe from Cassie Craves.
Glaze recipe from La Mia Vita Dolce.
Challah
Print This Recipe
When I’ve gone down to my parents’ house lately, they’ve had the best challah in their bread drawer to nosh on. I suppose I should note here that there are two types of challah eaters: the ones who slice challah and the ones that pull it apart. My family is pull-aparters, so it’s important that the challah have the right texture because inevitably, the innards will be eaten first.

So, a few days before Yom Kippur, I decided I wanted to give another challah recipe a whirl. This time however, instead of looking at the ingredients, I looked at the photos. I wanted bread where the end result looked doughy, soft, and elastic. This photo in this recipe met all of those criteria.
I’m happy to report I have a new favorite challah recipe, and my sister can attest to the amazing texture. This challah is delicious, and the recipe makes two, so you can easily eat one now and freeze the other for later. Plus, only one rise is required, so it’s super easy!
Photos of the process.
Ingredients
1 1/2 cup warm water, divided
1/4 cup plus 2 teaspoons sugar, divided
2 tablespoons active dry yeast
6 cups flour — either all white or half white whole wheat
2 teaspoons salt
1/4 cup mild honey, plus an extra tablespoon for eggwash, if desired
2/3 cup flavorless vegetable or canola oil
4 eggs, plus one yolk for eggwash, if desired
1 pinch ground cardamom, optional
Preparation
Put 1 cup warm water in a small bowl. Add 2 teaspoons of sugar, sprinkle the yeast over top, swirl the bowl just to combine, and leave it to proof for five minutes.
While yeast is proofing, mix flour, salt, 1/4 cup of sugar and cardamom, if using, in a large bowl (or in the bowl of a stand mixer fitted with the paddle attachment.) Stir to incorporate or blend on low speed.
In a medium bowl, mix remaining water, honey, oil, and eggs.
When yeast has finished proofing, add it to the flour, immediately followed by wet ingredients. Mix with a large wooden spoon or on medium-low speed in the mixer, just until combined, about 30 seconds.
Switch to dough hook and begin to knead on low speed, making sure to incorporate what’s at the bottom of the bowl if the dough hook misses it. If kneading by hand, stir using spoon until dough becomes to thick to stir. Empty dough onto well-floured surface and knead by hand. Knead dough until smooth and no longer sticky, adding flour with a light hand as needed, 7-10 minutes.
Split the dough into two equal pieces. Set each in a large oiled bowl, cover both bowls with plastic wrap or a damp towel, and let rise at room temperature until doubled in size. If using white flour, this should take about 2-2.5 hours. If using white whole wheat, it will take closer to 3.5 or 4. Feel free to let the dough rise in the refrigerator overnight instead; if you do this, be sure to set out the dough in plenty of time before shaping, so it can come to room temperature.
Preheat oven to 375.
After the rise, the dough should be soft and pliable. Separate each mound of dough into three equal balls, for a total of six. Roll each ball into a log almost 1-foot long. Braid the logs together to create your loaf. For the nicest-looking braid, do not pinch the top edges of your logs together before braiding; simply place one log over the next and braid until you reach the bottom, then pinch those edges together. Then, flip the unfinished loaf the long way, so that the unfinished edge is now at the bottom and the loaf has been flipped over and upside down. Finish braiding and pinch these edges together. This way, both ends look identical. Tuck the very tips beneath the loaf when braiding is finished. Repeat with second loaf.
Put each loaf on its own silpat-lined baking sheet. If using eggwash, mix yolk with a 1 tablespoon water and 1 tablespoon honey. Brush over loaves.
Bake at 375 degrees for 20-22 minutes, until challot are golden and baked through.
Recipe from Food 52.
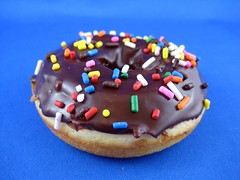
Baked Doughnuts II
Print This Recipe
 When I went to Wilton tent sale, the item I was most excited about was the baked doughnut pan. I had made baked doughnuts in the past, but used a recipe where I had to punch out the doughnuts using two different sized cookie cutters. They were a lot of work, and these pans seemed like an easy workaround!
The pans lived up to my expectations and made the doughnuts much easier to make. But while they look super cute, they aren’t very good. In fact, they’re bland, spongy, and just all around eh. Usually when I bring stuff into work, people are constantly saying how good the treat is. With these, everyone said they looked really good. That’s a bad sign!
Ingredients
2 cups cake flour, sifted
3/4 cup granulated sugar
2 tsp baking powder
1/4 tsp ground nutmeg (I omitted this)
1 tsp salt
3/4 cup buttermilk
2 eggs, lightly beaten
2 Tbsp butter, melted
Preparation
Preheat oven to 425°F. Spray the doughnut pan with nonstick cooking spray.
Sift together cake flour, sugar, baking powder, nutmeg, and salt in a large mixing bowl. Whisk in buttermilk, eggs, and butter and beat until just combined. Fill each doughnut cup until about 2/3 full. (Use a pastry bag if you have one; I wish I had made my life easier.)
Bake 7-9 minutes, or until the top of the donuts spring back when touched. Cool in pan for about 4-5 minutes before removing from pan. Complete donuts with either a dusting of powdered sugar, glaze, or cinnamon-sugar topping.
Glaze Ingredients
1/2 cup chocolate chips
2 tablespoons unsalted butter
2 tablespoons corn syrup
2-3 teaspoons hot water
Glaze Preparation
Microwave on 50% power for about 1 minute, stirring in-between, until melted. Stir in 1 teaspoon hot water until the glaze has thickened. Add another teaspoon hot water if the glaze is too thick.
Recipes from Wilton doughnut pan packaging.