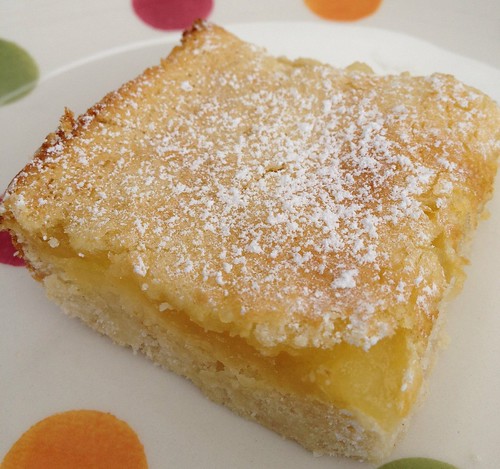
Lemon Bars
Hi, remember me? I used to blog…somewhat regularly…over here, but then, I didn’t. Work has had me traveling. A lot. In the past couple of months I’ve been to Portland, Seattle, Seattle again (at BlogHer Food, were you there?), then Washington DC, Denver, and Phoenix. My weekends have been spent playing catch-up, and baking unfortunately wasn’t on my to-do list.
But then I took few days off this week and went down to San Diego to visit my family and just…relax. I spent much of the time sitting by the pool.

Then saw these lemons sitting on the counter and knew I had to bake lemon…something.

A quick Google search led me to this recipe, and after reading dozens of reviews, I made a few adjustments and the end result is nothing short of delicious. And I don’t even like lemon bars. The crust is thick and buttery and the lemon layer was sweetly tart with a nice texture. I know these will be a summer go-to recipe!
Ingredients
1 cup butter, softened
1/2 cup white sugar
2 cups all-purpose flour
4 eggs
1 1/2 cups white sugar
1/4 cup + 1 TBS all-purpose flour
2/3 cup lemon juice
zest of one lemon
Preparation
Preheat oven to 350 degrees F (175 degrees C).
In a medium bowl, blend together softened butter, 2 cups flour, and 1/2 cup sugar. Press into the bottom of an ungreased 9×13 inch pan. Bake for 15 to 20 minutes in the preheated oven, or until firm and golden.
In another bowl, whisk together the remaining 1 1/2 cups sugar and 1/4 cup + 1 TBS flour. Whisk in the eggs, lemon juice, and zest. Pour over the baked crust.
Bake for an additional 20 minutes in the preheated oven. The bars will firm up as they cool. (You can put them in the fridge as well.)
Recipe adapted from AllRecipes.com.
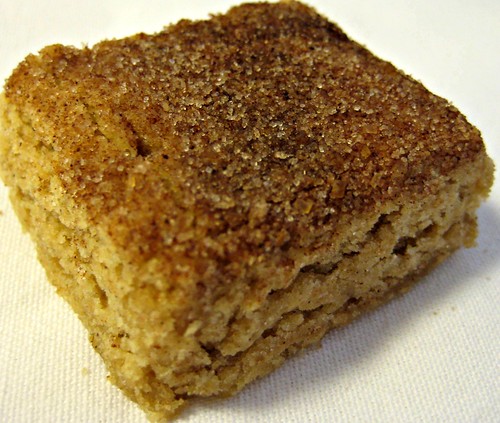
Snickerdoodle Bars
I’m always on the lookout for recipes for those crazy people who claim they don’t like chocolate. (If you’re one of them, I’m sorry, but we can’t be friends.) So I was more than excited when this recipe I was initially skeptical of turned out to be a favorite among chocolate (and non-chocolate) lovers alike.
Imagine a snickerdoodle cookie but cut in squares, chewier, and with a delicious cinnamon sugar crusty top. These bars are perfect for anytime–I originally made them to test out of my coworkers and they were gobbled up in no time, then I made them again for a baby shower and they were a party favorite. If you’re looking for something easy to bring to a BBQ today, make these.
Photos of the process.
Ingredients
2-2/3 cups all-purpose flour
2 teaspoons baking powder
1 teaspoon salt
1 teaspoon cinnamon
¼ teaspoon ground nutmeg
2 cups packed brown sugar
1 cup (8 ounces) unsalted butter, at room temperature
2 eggs
1 tablespoon vanilla extract
2 tablespoons granulated sugar
2 teaspoons cinnamon
Preparation
- Preheat the oven to 350 degrees F. Lightly grease a 9×13-inch baking pan; set aside.
- Whisk together the flour, baking powder, salt, cinnamon and nutmeg in a medium bowl; set aside.
- Beat together the butter and brown sugar on medium speed until light and fluffy, about 5 minutes. Add the eggs one at a time, and then the vanilla. Beat, scraping the bowl, until thoroughly combined. On low speed, gradually add the flour mixture until just combined. Give the dough a final stir with a spatula or wooden spoon to make sure the flour is incorporated.
- Spread the dough evenly into the pan (I used my hands then an offset spatula). Combine the granulated sugar and cinnamon in a small bowl and sprinkle evenly over the top of the batter.
- Bake for 25-30 minutes or until the surface springs back when gently pressed. Cool completely before cutting. Store in an airtight container at room temperature.
Recipe from Brown Eyed Baker.
Salted Caramel Shortbread Bars
 Print This Recipe
I first saw these bars on Pinterest, then my coworker’s girlfriend made them but I couldn’t try them because it was Passover, and now that the holiday is over and I’m actually in town again for a few weeks, I finally found the time to make them. These bars are INSANE.
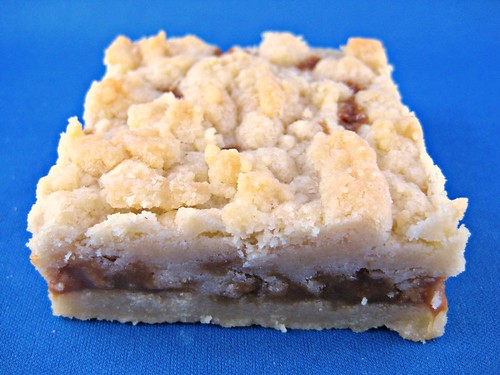
The recipe calls for ONE POUND OF BUTTER, therefore they couldn’t possibly be bad,right? And between the two layers of buttery shortbread there is salted caramel, one of my favorite things in the whole world. And to make everything even better, the recipe is super easy and didn’t take much time.
Speaking of easy, I baked these in Chinet Bakeware which means I cut them right in the baking pan, popped on a lid, and they’re ready to go to the office in the morning–no need to transfer them to another container! Chinet sent me a huge box filled with different types of disposable baking pans and I’m looking forward to trying them all out. Plus, they offered to let me give away a box of bakeware to a reader, so stay tuned for more information and the giveaway!
Shortbread Ingredients
4 sticks (1 lb) salted butter, at room temperature
1 cup white sugar
1 ½ cups confectioners’ sugar
1 tablespoon vanilla
4 cups all-purpose flour
Filling Ingredients
One 14-oz. bag caramel candies, unwrapped
1/3 cup heavy whipping cream
1 tablespoon vanilla
1 tablespoon coarse sea salt
Preparation
- In a large bowl, combine butter and sugars. Using hand-held mixer on medium speed, beat together until creamy. Add vanilla and beat until combined. Sift the flour into the butter mixture and beat on low speed until a smooth soft dough forms.
- Preheat oven to 325 degrees F. Spray a 9×13 baking dish with cooking spray. Press one half of the dough evenly into the pan to form a bottom crust. Place remaining dough in refrigerator.
- Bake until firm and edges are pale golden brown, about 20 minutes. Let cool for 15 minutes. While the bottom crust is baking and the remaining dough is chilling, make the caramel filling. Place the caramels in a microwave-safe bowl.
- Add the cream and vanilla, and microwave on high for 1 minute. Remove from the microwave and stir until smooth. If caramels are not completely melted, microwave on high for 30-second intervals, stirring after each interval, until smooth.
- Pour the caramel filling over the crust. Sprinkle the salt over top. Remove remaining dough from refrigerator and crumble it evenly over the caramel. Return the pan to the oven and bake until the filling is bubbly and the crumbled shortbread topping is firm and lightly golden, about 25-30 minutes. Let cool before cutting into squares.
Recipe adapted from Sticky, Chewy, Messy, Gooey: Desserts for the Serious Sweet Tooth via Pip & Ebby.
Mini Egg Stuffed Sugar Cookies
Print This Recipe
Thanks to Hershey’s, I received my very first ever Easter basket in the mail! For most people, this probably isn’t a big deal, but for me, it was huge! Being Jewish, I don’t celebrate Easter, thus I’ve never had an Easter basket. I happen to love Easter candy, so receiving this basket (that I customized) was incredibly exciting for me. (OK, you can stop the eye rolling now.)
Rather than eat all of the candy myself (what exactly do you do with all of the candy you get at Easter??), I decided to give some away and incorporate the mini Cadbury Creme Eggs into some sort of cookie. A quick Google search led me to some rather strange recipes, but I finally came across this sugar cookie one.

The cookie itself is pretty plain, but combined with the sprinkles or sanding sugar and mini egg in the center, it’s perfectly sweet. I had some issues with the fondant part of the egg melting (resulting in runny eggs, hah), but I have a feeling this could be alleviated by freezing the eggs before wrapping the dough around them. I also made some cookies using Reese’s mini eggs and those stayed completely intact.
Photos of the process.
Ingredients
1/2 cup butter (1 stick), softened
1/4 cup sugar
1 tsp vanilla
dash of salt
1 cup flour
12 pack of mini Cadbury cream eggs, unwrapped and frozen
assorted sprinkles
Preparation
Line baking sheet with parchment paper.
In a large bowl, cream butter, vanilla and sugar.
Add salt and flour, mixing until well combined and soft dough is formed (if the dough is too sticky, add a little more flour).
Roll a tablespoon of dough into a ball and flatten it with your fingers. Place an egg in the center of your dough and gently press the remaining dough around the egg until it’s completely covered. Lightly roll in the palm of your hand to cover smoothly then roll in sprinkles and place on baking sheet.
Repeat until all your eggs have been covered then place in fridge to chill for about 30 minutes. With about 10 minutes left, preheat your oven to 350. Place cookies in oven for about 10-12 minutes; the cookies won’t brown so gently press into one to feel for doneness.
Allow cookies to cool completely.
Yields 12.
Recipe adapted from swEEts by e.
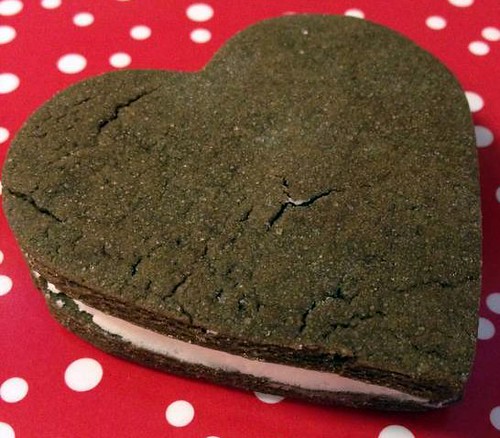
Chocolate Roll-Out Cookies
Print This Recipe
Wanting to make something easy to bring to the office for Valentine’s Day, I decided to finally give this recipe from Smitten Kitchen a whirl. Not needing any special ingredients, I made the dough the day before, whipped up a batch of the cream filling I used for the Homemade Oreos, sandwiched the cookies together, and expected to fall in love.
But I didn’t, I was disappointed.*** (Sorry Deb’s mom.) And well, I likened these cookies to online dating; stay with me for a sec. They’re like the picture where the guy looks friendly and happy then you meet him in person and he’s silently pining over his ex and you kick yourself for wasting your time having drinks when you could have been home in your PJs watching Teen Mom 2. (Don’t lie, you watch it too.) These cookies are cute and nice looking then you try them and you wish you hadn’t wasted your calories. Get it?
Anyway, I found the dough difficult to gather together and roll out–it kept cracking and was really dry. I thought the cookies were a little bland and not very sweet; if I were to make these again I’d sprinkle the cookies with sanding sugar or something to sweeten them up a bit. Of course, I’m curious to see what my coworkers say tomorrow, as they sometimes love things that I’m not very fond of.
***Update: These were a hit at the office. Maybe I just had a bad tasting day or something.
p.s. Happy Valentine’s Day from Nosh With Me!
Cookie Ingredients
3 cups all-purpose flour
1/2 teaspoon salt
1/2 teaspoon baking powder
1 cup unsalted butter, softened
1 1/2 cups sugar
2 large eggs
1 teaspoon vanilla extract
2/3 cup unsweetened cocoa
Cookie Preparation
Preheat oven to 350 degrees. Whisk dry flour, salt and baking powder in bowl and set aside. Mix butter, sugar, eggs, vanilla and cocoa in mixer. Gradually add flour mixture, and mix until smooth. Wrap in plastic and chill for at least one hour.
Roll out cookie dough on floured counter. Cut into desired shapes, brushing extra deposits of flour off the top. Bake on a parchment-lined baking sheet for 8 to 11 minutes (the former for 1/8-inch thick cookies, the latter for 1/4-inch cookies) until the edges are firm and the centers are slightly soft and puffed.
Transfer to a wire rack to cool.
Vanilla-Cream Filling Ingredients
1/4 cup (1/2 stick) room-temperature, unsalted butter
1/4 cup vegetable shortening
2 cups sifted confectioners’ sugar
2 teaspoons vanilla extract
Filling Preparation
Place butter and shortening in a mixing bowl, and at low speed, gradually beat in the sugar and vanilla. Turn the mixer on high and beat for 2-3 minutes until filling is light and fluffy.
Cookie recipe from Smitten Kitchen.