Homemade Moose Munch
 Print This Recipe
Whenever I go to Target, I always snag those pricey little bags of gourmet popcorn with nuts and drizzled with chocolate. Since I’m on a stricter budget right now, I figured this was something I could easily make myself.
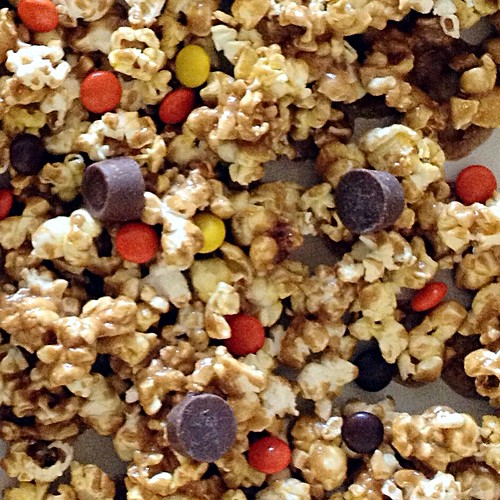
Well, not only was it easy, but it tastes amazing–buttery, rich, and crunchy. And you get to choose your own additions for the mix (what’s better than that?). I opted for Reese’s Pieces for the peanut butter and crunch, and mini Rolos because I figured chocolate and a little extra caramel couldn’t hurt. Unfortunately, the caramel pretty much settled on the bottom of the cookie sheet so it looks ugly (but still tastes delicious). I just broke the pieces apart and no one will ever know. Shhh. Next time I’d probably add mini chocolate chips or something that would melt a little easier.
Ingredients
6 tbsp. butter
3 tbsp. corn syrup
3/4 c. brown sugar
1/4 tsp. vanilla
1/4 tsp. baking soda
1 1/2 – 2 bags popped popcorn
chocolate chips, nuts, M&Ms, etc. to taste
Preparation
Preheat oven to 300º.
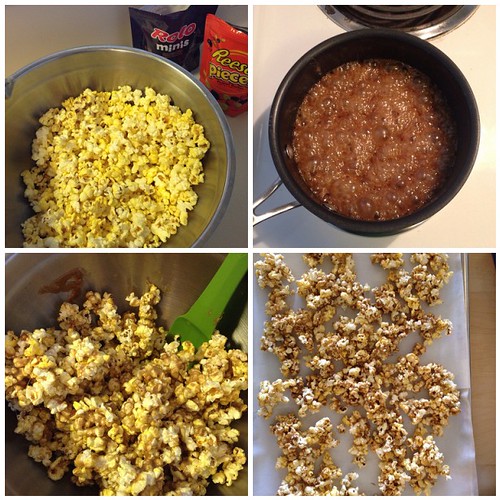
Remove all unpopped kernels from popcorn and pour popcorn into a bowl.
Combine butter, corn syrup, and brown sugar over medium heat. Cook and stir until mixture boils. Continue boiling at a steady rate for 4 minutes without stirring.
Remove from heat and stir in baking soda and vanilla.
Pour caramel over popcorn and stir to coat.
Spread onto greased cookie sheet, and bake for 10-15 minutes (10 for chewy, 15 for crunchy).
Remove from oven and add toppings. Let cool before returning to bowl.
Recipe from Something Swanky.
Conversation Hearts
Print This Recipe
Do you ever wonder what those little conversation hearts you eat around Valentine’s Day would say if they were written by someone deep in the trenches of online dating? TEXT ME! would be CALL ME! I HATE TEXTING! and KISS would become HE GOT CHEEK/CHIN/LIP, WAS THAT A KISS? You get the idea. So when I saw a recipe for homemade conversation hearts, I knew I had to make them and write more practical and current sayings on them.

And I wanted to like them. I really tried. But they taste nothing like the store bought conversation hearts, and while the outside is hard, the inside is kind of soft. In fact, they kind of reminded me of fondant, both in taste and texture. Disappointing.
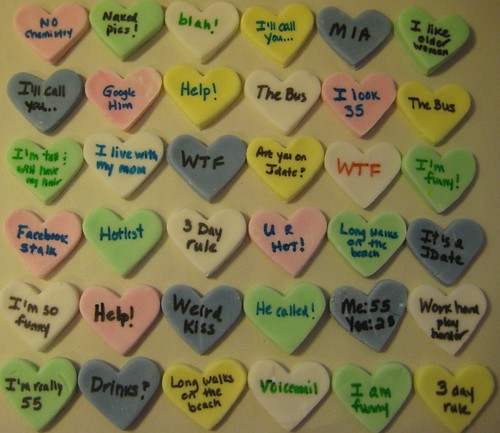
However, a few months ago I bought markers made specifically to write on food, and figured I’d find sometime to use them. I’m so glad I bought them, because the hearts were loads of fun to decorate. I just wish my handwriting was neater. While the marker has a fine point, the part just above the tip is really round which made it difficult. It was still fun though!
Photos of the process here.
Ingredients
1 packet (1/4 oz, or 2 tsp) unflavored gelatin
1/2 cup water
2 tsp light corn syrup
2 lbs powdered sugar, plus additional for dusting
Assorted flavoring extracts of your choice
Assorted food colors of your choice
Heart-shaped cutters
Food coloring markers
Preparation
- Place the corn syrup, gelatin, and water in a small microwave-safe bowl. Stir until the gelatin is well-distributed. Microwave the mixture for 30 seconds, so the gelatin dissolves, and stir well.
- Pour the gelatin mixture into the bowl of a large stand mixer fitted with a paddle attachment. Alternately, if you are using a hand mixer, pour the gelatin mixture into a large bowl. Add 1 cup of powdered sugar and turn the mixer to low, mixing until the sugar is incorporated.
- Once the sugar is mixed in, add another cup of sugar, again mixing on low until it liquefies. Continue to add the remaining powdered sugar, one cup at a time, pausing in between additions to allow the sugar to mix in, until the full two pounds of powdered sugar is added. Periodically, stop the mixer and scrape down the bottom and sides of the bowl. The candy will progress from a thin, watery liquid to a very stiff dough.
- Once all of the sugar is incorporated, dust a work surface (counter or large cutting board) with powdered sugar and scrape the candy out onto the work surface. The candy will be very sticky and stiff. Generously dust the top of the ball of candy with powdered sugar, and begin to knead the candy like bread dough: fold the ball of dough over onto itself, then use the heel of your hand to push it down. Give the candy a quarter-turn, and repeat the process, dusting it with more powdered sugar as often as necessary to prevent it from sticking to the board or your hands. Knead until the candy is satiny and not sticky.
- Decide how many colors/flavors of conversation hearts you want to make, and divide the candy dough into that many portions. To flavor and color the candy, take one of the balls and flatten it into a palm-sized disc. Add a few drops of food coloring and flavoring extract to the center of the disc, and fold it over on itself. (It is a good idea to wear disposable plastic gloves during this step to keep your hands free of colors and odors.) Knead the dough ball, just as you did before, until the color is evenly dispersed throughout the candy, and all streaks have disappeared. Repeat this process with remaining candy balls and colors/flavors, until all of your candy is colored and flavored. (My dough was starting to dry out as it was sitting on the counter so I wrapped each ball in plastic wrap.)
- Dust your work surface and a rolling pin with powdered sugar, and roll out one of the candy balls to your desired thickness. Small store-bought conversation hearts tend to be fairly thick, generally over 1/4” thick. I find that this thickness works well for small hearts (under 1”), but it makes larger heart sizes very substantial and a little overwhelming. However, the thickness is entirely a matter of personal preference and does not affect the taste of the final candy.
- Use heart-shaped cutters to cut hearts out of the rolled candy, and transfer the hearts to a baking sheet lined with parchment paper. Smaller hearts are more realistic, but larger hearts are easier to write messages on. Once you have cut out your hearts, you can re-roll the scraps to get more shapes out of the candy. Repeat with remaining candy balls.
- Allow your hearts to air-dry for at least 24 hours before you write on them. This step is VERY important, because the extra moisture in the hearts will cause the ink to run if you do not let them dry properly.
- After the hearts have dried for a day, use the food writing markers to write messages or draw designs on the hearts. Store your conversation hearts in an airtight container at room temperature.
Recipe from About.com: Candy.
Salted Butter Caramels
Print This Recipe
 As we’ve discussed before, salt and caramel are one of the best combinations ever. Ever. Ever. Ever. EVER. And these caramels may just be the best ever. You should go make them now. Seriously.
I know what you’re saying, “I don’t want to use corn syrup, blah blah blah.” Well, David has some alternatives to corn syrup in his post so go read it, make the caramels, then tell David and myself how much you love us. Ignore what your thighs say, they’re not allowed to have an opinion about this.
Photos of the process here.
Ingredients
3/4 cup (180 ml) heavy cream
1/2 teaspoon vanilla extract, bean paste, or powder
rounded 1/2 teaspoon + 1/4 teaspoon flaky sea salt, preferably fleur de sel
1/2 cup (160 g) light corn syrup, golden syrup (such as Lyle’s) or rice syrup*
1 cup (200 g) sugar
4 tablespoons (60 g), total, salted butter, cubed, at room temperature
Preparation
- Line a 9-inch (23 cm) loaf pan with foil and spray the inside with cooking spray. (I used non-stick foil–that stuff is incredible!)
- Heat cream, two tablespoons butter, vanilla, and 1/2 teaspoon sea salt in a small saucepan until the mixture begins to boil. Remove from heat, cover, and keep warm while you cook the syrup.
- In a medium, heavy duty saucepan (4 quarts, 4l), fitted with a candy thermometer, heat the corn syrup with the sugar and cook, stirring gently, to make sure the sugar melts smoothly. Once the mixture is melted together and the sugar is evenly moistened, only stir as necessary to keep it from getting any hot spots.
- Cook until the syrup reaches 310ºF (155ºC). To get an accurate reading while the syrup is cooking, tilt the saucepan to make sure the bulb of the thermometer is fully submerged in the syrup. (I had never done this before, and that could easily explain why I’ve burned sugar in the past. Good tip from David!)
- Turn off the heat and stir in the warm cream mixture until smooth.
- Turn the heat back on and cook the mixture to 260F (127C).
- Remove the pan from the heat, lift out the thermometer, and stir in the cubes of butter until they’re melted and the mixture is smooth.
- Pour the mixture into the prepared loaf pan and wait ten minutes, then sprinkle 1/4 teaspoon of the sea salt over the top. Set on a cooling rack and let cool completely. Once cool, lift out the foil with the caramel, peel away the foil, and slice the bar of caramel with a long, sharp knife into squares or rectangles.
Storage: These caramels can be individually-wrapped in cellophane or waxed paper. Once cut, they may stick together if not wrapped. Store in an air-tight container, and they’ll keep for about one month.
Recipe from David Lebovitz.
Penuche
Print This Recipe
 I originally saw this recipe over at Baking With Dynamite and immediately knew I wanted to make it. I love brown sugar, I love fudge, what’s not to like, right? RIGHT. This stuff is good.
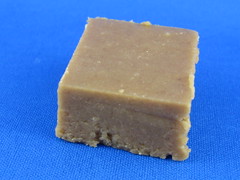
And apparently I’m the only person who has never heard of penuche. I brought the reject pieces into the office and one of my coworkers declared, “Dude you just took me to Mexico right now,” and said his grandmother used to make penuche for him when he was younger. Then a coworker from England told me about a little market near where her mother lives, and each time she went there she would buy penuche.
As I’ve mentioned before, I grew up in Michigan and would go to Mackinac Island every summer. Mackinac is known for all of their fudge shops, so I’m pretty sure I must have seen penuche there when I was a kid. Or not, because I’m fairly certain I would have remembered this caramel-y, melt in your mouth sweet. And sweet it is! A tiny little piece goes a long, long way.
Photos of the process here.
Ingredients
1 lb brown sugar (about 2 1/4 cups, firmly packed)
3/4 cup milk
1/8 teaspoon salt
2 1/2 tablespoons unsalted butter
1 teaspoon vanilla
1/2 cup chopped walnuts or pecans (optional)
Preparation
Grease 9x5x2-inch loaf pan; set aside.*
Combine sugar, milk and salt in heavy 2-quart saucepan. Place over medium heat, stirring until sugar dissolves. Wipe sugar crystals from side of pan as necessary. Cook without stirring until candy reaches 238°F or soft ball stage. Remove from heat; add butter. Without stirring, cool to 110°F or lukewarm.
Add vanilla and nuts. Stir continuously until thick and creamy. Spread into prepared pan at once. When firm, cut into squares. Store in airtight container.
Makes 24 pieces or (1 1/4 lbs).
*I would probably use an 8×8-inch pan and line it with parchment paper next time. I had a hard time cutting the fudge in the loaf pan, and parchment would make it easy (or easier) to pull out in one piece and cut on a cutting board.
Recipe from Domino Sugar via Baking With Dynamite.
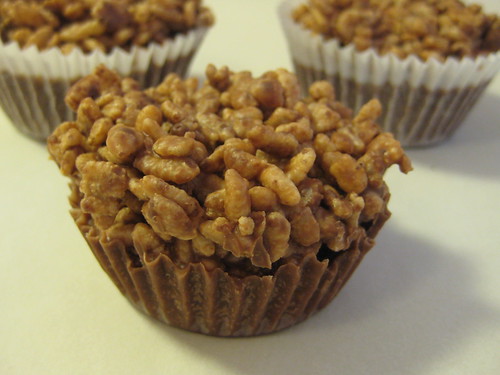
Chocolate Crackles
Print This Recipe
The last time my friend Jess came to visit me from Australia, I introduced her to Rice Krispies Treats. She in turn couldn’t wait to introduce me to Chocolate Crackles (like Rice Krispies Treats, the Chocolate Crackles recipe is on the back of the Rice Bubbles (what Kellogg’s calls Rice Krispies there) box. However, she said they could only be made with Copha, a refrigerated coconut shortening, or something equivalent. We did a bit of research and found that Crisco wouldn’t work, and Copha was nowhere to be found in the United States. I offered up this solid coconut oil I saw at my local grocery store, but Jess had her doubts, and Carly (another Aussie), suggested Palmin, the German equivalent to Copha. After more research, we located a place in LA that sold Palmin.
So earlier this week, Carly and I trekked down to Torrance (a good 30 minutes from Hollywood) to go to the market at Alpine Village (a German village/tourist attraction) to purchase the Palmin. Side note: we also stopped at King’s Hawaiian restaurant. HOT and FRESH King’s Hawaiian bread–YUM! Anyway, since we had to stop at the grocery to purchase Rice Krispies on the way home, I suggested we buy a container of the coconut oil and do a quarter test recipe with that as well.
What did we learn? Chocolate Crackles can now become an American sensation, because the coconut oil worked just as well, perhaps even better, than the Palmin. As for the crackles, they are super easy to make and absolutely delicious and remind me of Star Crunch or the 100 Grand candy bar, just without the caramel. I highly recommend making them NOW. Thank you Jess and Carly!
Photos of the process here.
Ingredients
4 cups Rice Krispies
1 1/2 cups powdered sugar
3 tablespoons cocoa
1 cup shredded coconut, optional (I omitted this)
250 grams solid coconut oil (I used LouAna brand)
Preparation
- In a large bowl, mix the Rice Krispies, powdered sugar, cocoa, and coconut (if using).
- Over low heat, melt the coconut oil in a saucepan and allow to cool slightly.
- Add to Rice Krispies mixture and stir until well combined.
- Spoon mixture into cupcake liners and refrigerate until firm.
Keep refrigerated until ready to serve. I’m not sure how many it’s supposed to make, but I used 12 regular cupcake liners. You could easily make them smaller and get 24, or use mini liners.
Recipe from my friend, but it’s all over the Internet as well.