Homemade Moose Munch
 Print This Recipe
Whenever I go to Target, I always snag those pricey little bags of gourmet popcorn with nuts and drizzled with chocolate. Since I’m on a stricter budget right now, I figured this was something I could easily make myself.
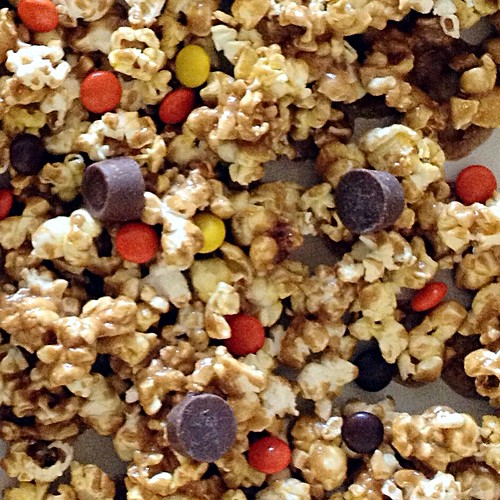
Well, not only was it easy, but it tastes amazing–buttery, rich, and crunchy. And you get to choose your own additions for the mix (what’s better than that?). I opted for Reese’s Pieces for the peanut butter and crunch, and mini Rolos because I figured chocolate and a little extra caramel couldn’t hurt. Unfortunately, the caramel pretty much settled on the bottom of the cookie sheet so it looks ugly (but still tastes delicious). I just broke the pieces apart and no one will ever know. Shhh. Next time I’d probably add mini chocolate chips or something that would melt a little easier.
Ingredients
6 tbsp. butter
3 tbsp. corn syrup
3/4 c. brown sugar
1/4 tsp. vanilla
1/4 tsp. baking soda
1 1/2 – 2 bags popped popcorn
chocolate chips, nuts, M&Ms, etc. to taste
Preparation
Preheat oven to 300º.
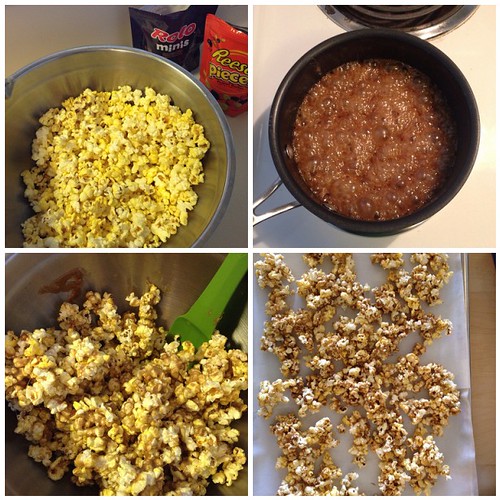
Remove all unpopped kernels from popcorn and pour popcorn into a bowl.
Combine butter, corn syrup, and brown sugar over medium heat. Cook and stir until mixture boils. Continue boiling at a steady rate for 4 minutes without stirring.
Remove from heat and stir in baking soda and vanilla.
Pour caramel over popcorn and stir to coat.
Spread onto greased cookie sheet, and bake for 10-15 minutes (10 for chewy, 15 for crunchy).
Remove from oven and add toppings. Let cool before returning to bowl.
Recipe from Something Swanky.
Salted Brown Butter Rice Krispies Treats
Print This Recipe
 While down in San Diego at my parents’ house for Mother’s Day weekend, I happily discovered the last few Rice Krispies Treats my sister had made sitting on the kitchen counter. Knowing they weren’t going to last long, and in the mood to make something easy yet delicious, I thought it was the perfect opportunity try this adult twist on Rice Krispies Treats.
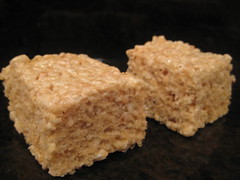
While these may look like your typical Rice Krispies Treats, they’re definitely not. Sure, they’re sweet and chewy just like the original, but when you’re least expecting it, the salt makes a very welcome appearance. And while I didn’t really notice any difference from browning the butter, I’m not complaining. These treats are yummy!
Photos of the process here.
Ingredients
4 ounces (1/4 pound or 1 stick) unsalted butter, plus extra for the pan
1 10-ounce bag marshmallows
Heaping 1/4 teaspoon coarse sea salt
6 cups Rice Krispies cereal (about half a 12-ounce box)
Preparation
Butter (or coat with non-stick spray) an 8-inch square cake pan with 2-inch sides.
In a large pot, melt butter over medium-low heat. It will melt, then foam, then turn clear golden and finally start to turn brown and smell nutty. Stir frequently, scraping up any bits from the bottom as you do. Don’t take your eyes off the pot as while you may be impatient for it to start browning, the period between the time the butter begins to take on color and the point where it burns is often less than a minute.
As soon as the butter takes on a nutty color, turn the heat off and stir in the marshmallows. The residual heat from the melted butter should be enough to melt them, but if it is not, turn it back on low until the marshmallows are smooth.
Remove the pot from the stove and stir in the salt and cereal together. Quickly spread into prepared pan.
Let cool and cut into squares.
Recipe from Smitten Kitchen.
Sugared Peanuts
Print This Recipe
 When I was kid, every year just before Labor Day my dad and I were among the first people to visit The Franklin Cider Mill when it opened for the season. We would gorge ourselves on fresh apple cider (you could even watch the wheel crush the apples!) and hot greasy doughnuts, fresh from the fryer. And there was always a caramel apple that would find its way to our house too.
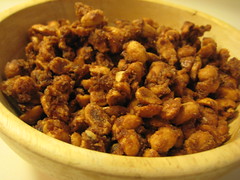
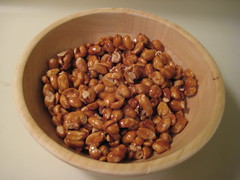
You’re probably wondering why I’m telling you about a cider mill in a post about peanuts, aren’t you? Well, it’s the smell. The smell of the sugar and spices coating the peanuts while heating in the oven smelled exactly like the cider mill. And for a few hours, my apartment here in Los Angeles smelled like my childhood in Michigan. Trippy. And delicious.
And so are these peanuts. Of course, the original recipe called for pecans, but I’m not a fan so I subbed in peanuts. I’m pretty sure you could use most kinds of nuts. Anyway, these are the kinds of nuts that would go well in a salad, but trust me, they’re just as yummy going straight from your hand to your mouth!
Ingredients
1/2 cup butter or margarine, melted
2 egg whites
1/2 teaspoon salt
1 cup sugar
1 1/2 teaspoons apple pie spice
1 pound peanuts
Preparation
- Preheat oven to 325°F. Pour butter into a 15 1/2×10 1/2×1-inch jelly roll pan. (I used a Silpat on top of parchment on the pan because my cookie sheet has seen better days.)
- In large bowl, beat egg whites and salt until foamy. Gradually add sugar and apple pie spice, beating just until blended. Add peanuts and stir to coat.
- Spread peanuts in a single layer in prepared pan. Bake about 30 minutes or until peanuts are crisp and butter is absorbed, turning peanuts over with a metal spatula every 10 minutes. Cool peanuts on baking sheet until crisp, about 2 hours. Store tightly covered.
Makes about 4 cups.
Recipe adapted from Domino Sugar.
Applesauce
Print This Recipe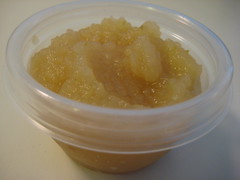
I hate applesauce. Mushed apples and water? Blech. I like my apples crisp with a nice crunch when I bite into them. So when I noticed the apples in my fridge (yes, I keep apples in the fridge) were going soft, I knew I had to do something with them. And since I had over-ripe bananas in the freezer, I figured this was the perfect time to make applesauce to use in a low fat banana muffin recipe (coming soon!) I had bookmarked earlier in the week.
I scoured the Internet for applesauce recipes and with the help of Rachel over at Coconut & Lime (she’s so patient!), I got to work. I was pleasantly surprised to learn applesauce is extremely easy to make (and not so surprised to find that I still don’t like it). I didn’t add much sugar since I knew I was going to bake with it, but if you’re planning to eat it and are using tart apples, throw it in. Also, I divided it into small individual Glad containers which I froze to use in future recipes.
Ingredients
4 apples (I used Fujis)
1/2 cup water
1/4 cup sugar, optional
1/2 teaspoon cinnamon, optional
Preparation
- Peel, core, and slice apples.
- In a saucepan over medium heat, combine apples, water, sugar, and cinnamon. Cover and cook for 20-30 minutes, or until the apples are soft enough to mash.
- Mash with a fork (or pulse in a food processor like I did).
Yields approximately three cups.
Candied Peanuts
Print This Recipe
 I was in the mood for something sweet and salty to snack on while watching the Olympics, but unfortunately didn’t have anything that fit the bill in my house. So, I made these.
Only three ingredients, and pretty easy if you don’t burn yourself with hot sugar like I did the previous time. While they are a little tedious (stir constantly, look for the color to change, stir again), they are worth the wait!
Pictures of the process here.
Ingredients
1/3 cup sugar
3 tablespoons water
1 ½ cups salted peanuts
Peparation
Have a parchment – or, better yet, a silicone mat-lined baking sheet at the ready, as well as a long-handled wooden spoon (you’ll be cooking sugar that will climb to over 300 degrees F, so you’ll want to keep as far away from it as possible) and a medium (about 2-quart) heavy-bottomed sauce pan.
Put the sugar and water in the saucepan and cook over medium-high heat, stirring, until the sugar dissolves. Keeping the heat fairly high, continue to cook the sugar, without stirring, until it just starts to color. (If sugar splatters onto the sides of the saucepan, wash down the splatters with a pastry brush dipped in cold water.) Toss in the peanuts and immediately start stirring. Keep stirring, to coat the peanuts with the sugar. Within a few minutes, they will be covered with sugar and turn white – keep stirring until the sugar turns back into caramel. When the peanuts are coated with a nice deep amber caramel, remove the pan from the heat and turn the nuts out onto the baking sheet, using the wooden spoon to spread them out as best you can. Cool the nuts to room temperature. When they are cool enough to handle, separate the nuts or break them into small pieces.
Recipe part of the Snickery Squares recipe.