The Perfect Apple Pie
 Print This Recipe
Over the years, I’ve tried various pie crust recipes–butter only, shortening only, butter and shortening combination–and have finally found the perfect one. The use of both butter and shortening gives this recipe the kind of flaky, buttery crust that apple pie dreams are made of. The filling is layers of apples and delicious goo (as my family refers to it) with just the right amount of sweetness. Perfection.

This recipe is actually a mashup of two recipes I’ve made in the past. I used the filling from one and crust from another, with a little tweaking to make it just right. The crust is foolproof, easy to work with, and versatile–I’ve used it to make lattice crusts as well as cut outs, so have fun with it.
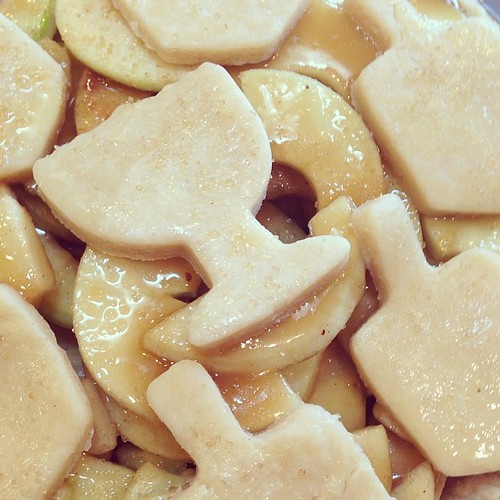
I used dreidel and menorah cut outs for one of the pies. It was Thanksgivukkah after-all! p.s. See that goo? Yum!
During Thanksgiving dinner, this pie was declared “the perfect apple pie” by everyone at the table, so my apple pie recipe search is officially over. I hope you enjoy it as much as we did!
Crust Ingredients
3 cups all-purpose flour
2 tablespoons sugar
3/4 teaspoon salt
3/4 cup (1 1/2 sticks) cold unsalted butter, cut into 1/4-inch pieces
1/4 cup cold vegetable shortening, cut into pieces
1/2 cup cold water
Crust Preparation
Combine the flour, sugar, and salt in a food processor; pulse several times to mix. Remove the lid and scatter the butter pieces over the dry ingredients. Pulse the machine 5 or 6 times to cut in the butter.
Remove the lid and fluff the mixture with a fork, lifting it up from the bottom of the bowl. Scatter the shortening pieces over the flour and pulse the machine 6 or 7 times. Remove the lid and fluff the mixture again.
Drizzle half of the water over the flour mixture and pulse the machine 5 or 6 times. Remove the lid, fluff the pastry, and sprinkle on the rest of the water. Pulse the machine 5 or 6 times more, until the pastry starts to form clumps. Overall, it will look like coarse crumbs. Dump the contents of the processor bowl into a large mixing bowl.
Test the pastry by squeezing some of it between your fingertips. If it seems a little dry and not quite packable, drizzle a teaspoon or so of cold water over the pastry and work it in with your fingertips. Using your hands, pack the pastry into 2 balls, as you would pack a snowball. Make one ball slightly larger than the other; this will be your bottom crust. Knead each ball once or twice, then flatten the balls into ¾-inch-thick disks on a floured work surface. Wrap the disks in plastic wrap and refrigerate for at least 1 hour before rolling. About 10 minutes before rolling, transfer the pastry to the freezer to make it even firmer.
Roll the bottom crust to fit a 9-inch pan and chill for 15 minutes before baking.
Filling Ingredients
1 recipe pastry for a 9 inch double crust pie
1/2 cup unsalted butter
3 tablespoons all-purpose flour
1/4 cup water
1/2 cup white sugar
1/2 cup packed brown sugar
5-6 Granny Smith apples – peeled, cored and sliced
1 tsp cinnamon (optional)
Turbinado sugar for sprinkling
Filling and Assembly
Preheat oven to 350 degrees F.
Pre-bake the bottom crust for 15 minutes, using pie weights on top of a piece of parchment paper.
Peel, core, and slice apples. Add cinnamon and mix. Set aside.
Melt butter in a saucepan then stir in flour to form a paste. Add water, white sugar, and brown sugar, and bring to a boil. Reduce temperature and let simmer.
Place pie plate on cookie sheet (to catch drips while baking). Fill bottom crust with one layer of apples, pour 1/3 of the filling liquid over the apples, then repeat with a second layer. Cover with a lattice top crust (or cut outs) and gently pour the remaining filling liquid over the crust. Sprinkle crust with turbinado sugar.
Bake 20 minutes at 350 degrees F, then reduce the temperature to 325 degrees F. Continue baking for 25 to 45 minutes, or until apples are soft.
Crust recipe adapted from Apple Pie by Ken Haedrich. Filling recipe adapted from All Recipes.
Peach Cobbler
Print This Recipe
When I’m down in San Diego visiting my parents, I always jump at the chance to bake in their amazing kitchen, and my parents are usually willing guinea pigs. Since it’s stone fruit season, I figured a peach cobbler was the way to go.
I have to admit, I’ve never been much of a cooked fruit fan, unless we’re talking apples. But this recipe received five stars from my family, and my dad kept asking, “Have you photographed it yet?” because the house smelled so good!*
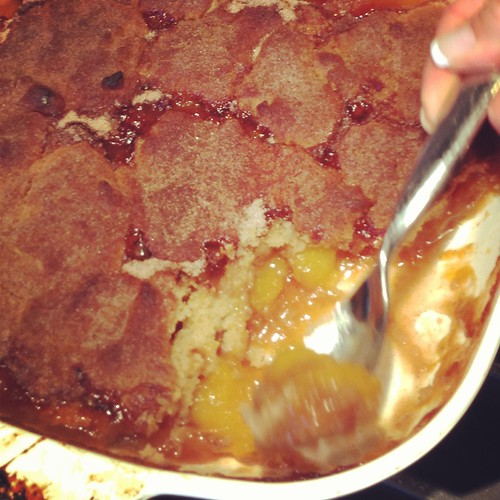
My mom got caught in the act.
While this cobbler didn’t sway me on cooked peaches, my mom declared it “perfect” and the next day, my dad immediately pulled it out of the fridge to let it come to room temperate as soon as he got home from work. And for you non-cooked fruit eaters like me, the crust topping is the best ever, I think maybe because it’s made with both white and brown sugar. Yeah, I may have picked at the top while everyone else enjoyed the peaches, don’t judge.
Finally, here’s an amazing tip that I’m probably the last to know: To easily peel peaches, place one peach at a time in a pot of boiling water, let cool for about a minute, then peel the skin off using your fingers. It’s like magic, and perfect for people like me whose knife skills leave a lot to be desired.
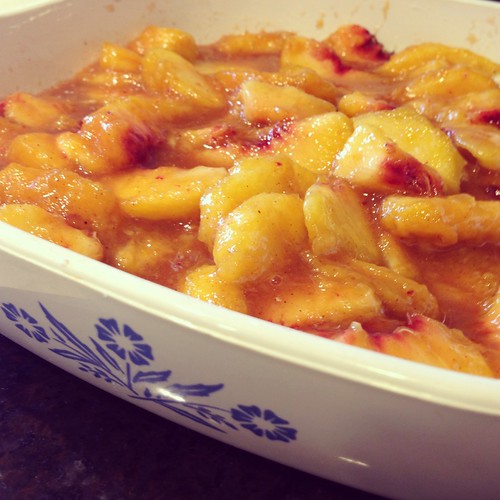
Note: the peaches I used were nowhere near ripe, but they worked beautifully in this cobbler.
*You know you’re a food blogger when people ask you that before daring to taste anything, right?
Filling Ingredients
8 small (or 6 large) fresh peaches – peeled, pitted and sliced into thin wedges
1/4 cup white sugar
1/4 cup brown sugar
1/4 teaspoon ground cinnamon
1/8 teaspoon ground nutmeg
1 teaspoon fresh lemon juice
2 teaspoons cornstarch
Crust Ingredients
1 cup all-purpose flour
1/4 cup white sugar
1/4 cup brown sugar
1 teaspoon baking powder
1/2 teaspoon salt
6 tablespoons unsalted butter, chilled and cut into small pieces
1/4 cup cold water
Cinnamon Sugar Mixture Ingredients
3 tablespoons white sugar
1 teaspoon ground cinnamon
Preparation
Preheat oven to 400 degrees F.
In a large bowl, combine peaches, 1/4 cup white sugar, 1/4 cup brown sugar, 1/4 teaspoon cinnamon, nutmeg, lemon juice, and cornstarch. Toss to coat evenly, and pour into a 2 quart baking dish. Bake in preheated oven for 10 minutes.
Meanwhile, in a large bowl, combine flour, 1/4 cup white sugar, 1/4 cup brown sugar, baking powder, and salt. Blend in butter with your fingertips, or a pastry blender, until mixture resembles coarse meal. Add a few teaspoons of water at a time, until the mixture is just combined.
Remove peaches from oven, and drop spoonfuls of topping over them. Sprinkle entire cobbler with the sugar and cinnamon mixture. Bake until topping is golden, about 25-30 minutes.
Recipe adapted from All Recipes.
Apple Tart with Salted Caramel
Print This Recipe
I first made this tart for an office Thanksgiving potluck so I could test it out before Thanksgiving and it was an enormous hit. Everyone was raving about it and asked for the recipe, which is always a good sign. Because it uses packaged puff pastry, it’s pretty much no-fail, and super quick to whip up.
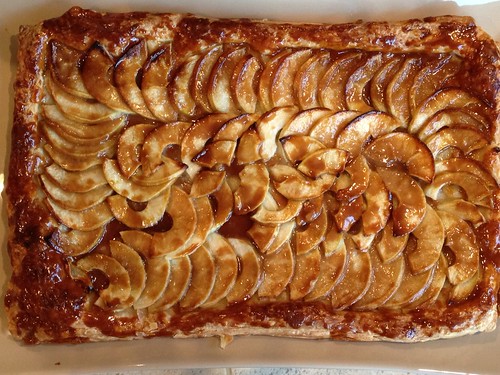
I kept calling the tart “rustic,” because while the quasi-mosaic part is pretty, the crust isn’t exactly picture perfect. But what it lacks in looks, it definitely makes up for in buttery, flaky, salty, sweet goodness.
Note: I used one package of Pepperidge Farm puff pastry and put the two sheets on top of each other before rolling.
Tart Base Ingredients
14-ounce package puff pastry, defrosted in fridge overnight
3 large or 4 medium apples (about 1 1/4 pounds)
2 tablespoons granulated sugar
2 tablespoons unsalted butter, cold, cut into small bits
Salted Caramel Glaze Ingredients
1/4 cup granulated sugar
2 tablespoons unsalted butter (or salted, but then ease up on the sea salt)
1/4 teaspoon flaky sea salt (or half as much table salt)
2 tablespoons heavy cream
Preparation
Heat your oven to 400°F. Line a rimmed baking sheet or jelly roll pan with parchment paper. Ideally you would use a 10×15-inch jelly roll pan. A smaller pan will make a thicker tart (and you might need fewer apples).
Lightly flour your counter and lay out your pastry. Flour the top and gently roll it until it fits inside your baking sheet, and transfer it there. If you roll it bigger, just trim the edges.
Peel, core, and slice the apples. (Deb suggested using a mandolin but I used one of those all in one peel/core/slice thingies and it worked just fine.) Leaving a 1/2-inch border, fan the apples around the tart in slightly overlapping concentric rectangles — each apple should overlap the one before so that only about 3/4-inch of the previous apple will be visible — until you reach the middle. Sprinkle the apples evenly with the first two tablespoons of sugar then dot with the first two tablespoons butter.
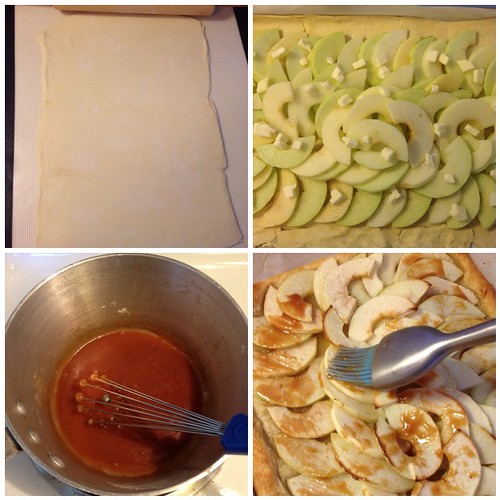
Bake for 30 minutes, or until the edges of the tart are brown and the edges of the apples begin to take on some color. If you sliced your apples by hand and they were on the thicker side, you might need a little more baking time to cook them through. The apples should feel soft, but dry to the touch. If your puffed pastry bubbles dramatically in any place during the baking time, simply poke it with a knife or skewer so that it deflates.
Meanwhile, about 20 minutes into the baking time, make your glaze. In a small saucepan over medium-high heat, melt your last 1/4 cup sugar; this will take about 3 minutes. Cook the liquefied sugar to a nice copper color, another minute or two. Off the heat, add the sea salt and butter and stir until the butter melts and is incorporated. Add the heavy cream and return to the stove over medium heat. Cook, stirring constantly, until you have a lovely, bronzed caramel syrup, just another minute, two, tops. Set aside until needed. You may need to briefly rewarm it to thin the caramel before brushing it over the tart.
After the tart has baked, transfer it to a cooling rack, but leave the oven on. Using very short, gentle strokes, and brushing in the direction that the apples fan to mess up their design as little as possible, brush the entire tart, including the exposed pastry, with the salted caramel glaze.
Return the apple tart to the oven for 5 to 10 more minutes, until the caramel glaze bubbles. Let tart cool complete before cutting into 12 squares.
Recipe from Smitten Kitchen.
Chocolate Salted Caramel Tartlets
Print This Recipe
And…my obsession with chocolate and salted caramel continues.
When David Lebovitz posted this recipe, my aunt immediately asked me if I had been to the bakery (Little Flower Cafe) he referenced in his post. Sadly, I have not, but it is now on my list of places to try. Since David shared a recipe adapted from one of the Little Flower Cafe recipes, I figured making the recipe could tide me over until I find a friend willing to schlep to Pasadena with me.
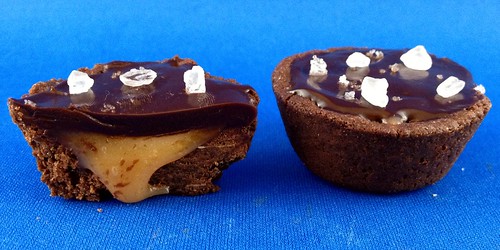
While these tartlets are a bit time consuming, they are not only delicious but absolutely gorgeous. My coworkers were oohing and aahing over them at the office, and their small size makes it perfectly acceptable to have one or two. Or three. Or um, maybe four. They’re a great party dessert too, because they’re easy to hold and won’t last for more than a few bites. In fact, I may bring these to my friends’ annual New Years Eve party.
Chocolate Dough Ingredients
4 ounces (115g) unsalted butter, at room temperature
1/2 cup (100g) sugar
1 large egg, at room temperature
1/2 teaspoon salt
1/2 teaspoon vanilla extract
3/4 cup (110g) all-purpose flour
1/4 cup (35g) rice flour (or use 1 cup, 140g, all-purpose flour, total)
6 tablespoons (50g) cocoa powder, natural or Dutch-process
Salted Caramel Filling Ingredients
4 ounces (115g) soft, salted butter caramels
3 tablespoons (45ml) heavy cream
Ganache Ingredients
4 1/2 ounces (130g) bittersweet chocolate, chopped
6 tablespoons (90ml) heavy cream
flaky sea salt
Preparation
- To make the tartlet dough, beat the butter and the sugar just until smooth in the stand mixer with the paddle attachment, or by hand. Add the egg, salt, and vanilla, and beat until smooth. In a separate bowl, whisk together the all-purpose flour, rice flour, and cocoa powder, then mix it into the creamed butter.
- Butter the indentations of two mini-muffin tins with 12 places in each, or one mini-muffin tin with 24 places. Pinch off pieces of dough and roll each into a 3/4-inch (2cm) ball. As you work, put the dough balls in the indentations of the muffin tins. Take your thumb and press the dough down in the center of each indentation, then use your thumb to press the dough up the sides. (If the dough is sticky, dampen your thumb very lightly with water or oil.) Freeze the pans of dough for 20 minutes.
- Preheat the oven to 350ºF (180ºC).
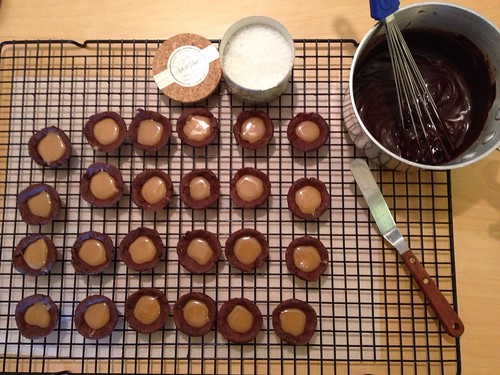
- Bake the tartlet shells for 8 to 10 minutes, until the dough appear dry and cooked. Remove from oven and use the handle of a wooden spoon to widen and smooth the inside of the little tartlet shells, pressing the dough that’s puffed up somewhat firmly against the sides. Let cool completely, then remove the tartlet shells from the muffin tins – the tip of a paring knife might be needed to help aid them out – and set them on a wire cooling rack.
- Make the caramel filling by warming the cream with the caramels in a small saucepan over low heat, stirring, until the caramels are melted and the mixture is smooth. Divide the caramel into each of the tartlet shells.
- Make the chocolate ganache by heating the cream in a small saucepan. Remove from heat and add the chopped chocolate. Let it sit for a minute, then whisk the chocolate into the cream until the mixture is smooth.
- Top each tartlet with some of the ganache and take a butter knife or small metal spatula and swipe off the excess. Sprinkle each tartlet with a few grains of sea salt.
Recipe by David Lebovitz.
Take 5 Candy Bar Pie
Print This Recipe
Happy Pi(e) Day!
Have you ever had a Take 5 candy bar? It’s one of those treats that satisfies any salty sweet craving you may have because it’s filled with pretzels, caramel, peanuts, and peanut butter then covered in chocolate. Yes, it’s as amazing as it sounds. Needless to say, when I saw Brown Eyed Baker’s tweet about a Take 5 candy bar pie recipe, I knew it had to be bumped to the top of my to-make list.

These pies are amazing. Salty, sweet, gooey, crunchy–they’re perfect! Because I love everything mini, I made my pies in mini tart tins. Unfortunately, the crusts did not hold up well at all (major crumble) and I’m not sure if it’s because the pretzel crumbs were so fine or because I used the tart tins, but I think if when I make these again, I’ll leave the pretzels in chunks rather than finely grind them.
Pretzel Crust Ingredients
4 ounces pretzel sticks, finely ground in a food processor or blender
½ cup unsalted butter, melted
2 tablespoons granulated sugar
Caramel Sauce Ingredients
¾ cup granulated sugar
¼ cup water
2 tablespoons light corn syrup
¾ cup heavy cream, warmed
2 tablespoons unsalted butter, cubed
Pie Ingredients
½ cup creamy peanut butter, melted
1/3 cup prepared caramel sauce
¼ cup coarsely chopped peanuts
10 ounces semisweet chocolate, melted
Crust Preparation
Preheat oven to 350 degrees. Stir together the ground pretzels, melted butter, and sugar. Press the mixture firmly into the bottom and up the sides of a 9-inch pie pan. Bake for 10 minutes. Remove from the oven and chill in the refrigerator until firm, 45 minutes to 1 hour.
Caramel Sauce Preparation
Whisk the sugar, water, and corn syrup in a medium-size heavy saucepan until well combined. Bring to a boil over medium-high heat. Cook the sugar mixture, without stirring, until it becomes a rich caramel color, 5 to 10 minutes. Remove from the heat and slowly whisk in the cream until the caramel sauce is smooth, using caution as the mixture may bubble up. (If the sauce seizes, stir it over low heat until the hardened caramel is melted.) Whisk in the butter and set aside.
Assemble the Pie
Smooth the warmed peanut butter evenly over the bottom of the pretzel crust. Refrigerate for 10 minutes. Pour the caramel sauce over the peanut butter layer and gently spread with the back of a spoon. Sprinkle the chopped peanuts over the caramel layer. Refrigerate for another 10 minutes. Finish with a smooth layer of melted chocolate. Refrigerate the pie until the chocolate is firm, about 30 minutes.
Pie can then remain at room temperature until serving. If you have leftovers, cover with plastic wrap and keep at room temperature or in the refrigerator.
Recipe from Brown Eyed Baker.