Salted Caramel Apple Pie
 Print This Recipe
Remember the super nice folks that sent me the Holiday Cookbooks? Well, they also sent me two amazing pie cookbooks. (Stay tuned for your chance to win them!).

Since I already had a pie recipe in mind, I decided to give one of the many crust recipes in the cookbooks a try. I settled on a butter/shortening recipe, because those are usually may favorite and the easiest to work with for pie crust novices like me. Have I mentioned lattice pie crusts are the bane of my existence? I had pretty much given up on ever making a pretty one.
Well, much to my surprise, this lattice top looks pretty damn nice and my coworkers kept complimenting me on it. The dough was easy to work with which made it easy to lay the strips down without breakage, and the finished product is buttery and flakey thanks to the butter and shortening combination. The salted caramel in the pie was a nice addition, and the lemon juice added just enough tartness to keep it from being cloyingly sweet.
This is definitely a pie I’ll be making again soon!
Crust Ingredients
3 cups all-purpose flour
2 tablespoons sugar
3/4 teaspoon salt
3/4 cup (1 1/2 sticks) cold unsalted butter, cut into 1/4-inch pieces
1/4 cup cold vegetable shortening, cut into pieces
1/2 cup cold water
Crust Preparation
- Put the flour, sugar, and salt in a food processor; pulse several times to mix. Remove the lid and scatter the butter pieces over the dry ingredients. Pulse the machine 5 or 6 times to cut in the butter.
- Remove the lid and fluff the mixture with a fork, lifting it up from the bottom of the bowl. Scatter the shortening pieces over the flour and pulse the machine 6 or 7 times. Remove the lid and fluff the mixture again.
- Drizzle half of the water over the flour mixture and pulse the machine 5 or 6 times. Remove the lid, fluff the pastry, and sprinkle on the rest of the water. Pulse the machine 5 or 6 times more, until the pastry starts to form clumps. Overall, it will look like coarse crumbs. Dump the contents of the processor bowl into a large mixing bowl.
- Test the pastry by squeezing some of it between your fingertips. If it seems a little dry and not quite packable, drizzle a teaspoon or so of cold water over the pastry and work it in with your fingertips. Using your hands, pack the pastry into 2 balls, as you would pack a snowball. Make one ball slightly larger than the other; this will be your bottom crust. Knead each ball once or twice, then flatten the balls into ¾-inch-thick disks on a floured work surface. Wrap the disks in plastic wrap and refrigerate for at least 1 hour before rolling. About 10 minutes before rolling, transfer the pastry to the freezer to make it even firmer.
To mix by hand: Combine the flour, sugar, and salt in a large mixing bowl. Toss well, by hand, to mix. Scatter the butter over the dry ingredients; toss. Using a pastry blender or 2 knives, cut the butter into the flour until it is broken into pieces the size of split peas. Add the shortening and continue to cut until all of the fat is cut into small pieces. Sprinkle half of the water over the dry mixture; toss well with a fork to dampen the mixture. Add the remaining water, 1 tablespoon at a time, and continue to toss and mix, pulling the mixture up from the bottom of the bowl on the upstroke and gently pressing down on the downstroke. Pastry made by hand often needs a bit more water, so add it 1 to 2 teaspoons at a time-if it seems necessary-until the pastry can be packed. Form the pastry into balls, as instructed above, then shape and refrigerate as directed.
Roll the bottom crust to fit a 9-inch pan, and cut the top crust as a lattice, approximately 1-inch in width or as desired. Chill the rolled crust while you prepare the salted caramel and apple filling.
Salted Caramel Ingredients
1 cup white sugar
1/4 cup water
1 stick (1/2 cup) unsalted butter
1/2 cup heavy cream
1 1/2 teaspoon sea salt (recommended: Maldon sea salt flakes)
Salted Caramel Preparation
Cook the sugar and water together over low heat until just dissolved. Add the butter and bring to a slow boil. Continue cooking at a low boil until the mixture turns a deep, golden brown color, almost copper.
Cook’s Note: This process can take awhile depending on the heat source. (They’re not kidding. After 30 minutes I decided to turn the heat up a bit and it still took a while.) Keep an eye on it, if the caramel begins to smoke, you’ve burned it and you’ll have to start over.
Once the mixture has turned a copper color, remove it from the heat and immediately add the heavy cream – the mixture will bubble rapidly and steam – be cautious as the sugar will be very hot.
Whisk the final mixture together well over low heat and sprinkle in the sea salt. Set the caramel aside while you prepare the apple filling.
Filling Ingredients
4 to 6 lemons
5 to 6 medium to large apples (I used Granny Smith)
1/3 cup raw sugar (I used Sugar in the Raw)
2 tablespoons flour
1/4 teaspoon ground cinnamon
1/4 teaspoon ground allspice
1/8 teaspoon freshly grated nutmeg
Filling Preparation
Juice the lemons into a large mixing bowl. Core, peel, and thinly slice the whole apples. Cook’s Note: A mandolin works great for producing very thin slices. (I used the apple peeler/slicer/corer with the handle that you turn–I love it!)
Dredge all the apple slices in the freshly squeezed lemon juice to prevent browning and to add flavor. Set the prepared apples aside.
In a large measuring cup or small mixing bowl, combine the sugar, flour, cinnamon, allspice, and nutmeg. Sprinkle this mixture over the apples in the mixing bowl. Use your hands to gently mix and coat the apple slices.
Assemble the Pie
Preheat the oven to 375 to 400 degrees F (depending on the hotness of your oven).
Gather your rolled pie crust, salted caramel, and apple mixture. Begin by layering 1/3 of the apples in the bottom of the crust so that there are minimal gaps. Pour 1/3 of the caramel over the apples. Add 1/3 of the apples and caramel for a second layer, and then add a third layer of apples, and then the caramel again. Cook’s Note: Save a small portion of the caramel to pour on top once the lattice is assembled.
Assemble the lattice crust and flute the edges of the crust. Pour the last bit of caramel on top. Brush the crust with the beaten egg and lightly sprinkle with raw sugar and sea salt.
Bake the pie on a baking sheet larger than the pie pan for 20 minutes (otherwise the caramel will bubble over and burn on the bottom of your oven). Reduce the oven temperature to 325 to 350 and bake for 25 to 35 minutes. You can test the apples for doneness with a long toothpick or small knife. The apples should be just soft.
Let the pie cool, then slice and enjoy.
Crust recipe from Apple Pie by Ken Haedrich.
Pie recipe adapted from Four and Twenty Blackbirds via Cooking Channel.
S’mores Pie
Print This Recipe
Note to self: Make sure you have your pie pans before making a pie. Also, the next time you and mom comment on how many pie pans your mom has, maybe think about how she has YOUR pie pans. So uh, yeah, once again, I made a pie in a cake pan. That’s apparently just how I roll.
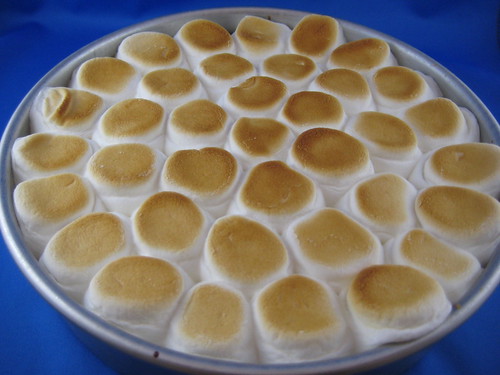
But look at those toasted marshmallows. I mean, who really cares what kind of pan it’s in, right? My coworkers didn’t care, that’s for sure! This pie in a cake pan was devoured quickly (dare I say, for breakfast by many), and when people went back for seconds it was long gone. Side note: It’s a well known fact that the only way to guarantee sweets at the office is to hoard some at your desk. This is true of every office, isn’t it?
Photos of the process.
Crust Ingredients
1 3/4 cups graham cracker crumbs
1 1/4 sticks butter, melted
Crust Preparation
Preheat oven to 325.
Add melted butter and graham cracker crumbs together until a crust forms. Press in to a 9 inch pie pan (or cake pan, whatever).
Filling Ingredients
1 cup heavy cream
1/2 cup milk
10 ounces semisweet chocolate, chopped
2 tablespoons sugar
1/4 teaspoon salt
2 eggs
1 bag of large marshmallows
Filling Preparation
Combine milk and heavy cream in a saucepan and heat over low heat. Watch carefully and once it begins to simmer, remove from heat and add in chocolate. Stir with a spatula until chocolate is melted, then whisk in sugar and salt. In a separate bowl, lightly beat the 2 eggs. Slowly add eggs to chocolate mixture while whisking.
Pour chocolate filling in to graham crust. Bake until the chocolate is no longer liquid, about 30-35, checking after 20 minutes. Remove the pan and top with as many large marshmallows as you can fit. Heat pie under broiler until the tops of marshmallows are golden. (This happens quickly, don’t leave the room.)
Let cool then refrigerate for 1-2 hours before cutting. Spray a knife with non-stick spray before slicing. It’s impossible to get a neat slice, I promise.
Recipe adapted from how sweet it is.
Asian Pear Tart and a Giveaway
Print This Recipe
 The folks at Crave! at Work offered to send me a 10 pound bag of fruit to share with my coworkers and use for their recipe challenge, and I obviously couldn’t say no. When the bag arrived (filled with a few different kinds of pears, mini bananas, and chestnuts), everyone at the office kept saying how cute the mini bananas were, and one colleague couldn’t wait to swipe the chestnuts to roast at home. For some reason, I gravitated toward pears, a fruit I have never baked with nor liked. Call me crazy.
I was super excited when I found this recipe for an Asian Pear Tart in the LA Times, but found myself extremely disappointed when the end result was a very soggy tart. I tweeted to someone at the LA Times test kitchen and she said she will try the recipe and get back to me because she was curious about the method involved. Has anyone tried the recipe?
 So, I ended up finding this “healthier” Asian pear tart recipe, and while it looks pretty, the dough was incredibly difficult to work with. I couldn’t get it to roll out and the amount of dough would never have even rolled to a 10 inch circle, so I ended up doubling the recipe and pressing it into a tart pan. I did however taste the pears, and what do you know–I actually like Asian pears, go figure!
While this recipe won’t win any ribbons, there is a prize for one of you! Crave! at Work is giving away a 10 pound bag of fruit to one of Nosh’s LA area readers. Just leave a comment below telling me your favorite dessert made with fruit and you will be entered in the giveaway to have fruit delivered to your office!
Contest ends at 11:59 p.m. EST on Wednesday, January 5, 2011. One winner will be selected at random shortly thereafter and contacted by email. Please note this contest is only open to Los Angeles area residents.
Ingredients
1 large ripe but firm pear, peeled and thinly sliced
1 teaspoon plus 1/3 cup all-purpose flour, divided, plus additional for dusting
2 tablespoons sugar, divided
1/4 teaspoon ground cinnamon
1/8 teaspoon grated nutmeg
1/8 teaspoon salt
1/3 cup whole-wheat pastry flour
1 tablespoon cold unsalted butter
2 tablespoons walnut oil, or canola oil
1-2 tablespoons cold water
Preparation
Preheat oven to 375 degrees F.
Toss pear slices, 1 teaspoon all-purpose flour, 1 tablespoon sugar, cinnamon, nutmeg and salt in a medium bowl.
Whisk 1/3 cup all-purpose flour, whole-wheat flour and the remaining 1 tablespoon sugar in a medium bowl. Cut in butter with a pastry cutter or a fork until the mixture resembles coarse meal. Sprinkle oil over the mixture and stir with a fork until evenly combined. Add 1 tablespoon water and stir until the dough just stays together when pressed with a fork; add up to 1 additional tablespoon of water if the dough seems too dry.
Line a work surface with parchment paper or a silicone baking mat, generously dust with flour and turn the dough out onto it. Form the dough into a small patty, dust the top with flour and roll into a rustic 10-inch circle, adding more flour if necessary to prevent sticking. Transfer the crust to a baking sheet with parchment paper or baking mat in place.
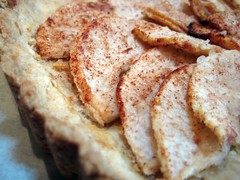
Lay the pear slices in decorative, overlapping circles on top of the crust, leaving a 1-inch border around the edge. Spoon any remaining pear juice over the slices. Pick up the edges of the crust using a spatula and fold over the pears. The crust will not meet in the center.
Bake the tart until lightly browned and bubbling, about 40 minutes. Cool for 10 minutes before serving.
Recipe from Eating Well.
Malted Milk Cookie Tart
Print This Recipe
 As soon as I saw this recipe I ripped it out of the magazine and stuck it on my fridge. I knew I would love it, and not only because it has a tart shell, chocolate, and malted milk balls, but also because it can be made using only one 1/2-cup measuring cup. I hate doing dishes and love recipes that are simple like that. And yes, I am a dork.
I should also mention that I had a really hard time finding malted milk powder in Los Angeles. After calling all of the major grocery store chains in the city, I finally found the Carnation brand at Gelsons, a more upscale chain. Weird and annoying.
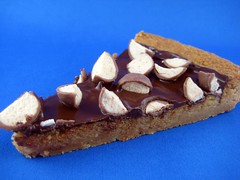
Fortunately, this tart was well worth the time it took to find the malted milk powder. It was super easy to pull together (in fact, I made a second one which I baked in a disposable pie tin), and it tastes amazing. The shell is chewy, not overly sweet, and has a hint of salt, and is the perfect match to the chocolate and malted milk balls on top.
Ingredients
1 1/2 cups all purpose flour
1 cup malted milk powder
1/2 cup sugar
1 teaspoon (scant) coarse kosher salt
1 cup (2 sticks) unsalted butter, cut into 1-inch pieces, room temperature
1/2 cup bittersweet chocolate chips (about 3 ounces; do not exceed 61% cacao)*
1/2 cup malted milk balls, coarsely chopped
Photos of the process.
Preparation
Preheat oven to 325°F. In processor, pulse flour, malted milk powder, sugar, and coarse salt. Add butter; pulse until moist clumps form. Transfer dough to work surface; gather into ball. Press evenly onto bottom of 9-inch-diameter tart pan with removable bottom.
Bake crust until evenly golden brown, about 45 minutes. (Mine was done somewhere around 35-40 minutes. Set the timer for a shorter time and check it regularly.) Scatter chocolate chips over; let stand 5 minutes to soften, then spread melted chocolate over hot crust in well that forms as center sinks. Sprinkle malted milk balls over. Cool completely. Remove tart from pan; cut into wedges.
*Don’t tell anyone, but I didn’t have enough bittersweet so I used some semi-sweet. Shhh.
Recipe from page 50 of July 2010 issue of Bon Appetit.
Crack Pie
Print This Recipe
 DISCLAIMER: 1. This pie does not contain actual crack. 2. This picture does not do it justice.
A few weeks ago my friend Carly asked if I had ever tasted Crack Pie. Crack Pie? Huh? She then explained it’s some crazy addictive pie she’d heard about, and that you can buy it online from Momofuku Milk Bar for $44. Yes, $44. As fate would have it, the LA Times ran an article about the pie the very next day, and included in the article was the recipe. I promised Carly I would make it.
So when I got invited to a friend’s Oscar party, I figured hey, why not try out the Crack Pie? Since the recipe yields two pies, I had grand plans of tasting one pie then freezing the rest of it so Carly could try it, and bringing the other pie to the party. Of course, my oven had other plans and I burned the first pie beyond repair (totally my fault, I set the oven incorrectly). This meant I only had one pie to work with and I would be bringing something I had never tasted to the party.
To make matters worse, I read tons of reviews and everyone said their pies were jiggily and oozing and undercooked so I cooked mine about 10 minutes longer, and when I took it out of the oven the top was cracked which made me fairly certain I had over-baked it. However, the final step of the recipe calls for a light (I have a heavy hand apparently) dusting of powdered sugar which covered the ugly exterior and no one was ever the wiser.
Fortunately, it was a huge hit. As in, OMG WHAT IS THIS PIE? IT IS SOOOOOOOOOO GOOD! and I CAN SEE WHY IT’S CALLED CRACK PIE, IT’S BETTER THAN CRACK (if you say so). The pie is crazy rich with a caramel flavor and gooey interior. A slice held its shape for about .23 seconds before becoming an oozy mess on a plate, but no one cared. It was that good. In fact, it’s a “I’d eat this straight from the fridge with a spoon my fingers kind of good. Although, I have to admit, I don’t think I’d pay $44 for it.
Some notes: 1. I hate “scant” measurements and used the weight measurements whenever possible. 2. My pies felt super jiggily after taking them out of the oven at the lower temp, so I baked them for an additional 10 minutes, which I’m still not sure they needed.
Photos of the process here.
Ingredients for Cookie for Crust
2/3 cup plus 1 tablespoon (3 ounces) flour
Scant 1/8 teaspoon baking powder
Scant 1/8 teaspoon baking soda
1/4 teaspoon salt
1/2 cup (1 stick) softened butter
1/3 cup (2 1/2 ounces) light brown sugar
3 tablespoons (1 1/4 ounces) sugar
1 egg
Scant 1 cup (3 1/2 ounces) rolled oats
Preparation
- Heat the oven to 375 degrees.
- In a medium bowl, sift together the flour, baking powder, baking soda and salt.
- In the bowl of a stand mixer using the paddle attachment, or in a large bowl using an electric mixer, beat the butter, brown sugar and sugar until light and fluffy.
- Whisk the egg into the butter mixture until fully incorporated.
- With the mixer running, beat in the flour mixture, a little at a time, until fully combined. Stir in the oats until incorporated.
- Spread the mixture onto a 9-inch-by-13-inch baking sheet and bake until golden brown and set, about 20 minutes. Remove from heat and cool to the touch on a rack. Crumble the cooled cookie to use in the crust.
Ingredients for Crust
Crumbled cookie for crust
1/4 cup (1/2 stick) butter
1 1/2 tablespoons (3/4 ounce) brown sugar
1/8 teaspoon salt
Preparation
Combine the crumbled cookie, butter, brown sugar and salt in a food processor and pulse until evenly combined and blended (a little of the mixture clumped between your fingers should hold together). Divide the crust between 2 (10-inch) pie tins. Press the crust into each shell to form a thin, even layer along the bottom and sides of the tins. Set the prepared crusts aside while you prepare the filling.
Ingredients for Filling
1 1/2 cups (10 1/2 ounces) sugar
3/4 cup plus a scant 3 tablespoons (7 ounces) light brown sugar
1/4 teaspoon salt
1/3 cup plus 1 teaspoon (3/4 ounce) milk powder
1 cup (2 sticks) butter, melted
3/4 cup plus a scant 2 tablespoons heavy cream
1 teaspoon vanilla extract
8 egg yolks
2 prepared crusts
Powdered sugar, garnish
Preparation
- Heat the oven to 350 degrees.
- In a large bowl, whisk together the sugar, brown sugar, salt and milk powder. Whisk in the melted butter, then whisk in the heavy cream and vanilla.
- Gently whisk in the egg yolks, being careful not to add too much air.
- Divide the filling evenly between the 2 prepared pie shells.
- Bake the pies, one at a time, for 15 minutes, then reduce the heat to 325 degrees and bake until the filling is slightly jiggly and golden brown (similar to a pecan pie), about 10 minutes. Remove the pies and cool on a rack.
- Refrigerate the cooled pies until well chilled. The pies are meant to be served cold, and the filling will be gooey. Dust with powdered sugar before serving.
Recipe from the LA Times.