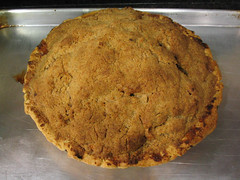
Apple Brown Sugar Tart
 Print This Recipe
Every now and then someone tries something I’ve baked and finds it so good that they ask me to make it and they’ll pay me for it. This is one of those recipes.
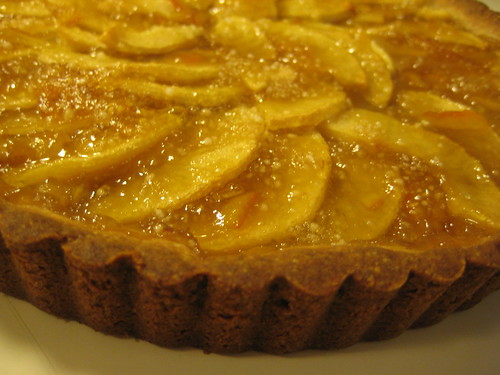
Earlier today we had a huge Thanksgiving lunch at work, and when the sign up sheet went around last week, I of course knew I had to make a dessert. (Trust me, you don’t want me cooking for you.) I hate anything pumpkin related, so when I saw this recipe for an apple brown sugar tart, I was smitten. As you know by now, I love anything with brown sugar. This did not disappointment.
The crust was buttery and held its shape well, and the orange marmalade was a nice touch with the apples. I’m still on the fence about the addition of the tapioca, mainly because it looks weird, but I think it works as a thickening agent. (Can anyone back me up on that one?)
Photos of the process here.
Shell Ingredients
1/2 cup slivered almonds
1 1/4 cups all-purpose flour
1/4 cup light brown sugar
1/2 cup sweet cream butter
1 large egg
Filling Ingredients
3 apples, approx. 1½ lb., choose between Gala or Pink Lady
1/3 cup firmly packed light brown sugar
2 tbsp. orange juice
1 tbsp. instant tapioca
3 tbsp. orange marmalade
Shell Preparation
- In a cake or pie pan, toast ½ cup (2 oz.) slivered almonds in a 350° oven until golden, shaking often, about 10 minutes.
- In a food processor or bowl, combine almonds, 1¼ cups all-purpose flour, and ¼ cup firmly packed light brown sugar. Add ½ cup (¼ lb.) butter, cut into pieces; whirl or rub with your fingers until fine crumbs form.
- Add 1 egg yolk; whirl or mix with a fork until dough sticks together. Pat into a ball.
- Press dough over bottom and up sides, flush with rim, of a 9- or 10-inch fluted tart pan with removable rim.
Filling Preparation
- Rinse apples and peel or leave skin on as desired. Core apples and cut into ¼-inch thick slices. In a bowl, gently mix apple slices with 2 tbsp. of the brown sugar, orange juice, and tapioca. Let rest 10 minutes to soften tapioca, then overlap slices neatly in unbaked tart shell.
- In a glass-measuring cup, combine remaining ¼ cup of the brown sugar and marmalade. Heat in a microwave at full power in 30-second intervals, stirring each time, until marmalade is melted. Evenly spread over apple slices.
- Bake in a 350° oven until crust is well browned and apples are tender when pierced, about 45 minutes (mine was done in about 40). Let tart cool on a rack at least 15 minutes. Serve warm or cool, cut into wedges, with ice cream if desired.
Recipe adapted from Safeway.
Apple Pie
My dad is a huge fan of Costco’s apple pie. (Hey, don’t knock it till you try it.) He mentioned that recently they changed their recipe, because the pies just don’t taste the same anymore. So, I decided I would find a recipe that had all of the characteristics of the pie he likes (not too tart, not too sweet, double crust, and a gooey inside), and make it myself. While this specific recipe calls for Granny Smith apples, I added some Fujis to cut down on the tartness.
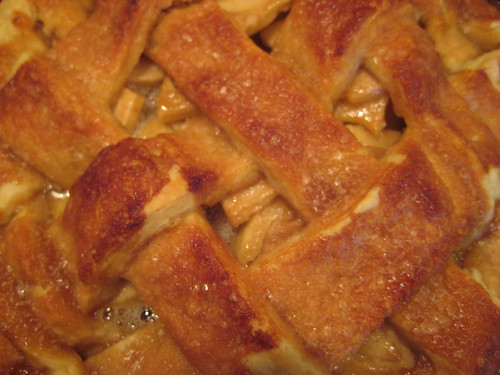
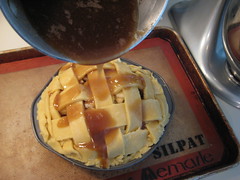 I scoured the Internet and came across a recipe with over 1800 reviews and a five-star rating and knew I had to give it a go. And it is now safe to say this is my family’s new favorite apple pie recipe. The difference between this pie and others I’ve made is in the preparation–the filling ingredients are boiled which creates a gooey goodness that I could easily eat by the spoonful. The filling is then poured onto the pie, over the lattice crust, and the gooey goodness seeps in the cracks and covers the apples. Sounds weird, but trust me, it works.
For the crust, I found a simple shortening recipe (I know some of you are butter purists, sorry) that was easy to work with and baked up flaky. As you can see from my pictures, I lack the technical skill and patience it takes to make a proper lattice crust, but it still tastes good, ugly strips and all. Also, those of you paying close attention to the pictures may have noticed I used a cake pan. I am ashamed to admit I do not own a pie dish, but the 8″ cake pan worked out just fine.
Photos of the process here.
Crust Ingredients (I doubled it so I could make a top and bottom crust.)
1 1/4 cups all-purpose flour
1/4 teaspoon salt
1/2 cup shortening, chilled (I used butter flavor Crisco)
3 tablespoons ice water
Crust Preparation
- Whisk the flour and salt together in a medium size bowl. With a pastry blender, cut in the cold shortening until the mixture resembles coarse crumbs. Drizzle 2 to 3 tablespoons ice water over flour.
- Toss mixture with a fork to moisten, adding more water a few drops at a time until the dough comes together.
- Gently gather dough particles together into a ball. Wrap in plastic wrap, and chill for at least 30 minutes before rolling.
- Roll out dough, and put in a pie plate. Fill with desired filling and bake.
Filling Ingredients
1 recipe pastry for a 9 inch double crust pie
1/2 cup unsalted butter
3 tablespoons all-purpose flour
1/4 cup water
1/2 cup white sugar
1/2 cup packed brown sugar
8 Granny Smith apples – peeled, cored and sliced
Cinnamon (the recipe doesn’t call for it, but I like it in my pies)
Filling Preparation
- Preheat oven to 425 degrees F (220 degrees C). Melt the butter in a saucepan. Stir in flour to form a paste. Add water, white sugar and brown sugar, and bring to a boil. Reduce temperature and let simmer.
- Place the bottom crust in your pan. Fill with apples, mounded slightly. Cover with a lattice work of crust. Gently pour the sugar and butter liquid over the crust. Pour slowly so that it does not run off.
- Bake 15 minutes in the preheated oven. Reduce the temperature to 350 degrees F (175 degrees C). Continue baking for 35 to 45 minutes, until apples are soft.
Crust recipe from All Recipes. Filling recipe from All Recipes.
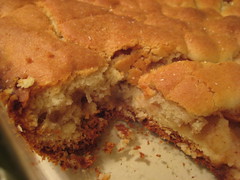
Russian Grandmothers’ Apple Pie-Cake
Print This Recipe
 I’m not a huge fruit dessert person. In fact, my favorite part of a pie is the crust. I am all about the crust. So when I saw this week’s Tuesdays With Dorie recipe I thought well, even if the filling sucks, at least there’s lots of crust! Why yes, I am the queen of pessimism. (Blame it on Internet dating.) Anyway, I suppose the negative thoughts began early on, when I tried to shape the dough into rectangles and it was sticky. And I mean sticky. (Photos of the process here. I have no idea if mine looks the way it’s supposed to because the book didn’t have a picture.)
 Then, I read and reread the recipe and realized I don’t have a 9×12″ baking dish, and oh no what am I going to do because I won’t have enough dough for my 9×13″ dish. Oh, did I not mention I’m also a worrier? Well, I conferred with my mom who didn’t think 9×12″ was a standard size and said just to use the 9×13″, then I did some research and found the 9×12″ to be a typo (phew!). Much happier, I got to slicing my apples. Speaking of apples, if you don’t have one of these gadgets that cores, peels, and slices, you must go out and buy it. What a time saver! (We use it every year for Passover apple crisp and the best ever apple pie for Thanksgiving.)
Back to the pie-cake. I bought 10 apples (half Granny Smith, half Fiji) like the recipe says, and I needed only half of them. Not sure how that happened (maybe the Granny Smiths were large?), but whatever. Aside from the extra apples, that part of the recipe was no problem. The dough however, oh, the dough. I tried rolling it out and it didn’t want to roll, so I ended up taking small pieces and flattening them between my palms then pressing them together in the dish to create the crust. It worked. It’s not attractive, but it worked.
Finally, I got the sucker in the oven and watched it brown in about five minutes. I quickly covered it with foil, let it bake for an hour, and listened for the sound of bubbling apples and cinnamon-sugar, which never happened. But my apartment smelled so good!
OK so, after all that rambling, the verdict: Eh. While the smell is fantastic (and there’s nothing like waking up the following day to the scent of apple pie), I just didn’t find this anything special. Of course, I’m not big on fruit desserts, so I’ll let you know what my coworkers say when I bring it into the office this morning. If it’s gone by lunchtime, we know it’s a hit. Stay tuned.
p.s. I omitted the raisins, because just like nuts, raisins ruin baked goods. Hah.
Dough Ingredients
2 sticks (8oz) unsalted butter, at room temperature
1 c sugar
2 large eggs
1 T baking powder
½ tsp salt
juice of 1 lemon
3¼-3½ c all-purpose flour
Filling Ingredients
10 medium apples, all one kind or a mix (Fuji, Golden Delicious, Ida Reds, Cortland, or Rome, etc)
Squirt of fresh lemon juice
1 c moist, plump raisins (dark or golden)
¼ c sugar
1¼ tsp ground cinnamon
Sugar, preferably decorating (coarse) sugar for dusting
Preparation
Working with a stand mixer, preferably fitted with a paddle attachment, or with a hand mixer in a large bowl, beat the butter and sugar together on medium speed until smooth, about 2 minutes. Add the eggs and continue to beat until the mixture is light and fluffy, about 3 minutes more. Reduce the mixer speed to low, add the baking powder and salt and mix just to combine. Add the lemon juice—the dough will probably curdle, but don’t worry about it. Still working on low speed, slowly but steadily add 3¼ cups of the flour, mixing to soft, but if you think it looks more like a batter than a dough at this point, add the extra ¼ cup flour. (The dough usually needs the extra flour.) When properly combined, the dough should almost clean the sides of the bowl.
Turn the dough out onto a work surface, gather it into a ball and divide it in half. Shape each half into a rectangle. Warp the dough in plastic wrap and refrigerate for at least 2 hours, or for up to 3 days. (The dough can be wrapped airtight and frozen for up to 2 months; defrost overnight in the refrigerator.)
Peel and core the apples and cut into slices about ¼ inch thick; cut the slices in half crosswise if you want. Toss the slices in a bowl with a little lemon juice—even with the juice, the apples may turn brown, but that’s fine—and add the raisins. Mix the sugar and cinnamon together, sprinkle over the apples and stir to coat evenly. Taste an apple and add more sugar, cinnamon and/or lemon juice if you like.
Getting ready to bake
Center a rack in the oven and preheat the oven to 375?F. Generously butter a 9×12 inch baking pan (Pyrex is good) and place it on a baking sheet lined with parchment or a silicone mat.
Remove the dough from the fridge. If it is too hard to roll and it cracks, either let it sit at room temperature for about 15 minutes or give it a few bashes with your rolling pin to get it moving. Once it’s a little more malleable, you’ve got a few choices. You can roll it on a well-floured work surface or roll it between sheets of plastic wrap or wax paper. You can even press or roll out pieces of the dough and patch them together in the pan—because of the baking powder in the dough, it will puff and self-heal under the oven’s heat. Roll the dough out until it is just a little larger all around than your pan and about ¼ inch thick—you don’t want the dough to be too thin, because you really want to taste it. Transfer the dough to the pan. If you the dough comes up the sides of the pan, that’s fine; if it doesn’t, that’s fine too.
Give the apples another toss in the bowl, then turn them into the pan and, using your hands, spread them evenly across the bottom. Roll out the second piece of dough and position it over the apples. Cut the dough so you’ve got a ¼-½ inch overhang and tuck the excess into the sides of the pan, as though you were making a bed. (If you don’t have that much overhang, just press what you’ve got against the sides of the pan.) Brush the top of the dough lightly with water and sprinkle sugar over the dough. Using a small sharp knife, cut 6 to 8 evenly spaced slits in the dough.
Bake for 65-80 minutes, or until the dough is a nice golden brown and the juices from the apples are bubbling up through the slits. Transfer the baking pan to a cooling rack and cool to just warm or to room temperature. You’ll be tempted to taste it sooner, but I think the dough needs a little time to rest.
Recipe from Baking: From My Home To Yours by Dorie Greenspan.
Double Layer Pumpkin Cheesecake
Print This Recipe
 I spent Thanksgiving in Austin, Texas at my cousin Rachel’s house, and had the pleasure of baking in a real kitchen. One with lots of counters, drawers, storage–things I don’t have in my tiny apartment kitchen. I made a delicious apple crumble pie, and this pumpkin cheesecake. The bottom layer is plain cheesecake, the top is pumpkin cheesecake.
 In the interest of full disclosure, I should tell you I hate pumpkin. I hate the texture, the smell, and especially the taste. I also hate cheesecake. But I love my family, so I made them a pumpkin cheesecake. And they loved it and gave it rave reviews. Yay!
Ingredients
2 (8 ounce) packages cream cheese, softened
1/2 cup white sugar
1/2 teaspoon vanilla extract
2 eggs
1 (9 inch) prepared graham cracker crust
1/2 cup pumpkin puree
1/2 teaspoon ground cinnamon
1 pinch ground cloves
1 pinch ground nutmeg
1/2 cup frozen whipped topping, thawed
Preparation
- Preheat oven to 325 degrees F (165 degrees C).
- In a large bowl, combine cream cheese, sugar and vanilla. Beat until smooth. Blend in eggs one at a time. Remove 1 cup of batter and spread into bottom of crust; set aside.
- Add pumpkin, cinnamon, cloves and nutmeg to the remaining batter and stir gently until well blended. Carefully spread over the batter in the crust.
- Bake in preheated oven for 35 to 40 minutes, or until center is almost set. Allow to cool, then refrigerate for 3 hours or overnight. Cover with whipped topping before serving.
My notes
I made my own crust using the recipe on the box of graham cracker crumbs. It was delicious.
Recipe from All Recipes.
The Yummiest Crumble Apple Pie Ever Ever Ever
Print This Recipe
After last year’s attempt at a lattice crust (not so fun), I decided to try a crumble top this year. And I am so glad I did. This was the best apple pie I’ve ever had! The Granny Smith’s give it a nice tartness, and the crumble top has the perfect amount of sweetness. It’s safe to say I’ll be using this recipe again and again and again.
Ingredients
Crust
1 1/3 cups all purpose flour
1/2 teaspoon salt
1/2 teaspoon sugar
1/4 cup (1/2 stick) chilled unsalted butter, cut into 1/2-inch cubes
1/4 cup frozen solid vegetable shortening, cut into 1/2-inch cubes
3 tablespoons (or more) ice water
1/2 teaspoon apple cider vinegar
Filling
3 1/4 pounds Granny Smith apples, peeled, cored, sliced 1/4 inch thick
2/3 cup sugar
2 tablespoons all purpose flour
2 teaspoons ground cinnamon
2 tablespoons unsalted butter, melted
Topping
1 cup all purpose flour
1/2 cup sugar
1/4 cup (packed) golden brown sugar
1 1/2 teaspoons ground cinnamon
1/2 teaspoon salt
6 tablespoons chilled unsalted butter, cut into 1/2-inch cubes
Preparation
For crust:
Mix flour, salt, and sugar in large bowl. Add butter and shortening; rub in with fingertips until coarse meal forms. Mix 3 tablespoons ice water and vinegar in small bowl to blend. Drizzle over flour mixture; stir with fork until moist clumps form, adding more water by teaspoonfuls if dough is dry. Gather dough into ball; flatten into disk. Wrap in plastic; refrigerate 30 minutes.
Position rack in center of oven and preheat to 400°F. Roll out dough on lightly floured surface to 12-inch round. Transfer to 9-inch-diameter glass pie dish. Trim overhang to 1/2 inch; turn edge under and crimp decoratively. Refrigerate while preparing filling and topping.
For filling:
Mix all ingredients in large bowl to coat apples.
For topping:
Blend first 5 ingredients in processor. Add chilled butter cubes; using on/off turns, cut in until mixture resembles wet sand.
Toss filling to redistribute juices; transfer to crust, mounding in center. Pack topping over and around apples. Bake pie on baking sheet until topping is golden, about 40 minutes (cover top with foil if browning too quickly). Reduce oven temperature to 350°F. Bake until apples in center are tender when pierced and filling is bubbling thickly at edges, about 45 minutes longer. Cool until warm, about 1 hour. Serve with ice cream.
Makes 8 servings.
Notes: I added a few Fuji apples for a little sweetness. Also, I have one of the most amazing inventions ever, that made preparing the apples the easiest thing ever. If you don’t have one, you must get one.
Recipe from Bon Appétit via Epicurious.