Kit Kat Cake
 Print This Recipe
Cake decorating has never been my strong suit. In fact, I really suck at it. Following my trip to the Wilton Food Blogger Workshop a couple of years ago, I became more confident with the piping bag, but trust me when I say that you don’t want me decorating a birthday cake for you anytime soon. And yes, this is why the only kinds of cakes you usually see on this blog are cupcakes or bundt cakes; they’re so much easier to decorate!
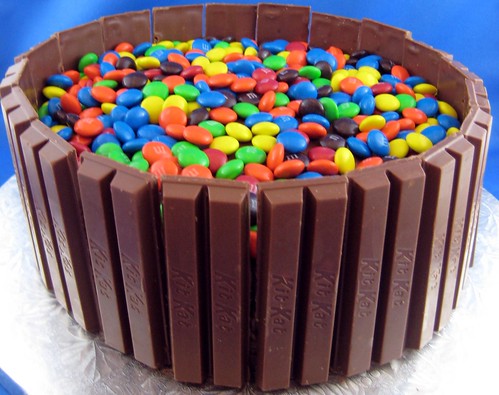
However, I’ve been seeing this Kit Kat cake online for years and immediately thought this was something I could do. So for those of you lacking in the cake decorating skills department like me, this is the cake for you! Added bonus: Everyone thinks it looks so cool and colorful, and with National Cake Day coming up later this month (November 26), you now have an excuse to make it!

Because I wasn’t sure how this would turn out, I initially made it using *gasp* cake mix and canned frosting, but you can use your favorite cake and frosting recipes instead. I recommend using chocolate frosting as it will be less noticeable in the gaps between the Kit Kats.
Ingredients
Two 8″ or 9″ cakes, any flavor
Frosting
12.60 ounce bag of M&Ms (or any candy you want to top it with)
11-12 full size (not snack size) packages Kit Kats)
Preparation
Using a cake leveler or serrated knife, level cakes so the tops are no longer domed. (If you are using a serrated knife, it helps to freeze the cake first.)
Separate each Kit Kat so you have sections of two Kit Kats. (I put them in the fridge first so they wouldn’t melt while I was handling them.)
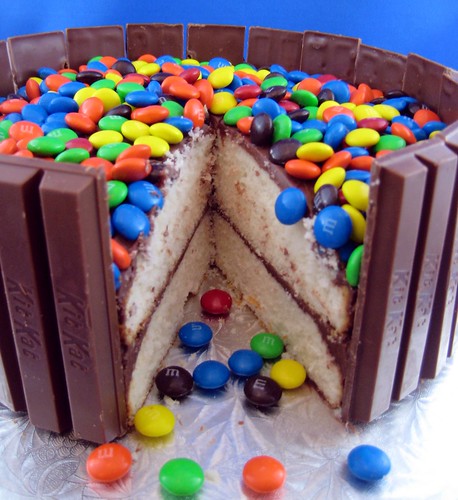
Frost the top of one cake, then place the second cake on top of it. Frost the top of the second cake and the sides of the stacked cakes.
Place the Kit Kats around the frosted cake, as close together as possible.
You can also tie a ribbon around the cake to keep the Kit Kats from moving. Pour the M&Ms on the top of the cake. Slice and serve!
Conversation Hearts
Print This Recipe
Do you ever wonder what those little conversation hearts you eat around Valentine’s Day would say if they were written by someone deep in the trenches of online dating? TEXT ME! would be CALL ME! I HATE TEXTING! and KISS would become HE GOT CHEEK/CHIN/LIP, WAS THAT A KISS? You get the idea. So when I saw a recipe for homemade conversation hearts, I knew I had to make them and write more practical and current sayings on them.

And I wanted to like them. I really tried. But they taste nothing like the store bought conversation hearts, and while the outside is hard, the inside is kind of soft. In fact, they kind of reminded me of fondant, both in taste and texture. Disappointing.
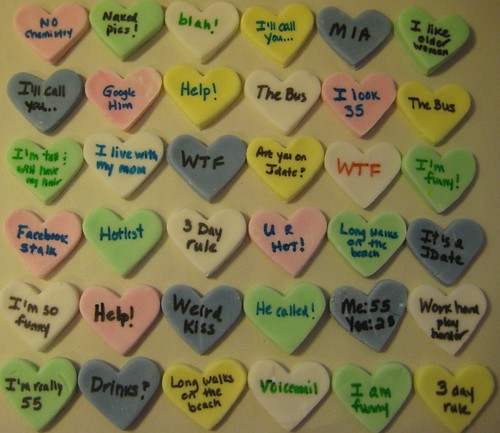
However, a few months ago I bought markers made specifically to write on food, and figured I’d find sometime to use them. I’m so glad I bought them, because the hearts were loads of fun to decorate. I just wish my handwriting was neater. While the marker has a fine point, the part just above the tip is really round which made it difficult. It was still fun though!
Photos of the process here.
Ingredients
1 packet (1/4 oz, or 2 tsp) unflavored gelatin
1/2 cup water
2 tsp light corn syrup
2 lbs powdered sugar, plus additional for dusting
Assorted flavoring extracts of your choice
Assorted food colors of your choice
Heart-shaped cutters
Food coloring markers
Preparation
- Place the corn syrup, gelatin, and water in a small microwave-safe bowl. Stir until the gelatin is well-distributed. Microwave the mixture for 30 seconds, so the gelatin dissolves, and stir well.
- Pour the gelatin mixture into the bowl of a large stand mixer fitted with a paddle attachment. Alternately, if you are using a hand mixer, pour the gelatin mixture into a large bowl. Add 1 cup of powdered sugar and turn the mixer to low, mixing until the sugar is incorporated.
- Once the sugar is mixed in, add another cup of sugar, again mixing on low until it liquefies. Continue to add the remaining powdered sugar, one cup at a time, pausing in between additions to allow the sugar to mix in, until the full two pounds of powdered sugar is added. Periodically, stop the mixer and scrape down the bottom and sides of the bowl. The candy will progress from a thin, watery liquid to a very stiff dough.
- Once all of the sugar is incorporated, dust a work surface (counter or large cutting board) with powdered sugar and scrape the candy out onto the work surface. The candy will be very sticky and stiff. Generously dust the top of the ball of candy with powdered sugar, and begin to knead the candy like bread dough: fold the ball of dough over onto itself, then use the heel of your hand to push it down. Give the candy a quarter-turn, and repeat the process, dusting it with more powdered sugar as often as necessary to prevent it from sticking to the board or your hands. Knead until the candy is satiny and not sticky.
- Decide how many colors/flavors of conversation hearts you want to make, and divide the candy dough into that many portions. To flavor and color the candy, take one of the balls and flatten it into a palm-sized disc. Add a few drops of food coloring and flavoring extract to the center of the disc, and fold it over on itself. (It is a good idea to wear disposable plastic gloves during this step to keep your hands free of colors and odors.) Knead the dough ball, just as you did before, until the color is evenly dispersed throughout the candy, and all streaks have disappeared. Repeat this process with remaining candy balls and colors/flavors, until all of your candy is colored and flavored. (My dough was starting to dry out as it was sitting on the counter so I wrapped each ball in plastic wrap.)
- Dust your work surface and a rolling pin with powdered sugar, and roll out one of the candy balls to your desired thickness. Small store-bought conversation hearts tend to be fairly thick, generally over 1/4” thick. I find that this thickness works well for small hearts (under 1”), but it makes larger heart sizes very substantial and a little overwhelming. However, the thickness is entirely a matter of personal preference and does not affect the taste of the final candy.
- Use heart-shaped cutters to cut hearts out of the rolled candy, and transfer the hearts to a baking sheet lined with parchment paper. Smaller hearts are more realistic, but larger hearts are easier to write messages on. Once you have cut out your hearts, you can re-roll the scraps to get more shapes out of the candy. Repeat with remaining candy balls.
- Allow your hearts to air-dry for at least 24 hours before you write on them. This step is VERY important, because the extra moisture in the hearts will cause the ink to run if you do not let them dry properly.
- After the hearts have dried for a day, use the food writing markers to write messages or draw designs on the hearts. Store your conversation hearts in an airtight container at room temperature.
Recipe from About.com: Candy.