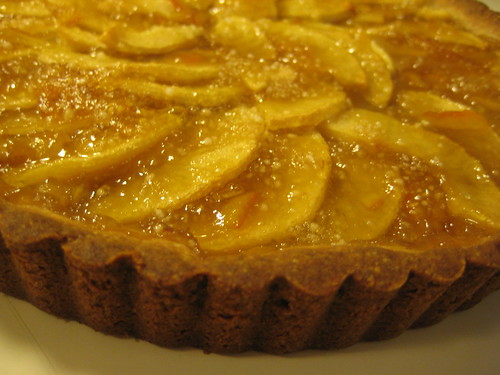
Apple Tart with Salted Caramel
 Print This Recipe
I first made this tart for an office Thanksgiving potluck so I could test it out before Thanksgiving and it was an enormous hit. Everyone was raving about it and asked for the recipe, which is always a good sign. Because it uses packaged puff pastry, it’s pretty much no-fail, and super quick to whip up.
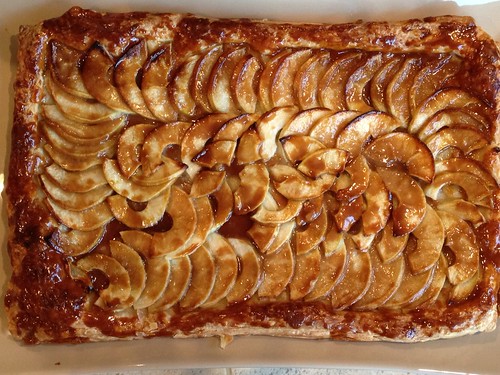
I kept calling the tart “rustic,” because while the quasi-mosaic part is pretty, the crust isn’t exactly picture perfect. But what it lacks in looks, it definitely makes up for in buttery, flaky, salty, sweet goodness.
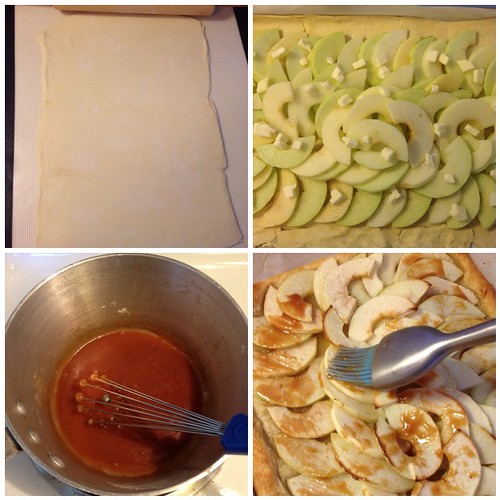
Note: I used one package of Pepperidge Farm puff pastry and put the two sheets on top of each other before rolling.
Tart Base Ingredients
14-ounce package puff pastry, defrosted in fridge overnight
3 large or 4 medium apples (about 1 1/4 pounds)
2 tablespoons granulated sugar
2 tablespoons unsalted butter, cold, cut into small bits
Salted Caramel Glaze Ingredients
1/4 cup granulated sugar
2 tablespoons unsalted butter (or salted, but then ease up on the sea salt)
1/4 teaspoon flaky sea salt (or half as much table salt)
2 tablespoons heavy cream
Preparation
Heat your oven to 400°F. Line a rimmed baking sheet or jelly roll pan with parchment paper. Ideally you would use a 10×15-inch jelly roll pan. A smaller pan will make a thicker tart (and you might need fewer apples).
Lightly flour your counter and lay out your pastry. Flour the top and gently roll it until it fits inside your baking sheet, and transfer it there. If you roll it bigger, just trim the edges.
Peel, core, and slice the apples. (Deb suggested using a mandolin but I used one of those all in one peel/core/slice thingies and it worked just fine.) Leaving a 1/2-inch border, fan the apples around the tart in slightly overlapping concentric rectangles — each apple should overlap the one before so that only about 3/4-inch of the previous apple will be visible — until you reach the middle. Sprinkle the apples evenly with the first two tablespoons of sugar then dot with the first two tablespoons butter.
Bake for 30 minutes, or until the edges of the tart are brown and the edges of the apples begin to take on some color. If you sliced your apples by hand and they were on the thicker side, you might need a little more baking time to cook them through. The apples should feel soft, but dry to the touch. If your puffed pastry bubbles dramatically in any place during the baking time, simply poke it with a knife or skewer so that it deflates.
Meanwhile, about 20 minutes into the baking time, make your glaze. In a small saucepan over medium-high heat, melt your last 1/4 cup sugar; this will take about 3 minutes. Cook the liquefied sugar to a nice copper color, another minute or two. Off the heat, add the sea salt and butter and stir until the butter melts and is incorporated. Add the heavy cream and return to the stove over medium heat. Cook, stirring constantly, until you have a lovely, bronzed caramel syrup, just another minute, two, tops. Set aside until needed. You may need to briefly rewarm it to thin the caramel before brushing it over the tart.
After the tart has baked, transfer it to a cooling rack, but leave the oven on. Using very short, gentle strokes, and brushing in the direction that the apples fan to mess up their design as little as possible, brush the entire tart, including the exposed pastry, with the salted caramel glaze.
Return the apple tart to the oven for 5 to 10 more minutes, until the caramel glaze bubbles. Let tart cool complete before cutting into 12 squares.
Recipe from Smitten Kitchen.
Asian Pear Tart and a Giveaway
Print This Recipe
 The folks at Crave! at Work offered to send me a 10 pound bag of fruit to share with my coworkers and use for their recipe challenge, and I obviously couldn’t say no. When the bag arrived (filled with a few different kinds of pears, mini bananas, and chestnuts), everyone at the office kept saying how cute the mini bananas were, and one colleague couldn’t wait to swipe the chestnuts to roast at home. For some reason, I gravitated toward pears, a fruit I have never baked with nor liked. Call me crazy.
I was super excited when I found this recipe for an Asian Pear Tart in the LA Times, but found myself extremely disappointed when the end result was a very soggy tart. I tweeted to someone at the LA Times test kitchen and she said she will try the recipe and get back to me because she was curious about the method involved. Has anyone tried the recipe?
 So, I ended up finding this “healthier” Asian pear tart recipe, and while it looks pretty, the dough was incredibly difficult to work with. I couldn’t get it to roll out and the amount of dough would never have even rolled to a 10 inch circle, so I ended up doubling the recipe and pressing it into a tart pan. I did however taste the pears, and what do you know–I actually like Asian pears, go figure!
While this recipe won’t win any ribbons, there is a prize for one of you! Crave! at Work is giving away a 10 pound bag of fruit to one of Nosh’s LA area readers. Just leave a comment below telling me your favorite dessert made with fruit and you will be entered in the giveaway to have fruit delivered to your office!
Contest ends at 11:59 p.m. EST on Wednesday, January 5, 2011. One winner will be selected at random shortly thereafter and contacted by email. Please note this contest is only open to Los Angeles area residents.
Ingredients
1 large ripe but firm pear, peeled and thinly sliced
1 teaspoon plus 1/3 cup all-purpose flour, divided, plus additional for dusting
2 tablespoons sugar, divided
1/4 teaspoon ground cinnamon
1/8 teaspoon grated nutmeg
1/8 teaspoon salt
1/3 cup whole-wheat pastry flour
1 tablespoon cold unsalted butter
2 tablespoons walnut oil, or canola oil
1-2 tablespoons cold water
Preparation
Preheat oven to 375 degrees F.
Toss pear slices, 1 teaspoon all-purpose flour, 1 tablespoon sugar, cinnamon, nutmeg and salt in a medium bowl.
Whisk 1/3 cup all-purpose flour, whole-wheat flour and the remaining 1 tablespoon sugar in a medium bowl. Cut in butter with a pastry cutter or a fork until the mixture resembles coarse meal. Sprinkle oil over the mixture and stir with a fork until evenly combined. Add 1 tablespoon water and stir until the dough just stays together when pressed with a fork; add up to 1 additional tablespoon of water if the dough seems too dry.
Line a work surface with parchment paper or a silicone baking mat, generously dust with flour and turn the dough out onto it. Form the dough into a small patty, dust the top with flour and roll into a rustic 10-inch circle, adding more flour if necessary to prevent sticking. Transfer the crust to a baking sheet with parchment paper or baking mat in place.
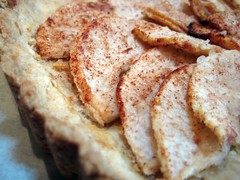
Lay the pear slices in decorative, overlapping circles on top of the crust, leaving a 1-inch border around the edge. Spoon any remaining pear juice over the slices. Pick up the edges of the crust using a spatula and fold over the pears. The crust will not meet in the center.
Bake the tart until lightly browned and bubbling, about 40 minutes. Cool for 10 minutes before serving.
Recipe from Eating Well.
Malted Milk Cookie Tart
Print This Recipe
 As soon as I saw this recipe I ripped it out of the magazine and stuck it on my fridge. I knew I would love it, and not only because it has a tart shell, chocolate, and malted milk balls, but also because it can be made using only one 1/2-cup measuring cup. I hate doing dishes and love recipes that are simple like that. And yes, I am a dork.
I should also mention that I had a really hard time finding malted milk powder in Los Angeles. After calling all of the major grocery store chains in the city, I finally found the Carnation brand at Gelsons, a more upscale chain. Weird and annoying.
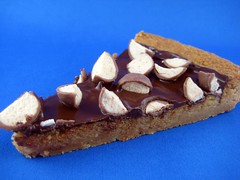
Fortunately, this tart was well worth the time it took to find the malted milk powder. It was super easy to pull together (in fact, I made a second one which I baked in a disposable pie tin), and it tastes amazing. The shell is chewy, not overly sweet, and has a hint of salt, and is the perfect match to the chocolate and malted milk balls on top.
Ingredients
1 1/2 cups all purpose flour
1 cup malted milk powder
1/2 cup sugar
1 teaspoon (scant) coarse kosher salt
1 cup (2 sticks) unsalted butter, cut into 1-inch pieces, room temperature
1/2 cup bittersweet chocolate chips (about 3 ounces; do not exceed 61% cacao)*
1/2 cup malted milk balls, coarsely chopped
Photos of the process.
Preparation
Preheat oven to 325°F. In processor, pulse flour, malted milk powder, sugar, and coarse salt. Add butter; pulse until moist clumps form. Transfer dough to work surface; gather into ball. Press evenly onto bottom of 9-inch-diameter tart pan with removable bottom.
Bake crust until evenly golden brown, about 45 minutes. (Mine was done somewhere around 35-40 minutes. Set the timer for a shorter time and check it regularly.) Scatter chocolate chips over; let stand 5 minutes to soften, then spread melted chocolate over hot crust in well that forms as center sinks. Sprinkle malted milk balls over. Cool completely. Remove tart from pan; cut into wedges.
*Don’t tell anyone, but I didn’t have enough bittersweet so I used some semi-sweet. Shhh.
Recipe from page 50 of July 2010 issue of Bon Appetit.
Apple Brown Sugar Tart
Print This Recipe
Every now and then someone tries something I’ve baked and finds it so good that they ask me to make it and they’ll pay me for it. This is one of those recipes.
Earlier today we had a huge Thanksgiving lunch at work, and when the sign up sheet went around last week, I of course knew I had to make a dessert. (Trust me, you don’t want me cooking for you.) I hate anything pumpkin related, so when I saw this recipe for an apple brown sugar tart, I was smitten. As you know by now, I love anything with brown sugar. This did not disappointment.
The crust was buttery and held its shape well, and the orange marmalade was a nice touch with the apples. I’m still on the fence about the addition of the tapioca, mainly because it looks weird, but I think it works as a thickening agent. (Can anyone back me up on that one?)
Photos of the process here.
Shell Ingredients
1/2 cup slivered almonds
1 1/4 cups all-purpose flour
1/4 cup light brown sugar
1/2 cup sweet cream butter
1 large egg
Filling Ingredients
3 apples, approx. 1½ lb., choose between Gala or Pink Lady
1/3 cup firmly packed light brown sugar
2 tbsp. orange juice
1 tbsp. instant tapioca
3 tbsp. orange marmalade
Shell Preparation
- In a cake or pie pan, toast ½ cup (2 oz.) slivered almonds in a 350° oven until golden, shaking often, about 10 minutes.
- In a food processor or bowl, combine almonds, 1¼ cups all-purpose flour, and ¼ cup firmly packed light brown sugar. Add ½ cup (¼ lb.) butter, cut into pieces; whirl or rub with your fingers until fine crumbs form.
- Add 1 egg yolk; whirl or mix with a fork until dough sticks together. Pat into a ball.
- Press dough over bottom and up sides, flush with rim, of a 9- or 10-inch fluted tart pan with removable rim.
Filling Preparation
- Rinse apples and peel or leave skin on as desired. Core apples and cut into ¼-inch thick slices. In a bowl, gently mix apple slices with 2 tbsp. of the brown sugar, orange juice, and tapioca. Let rest 10 minutes to soften tapioca, then overlap slices neatly in unbaked tart shell.
- In a glass-measuring cup, combine remaining ¼ cup of the brown sugar and marmalade. Heat in a microwave at full power in 30-second intervals, stirring each time, until marmalade is melted. Evenly spread over apple slices.
- Bake in a 350° oven until crust is well browned and apples are tender when pierced, about 45 minutes (mine was done in about 40). Let tart cool on a rack at least 15 minutes. Serve warm or cool, cut into wedges, with ice cream if desired.
Recipe adapted from Safeway.