2009 in Pictures
It’s been another sweet year for Nosh With Me! Thanks for reading and commenting, and I hope everyone has a very happy, healthy, and sweet 2010!

Happy New Year!
Chocolate-Caramel Cookie Bars
 Print This Recipe
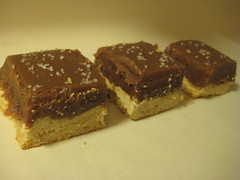 As soon as I saw this recipe in the magazine I ripped out the page and pushed it to the top of my recipe list. Chocolate-caramel and a cookie base, what could be bad, right?
Well. I wanted to like these. And I was sure I would like these. But I didn’t. The crust was good but the chocolate caramel was just too sweet for me. WHAT? I know, I can’t believe I said that either. I don’t think I’ve ever referred to anything as too sweet.
Has you tried these? What did you think?
Photos of the process here.
Crust Ingredients
4 1/2 ounces (9 tablespoons) unsalted butter, room temperature, plus more for parchment
1/4 cup packed light-brown sugar
1 1/2 cups all-purpose flour
1/4 teaspoon table salt
Chocolate Caramel Ingredients
10 1/2 ounces milk chocolate, chopped (2 cups)
1 1/2 cups granulated sugar
1/4 cup water
3 ounces (6 tablespoons) unsalted butter
1 cup heavy cream
1/2 teaspoon table salt
1 tablespoon sea salt, preferably fleur de sel
Preparation
- Preheat oven to 350 degrees. Make the crust: Line a 9-inch square baking pan with parchment, leaving an overhang on all sides; butter parchment, excluding overhang. Beat butter and brown sugar on medium speed until pale and fluffy, about 3 minutes. Add flour and table salt, and beat until just combined.
- Press dough evenly into pan, and bake until lightly browned, about 30 minutes.
- Make the chocolate caramel: Place chocolate in a medium bowl. Heat granulated sugar and water in a small saucepan over medium-high heat, washing sides of pan with a wet pastry brush to prevent sugar crystals from forming, until amber, 10 to 12 minutes. Remove from heat. Add butter, cream, and table salt. Bring to a boil, stirring until smooth. Pour over chocolate. Let stand for 2 minutes. Stir to combine, and let stand until cool, about 10 minutes.
- Pour mixture over crust. Refrigerate at least 4 hours, or overnight. Run a knife around edges; lift parchment to remove whole bar from pan. Sprinkle with sea salt. Trim edges, and cut into 16 bars. Bars can be refrigerated for up to 3 days.
Recipe from Martha Stewart Living.
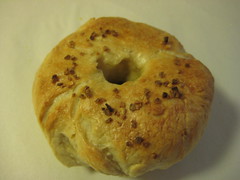
Bagels
Print This Recipe
Growing up, bagels or (non-sugared) cereal were what we ate for breakfast regularly. On weekends my mom would make us these baked pancakes with apples and cinnamon, but most of the time it was bagels.
 In fact, until I went away to college I had never even tasted a Pop Tart or eaten a doughnut for breakfast, and to this day, doughnuts for breakfast are just odd to me. I’ve been told this is a Jewish thing.
Back to the bagel. There are two kinds of bagels: good bagels and bad bagels. Good bagels have a tough exterior and are chewy on the inside. Bad bagels have a soft exterior and are bready on the inside. Seriously, it’s that simple.
My family would usually buy a dozen bagels at a time, and we’d eat them throughout the week, in various ways. For breakfast you can eat them with a schmear (and lox), with jelly, with melted cheese, you name it. At lunch time, you can use a bagel in place of loaf bread in a sandwich. And for dinner–the pizza bagel (my sister and I loved these)! See, bagels are a multi-purpose food. And you can freeze them too. Which is what I did with some of these.
And surprisingly, they weren’t that difficult to make. As with most breads, there was a lot of waiting time, but other than that, the recipe was pretty simple. Unfortunately, mine are ugly and probably could have used more time to initially rise, but I was impatient and my apartment was getting warm (this is when I mention it was 75 degrees here yesterday, don’t hate me.)
Sponge Ingredients
1 teaspoon instant yeast
4 cups unbleached high-gluten or bread flour (I used bread flour)
2 1/2 cups water, room temperature
Dough Ingredients
1/2 teaspoon instant yeast
3 3/4 cups unbleached high-gluten or bread flour (I used bread flour)
2 3/4 teaspoons salt
2 teaspoons malt powder or 1 tablespoon dark or light malt syrup, honey, or brown sugar (I used brown sugar)
To Finish
1 tablespoon baking soda
Cornmeal or semolina flour for dusting
Sesame seeds, poppy seeds, kosher salt, rehydrated dried minced garlic or onions, or chopped onions that have been tossed in oil (optional)
Day one
- To make the sponge, stir the yeast into the flour in a 4-quart mixing bowl. Add the water, whisking or stirring only until it forms a smooth, sticky batter. Cover the bowl with plastic wrap and leave at room temperature for approximately 2 hours, or until the mixture becomes very foamy and bubbly. It should swell to nearly double in size and collapse when the bowl is tapped on the countertop.
- To make the dough, in the same mixing bowl (or in the bowl of an electric mixer), add the additional yeast to the sponge and stir. Then add 3 cups of the flour and all of the salt and malt (I used brown sugar.). Stir (or mix on low speed with the dough hook) until the ingredients form a ball, slowly working in the remaining 3/4 cup flour to stiffen the dough.
- Transfer the dough to the counter and knead for at least 10 minutes (or for 6 minutes by machine). The dough should be firm, stiffer than French bread dough, but still pliable and smooth. There should be no raw flour – all ingredients should be hydrated. The dough should pass the windowpane test and register 77 to 71 degrees F. If the dough seems to dry and rips, add a few drops of water and continue kneading. If the dough seems tacky or sticky, add more flour to achieve the stiffness required. The kneaded dough should feel satiny and pliable but not be tacky.
- Immediately divide the dough into 4 1/2 ounce pieces for standard bagels, or smaller if desired. Form the pieces into rolls.
- Cover the rolls with a damp towel and allow them to rest for approximately 20 minutes.
- Line 2 sheet pans with baking parchment and mist lightly with spray oil. Proceed with one of the following shaping methods:
- Method 1: Poke a hole in a ball of bagel dough and gently rotate your thumb around the inside of the hole to widen it to approximately 2 1/2 inches in diameter (half of this for a mini-bagel). The dough should be as evenly stretched as possible (try to avoid thick and thin spots.)
- Method 2: Roll out the dough into an 8-inch long rope. (This may require rolling part of the way and resting if the pieces are too elastic and snap back, in which case, allow them to rest for 3 minutes and then extend them again to bring to full length. Wrap the dough around the palm and back of your hand, between the thumb and forefinger, overlapping the ends by several inches. Press the overlapping ends on the counter with the palm of your hand, rocking back and forth to seal.
- Place each of the shaped pieces 2 inches apart on the pans. Mist the bagels very lightly with the spray oil and slip each pan into a food-grade plastic bag, or cover loosely with plastic wrap. Let the pans sit at room temperature for about 20 minutes.
- Check to see if the bagels are ready to be retarded in the refrigerator by using the “float test.” Fill a small bowl with cool or room-temperature water. The bagels are ready to be retarded when they float within 10 seconds of being dropped into the water. Take one bagel and test it. If it floats, immediately return the tester bagel to the pan, pat it dry, cover the pan, and place it in the refrigerator overnight (it can stay in the refrigerator for up to 2 days). If the bagel does not float. Return it to the pan and continue to proof the dough at room temperature, checking back every 10 to 20 minutes or so until a tester floats. The time needed to accomplish the float will vary, depending on the ambient temperature and the stiffness of the dough.
The Following Day
- Preheat the oven to 500 degrees F with the two racks set in the middle of the oven. Bring a large pot of water to a boil (the wider the pot the better), and add the baking soda. Have a slotted spoon or skimmer nearby.
- Remove the bagels from the refrigerator and gently drop them into the water, boiling only as many as comfortably fit (they should float within 10 seconds). After 1 minute flip them over and boil for another minute. If you like very chewy bagels, you can extend the boiling to 2 minutes per side. While the bagels are boiling, sprinkle the same parchment-lined sheet pans with cornmeal or semolina flour. (If you decide to replace the paper, be sure to spray the new paper lightly with spray oil to prevent the bagels from sticking to the surface.) If you want to top the bagels, do so as soon as they come out of the water. You can use any of the suggestions in the ingredients list or a combination.
- When all the bagels have been boiled, place the pans on the 2 middle shelves in the oven. Bake for approximately 5 minutes, then rotate the pans, switching shelves and giving the pans a 180-degree rotation. (If you are baking only 1 pan, keep it on the center shelf but still rotate 180 degrees.) After the rotation, lower the oven setting to 450 degrees F and continue baking for about 5 minutes, or until the bagels turn light golden brown. You may bake them darker if you prefer.
- Remove the pans from the oven and let the bagels cool on a rack for 15 minutes or longer before serving.
Recipe from Peter Reinhart via Smitten Kitchen.
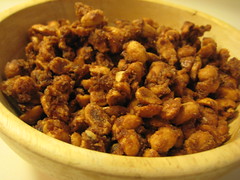
Sugared Peanuts
Print This Recipe
 When I was kid, every year just before Labor Day my dad and I were among the first people to visit The Franklin Cider Mill when it opened for the season. We would gorge ourselves on fresh apple cider (you could even watch the wheel crush the apples!) and hot greasy doughnuts, fresh from the fryer. And there was always a caramel apple that would find its way to our house too.
You’re probably wondering why I’m telling you about a cider mill in a post about peanuts, aren’t you? Well, it’s the smell. The smell of the sugar and spices coating the peanuts while heating in the oven smelled exactly like the cider mill. And for a few hours, my apartment here in Los Angeles smelled like my childhood in Michigan. Trippy. And delicious.
And so are these peanuts. Of course, the original recipe called for pecans, but I’m not a fan so I subbed in peanuts. I’m pretty sure you could use most kinds of nuts. Anyway, these are the kinds of nuts that would go well in a salad, but trust me, they’re just as yummy going straight from your hand to your mouth!
Ingredients
1/2 cup butter or margarine, melted
2 egg whites
1/2 teaspoon salt
1 cup sugar
1 1/2 teaspoons apple pie spice
1 pound peanuts
Preparation
- Preheat oven to 325°F. Pour butter into a 15 1/2×10 1/2×1-inch jelly roll pan. (I used a Silpat on top of parchment on the pan because my cookie sheet has seen better days.)
- In large bowl, beat egg whites and salt until foamy. Gradually add sugar and apple pie spice, beating just until blended. Add peanuts and stir to coat.
- Spread peanuts in a single layer in prepared pan. Bake about 30 minutes or until peanuts are crisp and butter is absorbed, turning peanuts over with a metal spatula every 10 minutes. Cool peanuts on baking sheet until crisp, about 2 hours. Store tightly covered.
Makes about 4 cups.
Recipe adapted from Domino Sugar.