Lemon Pound Cake
 Print This Recipe
Hi! Remember me? I’m the one that made baked donuts and posted a bunch of Passover stuff then sort of disappeared (except for on Twitter, you can always find me there!). Things have been kind of crazy over here. My back got really bad again (MRI and nerve test next week, eeks!), then my beloved KitchenAid mixer starting wobbling and almost walked off my counter, and then I got laid off from my job of 3+ years. On the flip side, now that I’m home during the day, I was able to spend three hours on Google finding potential solutions to the wobbly mixer. Fingers crossed that it is finally fixed!
A couple days after I was laid off, I went down to San Diego to celebrate my mom’s birthday with the family. Around that time, my mom apparently asked my dad to pick up lemons while he was at Costco. And pick up lemons, he did. A HUGE bag of lemons, more than my mom would ever use before they would go bad. Fortunately, my sister and I benefited from my dad’s shopping mishap, and I decided a lemon cake was in order.

With my mixer not wobbling off the counter, I got to work zesting, juicing, and mixing, and had high hopes. Sadly, those hopes were squashed. I’m sure this is a perfectly decent lemon cake, even if the texture and taste of the bottom and sides was a little cornbread-ish. But once you have tasted Ina’s Lemon Cake, any other lemon cake is guaranteed to fail in comparison.
Now if you’ll excuse me, I have Judge Judy to watch before I head to happy hour at 5:00.
Ingredients
3 cups all-purpose flour
1 Tbsp baking powder
3/4 tsp salt
3 cups sugar
1 cup unsalted butter, room temperature
1/2 cup shortening, room temperature
5 large eggs
1 cup whole milk
6 Tbsp lemon juice
1 lemon, zested
Preparation
Preheat oven to 350F.
Spray or butter and flour 2 loaf pans or one large bundt pan. (I used a 10-cup bundt pan and had about two extra cups of batter so I made mini bundts.)
Sift flour, baking powder and salt into medium bowl. Set aside.
Using an electric mixer, cream together butter, shortening and sugar. Add eggs one at a time, beating until well blended after each one.
Add dry ingredients in three additions to butter mixture alternately with milk, beginning and ending with flour mixture. Beat at low speed just until blended after each addition. Mix in lemon juice and zest.
Pour batter into prepared pans. Bake cakes until tester inserted into center comes out clean, about 55 minutes. Cool cakes in pans for 15 minutes. Turn cakes out onto racks and cool completely.
Recipe from Plain Chicken.
Chocolate-Caramel Cookie Bars
Print This Recipe
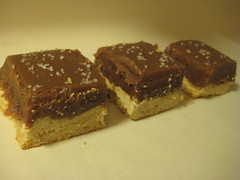 As soon as I saw this recipe in the magazine I ripped out the page and pushed it to the top of my recipe list. Chocolate-caramel and a cookie base, what could be bad, right?
Well. I wanted to like these. And I was sure I would like these. But I didn’t. The crust was good but the chocolate caramel was just too sweet for me. WHAT? I know, I can’t believe I said that either. I don’t think I’ve ever referred to anything as too sweet.
Has you tried these? What did you think?
Photos of the process here.
Crust Ingredients
4 1/2 ounces (9 tablespoons) unsalted butter, room temperature, plus more for parchment
1/4 cup packed light-brown sugar
1 1/2 cups all-purpose flour
1/4 teaspoon table salt
Chocolate Caramel Ingredients
10 1/2 ounces milk chocolate, chopped (2 cups)
1 1/2 cups granulated sugar
1/4 cup water
3 ounces (6 tablespoons) unsalted butter
1 cup heavy cream
1/2 teaspoon table salt
1 tablespoon sea salt, preferably fleur de sel
Preparation
- Preheat oven to 350 degrees. Make the crust: Line a 9-inch square baking pan with parchment, leaving an overhang on all sides; butter parchment, excluding overhang. Beat butter and brown sugar on medium speed until pale and fluffy, about 3 minutes. Add flour and table salt, and beat until just combined.
- Press dough evenly into pan, and bake until lightly browned, about 30 minutes.
- Make the chocolate caramel: Place chocolate in a medium bowl. Heat granulated sugar and water in a small saucepan over medium-high heat, washing sides of pan with a wet pastry brush to prevent sugar crystals from forming, until amber, 10 to 12 minutes. Remove from heat. Add butter, cream, and table salt. Bring to a boil, stirring until smooth. Pour over chocolate. Let stand for 2 minutes. Stir to combine, and let stand until cool, about 10 minutes.
- Pour mixture over crust. Refrigerate at least 4 hours, or overnight. Run a knife around edges; lift parchment to remove whole bar from pan. Sprinkle with sea salt. Trim edges, and cut into 16 bars. Bars can be refrigerated for up to 3 days.
Recipe from Martha Stewart Living.
Oatmeal Caramel Bars
Print This Recipe
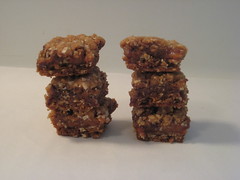 Have you ever read reviews of a five-star recipe that everyone is raving about it and then gotten excited to make it, because you know it’s going to be spectacular and your coworkers will just love it? OK good, I thought you have. But have you ever made the five-star recipe that everyone is raving about only to be incredibly disappointed and left wondering HUH? This is one of those recipes.
I took the bulk of the reviewers suggestions and implemented them only to find the end result very eh. The cookie is an ooey, gooey mess of oatmeal, too much chocolate (I know, I never thought I would utter those words either), and a thin layer of caramel. Disappointing. And I’m guessing there will be some left at the end of the workday tomorrow.
Ingredients
32 individually wrapped caramels, unwrapped
6 tablespoons heavy cream
2 cup all-purpose flour
2 cup rolled oats
1 1/2 cup brown sugar
1 teaspoon baking soda
1/2 teaspoon salt
1 1/4 cup butter, melted
1/2 cup semisweet chocolate chips
Preparation
- Preheat oven to 350 degrees F (175 degrees C). Butter a 9×13 inch baking pan lined with foil or parchment paper. In a medium saucepan over low heat, melt together the caramels and heavy cream, stirring occasionally until smooth.
- In a medium bowl, stir together the flour, oats, brown sugar, baking soda and salt. Stir in the melted butter until well blended (I used my hands). Press half of the mixture into the bottom of pan. Reserve the rest.
- Bake the crust for 15 minutes in the preheated oven. Remove and sprinkle with chocolate chips. Pour the caramel mixture over the top and then crumble the remaining crust mixture over everything (I used my hands to pat the mixture down).
- Return to the oven and bake for an additional 20 minutes, or until the top is lightly toasted (you may want to check it around 15 minutes). Cool then cut into squares.
Recipe adapted from Allrecipes.
Peanut Butter Squares
Print This Recipe
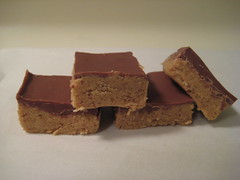 Chocolate and peanut butter–the two great tastes that always taste great together, right? Wrong. I know, I know, you didn’t think it was possible. Neither did I, until I made these. But they’re terrible. I mean, really, really terrible. The peanut butter base is mushy and gritty and the overall texture is just ick.
After I got over my initial disappointment, I Googled the recipe and found rave reviews which totally surprised me. Have you made these? What did you think?
Photos of the process here.
Base Ingredients
Scant 1/4 cup dark brown sugar
1 1/3 cups confectioners’ sugar
scant 1/4 cup unsalted butter
3/4 cup plus 2 tablespoons creamy peanut butter
Topping Ingredients
7 ounces milk chocolate
4 ounces bittersweet chocolate
1 tablespoon unsalted butter
Preparation
- Stir all the ingredients for the base together until smooth.
- I use the paddle attachments to my mixer, which my children love operating, but a bowl and a wooden spoon will do the job just as well.
- You will find, either way, that some of the dark brown sugar stays in rubbly but very small, lumps, but don’t worry about that.
- Press the sandy mixture into a 9-inch square brownie pan and make the surface as even as possible.
- To make the topping, melt the chocolates and butter together (in a microwave for ease, for a minute or two on medium) and spread the base.
- Put the pan in the refrigerator to set. When the chocolate has hardened, cut into small squares because, more-ish as it undeniably is, it is also very rich.
Makes approximately 48.
Recipe from How to Be Domestic Goddess via WCHS.
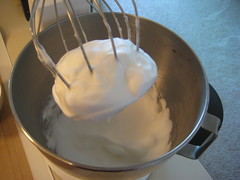
Marshmallows (Dorie Greenspan’s Recipe)
Print This Recipe
 The minute I began making these I had a feeling it was going to be a disaster. As I reviewed the ingredients I was a little surprised by the egg whites the recipe called for. I’ve made marshmallows twice, both times sans eggs (recipes here and here) and they were super easy and delicious. This time however, no such luck.
 Here’s a quick rundown of my problems. First, I measured out all of my ingredients ahead of time as I always do yet I somehow ended up with an extra tablespoon of sugar and read the recipe about 10 times trying to figure out when and to what I should have added it. I eventually just threw it in with the egg whites. Next, because of the Hot Sugar Blister Incident of 2008, there was no way in hell I going to pour 265 degree boiling sugar into a mixer on medium speed. Adventurous when it comes to recipes, maybe; crazy, I am not.
 So instead, I put the mixer on low and poured the boiling sugar into the egg white and then–I smelled scrambled eggs. I kid you not. By now, I was 99% sure this was going to be a failure but I continued on, committed as always, and followed the rest of the steps. I let the mixture (which somehow looked correct) sit out on the counter overnight but the next morning, it was bad. Gooey and globby and slimey and not what marshmallows should look like. I suppose I should also note that I live in southern California and being as we had record high temps this past weekend (95 degrees in Hollywood, insane!), I didn’t really have a “cool, dry place” to let the marshmallows set. Perhaps that contributed to the disaster?
And so, it is safe to say that the next time I feel the need to use the whisk attachment of my KitchenAid, you better believe I will be using an eggless marshmallow recipe.
Ingredients
About 1 cup potato starch (found in the kosher foods section of supermarkets) or cornstarch
2 tablespoons light corn syrup
2 1/4-ounce packets unflavored gelatin
3 large egg whites, at room temperature
3/4 cup cold water
1 tablespoon pure vanilla extract
1 1/4 cups plus 1 tablespoon sugar*
Preparation
GETTING READY: Line a rimmed baking sheet — choose one with a rim that is 1 inch high — with parchment paper and dust the paper generously with potato starch or cornstarch. Have a candy thermometer at hand.
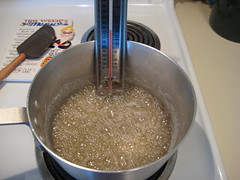
Put 1/3 cup of the water, 1 1/4 cups of the sugar and the corn syrup in a medium saucepan over medium heat. Bring the mixture to a boil, stirring until the sugar dissolves. Once the sugar is dissolved, continue to cook the syrup — without stirring — until it reaches 265 degrees F on the candy thermometer, about 10 minutes.
While the syrup is cooking, work on the gelatin and egg whites. In a microwave-safe bowl, sprinkle the gelatin over the remaining cold water (a scant 7 tablespoons) and let it sit for about 5 minutes, until it is spongy, then heat the gelatin in a microwave oven for 20 to 30 seconds to liquefy it. (Alternatively, you can dissolve the gelatin in a saucepan over low heat.)
Working in the clean, dry bowl of a stand mixer fitted with the whisk attachment or in another large bowl with a hand mixer, beat the egg whites on medium-high speed until firm but still glossy — don’t overbeat them and have them go dull.
As soon as the syrup reaches 265 degrees F, remove the pan from the heat and, with the mixer on medium speed, add the syrup, pouring it between the spinning beater(s) and the sides of the bowl. Add the gelatin and continue to beat for another 3 minutes, so that the syrup and the gelatin are fully incorporated. Beat in the vanilla.
Using a large rubber spatula, scrape the meringue mixture onto the baking sheet, laying it down close to a short end of the sheet. Then spread it into the corners and continue to spread it out, taking care to keep the height of the batter at 1 inch; you won’t fill the pan. Lift the excess parchment paper up to meet the edge of the batter, then rest something against the paper so that it stays in place (I use custard cups).
Dust the top of the marshmallows with potato starch or cornstarch and let the marshmallows set in a cool, dry place. They’ll need about 3 hours, but they can rest for 12 hours or more.
Once they are cool and set, cut the marshmallows with a pair of scissors or a long thin knife. Whatever you use, you’ll have to rinse and dry it frequently. Have a big bowl with the remaining potato starch or cornstarch at hand and cut the marshmallows as you’d like — into squares, rectangles or even strips (as they’re cut in France). As each piece is cut, drop it into the bowl. When you’ve got 4 or 5 marshmallows in the bowl, reach in with your fingers and turn the marshmallows to coat them with starch, then, one by one, toss the marshmallows from one hand to the other to shake off the excess starch; transfer them to a serving bowl. Cut and coat the rest of the batch.
*Where does this extra tablespoon go?!
SERVING: Put the marshmallows out and let everyone nibble as they wish. Sometimes I fill a tall glass vase with the marshmallows and put it in the center of the table — it never fails to make friends smile. You can also top hot chocolate or cold sundaes with the marshmallows.
STORING: Keep the marshmallows in a cool, dry place; don’t cover them closely. Stored in this way, they will keep for about 1 week — they might develop a little crust on the outside or they might get a little firmer on the inside, but they’ll still be very good.
Playing Around
RASPBERRY MARSHMALLOWS: Fruit purees are excellent for flavoring these candies. For raspberry marshmallows, you’ll need a generous 1/3 cup of puree; reduce the vanilla extract to 1/4 teaspoon. After the batter is mixed, gently fold in the puree with a rubber spatula. You can use the same measurements and technique for other purees, such as strawberry, mango and passion fruit.
CAPPUCCINO MARSHMALLOWS: Sift 1/4 cup unsweetened cocoa powder, 2 tablespoons instant espresso powder and 1/2 teaspoon ground cinnamon together into a small bowl. Stir in 1/3 cup boiling water and mix until smooth. Reduce the vanilla extract to 1/2 teaspoon, and add it to the espresso mix. After you add the sugar syrup and gelatin to the meringue, beat in the espresso mixture and continue.
LIGHT CHOCOLATE MARSHMALLOWS: Melt 3 ounces bittersweet or semisweet chocolate and stir in 2 1/2 tablespoons unsweetened cocoa powder. Reduce the vanilla extract to 1/4 teaspoon, and after the marshmallow batter is mixed, fold in the chocolate mixture with a large rubber spatula.
PUMPKIN SPICE MARSHMALLOWS: Whisk together 1/2 cup canned unsweetened pumpkin puree, 1 teaspoon ground cinnamon, 1/2 teaspoon ground ginger, a pinch of freshly grated nutmeg and a pinch of ground allspice. After the marshmallow batter is mixed, fold in the spiced pumpkin with a large rubber spatula.
Makes about 1 pound marshmallows.
Recipe from Baking: From My Home To Yours by Dorie Greenspan.