Challah
 Print This Recipe
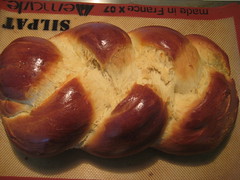 Challah is an egg bread traditionally eaten on shabbat (the Jewish sabbath) that is similar in texture and taste to brioche, but is made without milk or butter. For shabbat, challah is usually braided using three or six strands, and on Rosh Hashana, it’s usually twisted in a circular shape (to symbolize the cycle of a year, as Rosh Hashana is the Jewish new year). And often times the bread is sprinkled with sesame or poppy seeds.
As a kid, I ate my sandwiches on challah or challah rolls. And my mom always used it when she would make us french toast. Seriously, challah makes for the most incredible french toast! But the best way to eat a challah? The way my family does it now–rip into it and tear out the insides, leaving a shell of the crust. Mmm.
This recipe, while time consuming, was pretty simple and oh so good! (In fact, I’m going to make a few loaves for Rosh Hashana later this month.) The bread is soft and chewy with a nice crust and the dough was easy to work with. There’s a lot of sitting and waiting, so it’s best to do it when you have stuff you can complete in spurts while waiting for the dough to rise.
Finally, I halved the recipe (because I was trying out different recipes) but this is so good you should make the full recipe and freeze one loaf.
Photos of the process here.
Ingredients
1 1/2 packages active dry yeast (1 1/2 tablespoons)
1 tablespoon plus 1/2 cup sugar
1/2 cup vegetable oil, more for greasing bowl
5 large eggs
1 tablespoon salt
8 to 8 1/2 cups all-purpose flour
Poppy or sesame seeds for sprinkling (optional)
Preparation
- In a large bowl, dissolve yeast and 1 tablespoon sugar in 1 3/4 cups lukewarm water.
- Whisk oil into yeast, then beat in 4 eggs, one at a time, with remaining sugar and salt. Gradually add flour. When dough holds together, it is ready for kneading. (You can also use a mixer with a dough hook for both mixing and kneading.)
- Turn dough onto a floured surface and knead until smooth. Clean out bowl and grease it, then return dough to bowl. Cover with plastic wrap, and let rise in a warm place for 1 hour, until almost doubled in size. Dough may also rise in an oven that has been warmed to 150 degrees then turned off. Punch down dough, cover and let rise again in a warm place for another half-hour.
- (I tried this but got entirely too confused and just braided it with three strands, the same way you braid hair.) To make a 6-braid challah, either straight or circular, take half the dough and form it into 6 balls. With your hands, roll each ball into a strand about 12 inches long and 1 1/2 inches wide. Place the 6 in a row, parallel to one another. Pinch the tops of the strands together. Move the outside right strand over 2 strands. Then take the second strand from the left and move it to the far right. Take the outside left strand and move it over 2. Move second strand from the right over to the far left. Start over with the outside right strand. Continue this until all strands are braided. For a straight loaf, tuck ends underneath. For a circular loaf, twist into a circle, pinching ends together. Make a second loaf the same way. Place braided loaves on a greased cookie sheet with at least 2 inches in between.
- Beat remaining egg and brush it on loaves. Either freeze breads or let rise another hour.
- If baking immediately, preheat oven to 375 degrees and brush loaves again. If freezing, remove from freezer 5 hours before baking. Then dip your index finger in the egg wash, then into poppy or sesame seeds and then onto a mound of bread. Continue until bread is decorated with seeds.
- Bake in middle of oven for 35 to 40 minutes, or until golden. Cool loaves on a rack.
Yield: 2 challahs.
Joan Nathan recipe from The New York Times.
Low Fat Banana Muffins
Print This Recipe
 I’ve read about how applesauce can be used in baked goods in place of fats such as eggs, oil, and butter but hadn’t tried the substitution until now. And I’m happy to report it’s a good substitution!
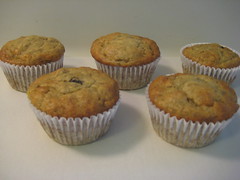
Of course, these muffins are not meant to replace my favorite banana bread. They are simply a low fat alternative, and even with the chocolate chips they are still only three points each. They’re easy (no need for a mixer!), moist and flavorful, and lighter than I was expecting after reading some of the reviews.
The lightness may be because I made muffins rather than a loaf (I like wrapping them individually then freezing them so I can defrost one at a time). I made the mistake of using paper liners, and the muffins completely stuck to them so I suggest spraying a muffin tin with Pam and forgoing the liners.
Photos of the process here.
Ingredients
4 very ripe bananas
1 1/2 cups all-purpose flour
3/4 cup white sugar (I used Splenda Sugar Blend)
1 teaspoon vanilla extract
1 teaspoon baking soda
1/2 teaspoon baking powder
1 egg
4 tablespoons applesauce (I made my own)
1/2 cup chocolate chips, optional
Preparation
- Mash bananas in a bowl.
- Add all other ingredients and mix well.
- Pour into greased loaf pan.
- Bake at 350 degrees for 13-15 minutes if making muffins (or 50 to 60 minutes if making a loaf), or until toothpick inserted into center of cake comes out clean.
Yields 16 muffins or one loaf.
Recipe adapted from Recipe Zaar.
Brioche
Print This Recipe
 When the kind folks at KaTom Restaurant Supply offered to send me a silicone brioche mold to test out, I of course said YES! (Note: They also sent me one to give away, so stay tuned for your chance to win it later this week.) This recipe was a learning experience for me, as I have never a) made a yeast bread or b) baked with a silicone mold.
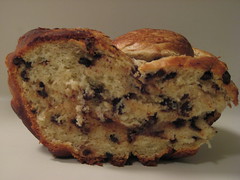
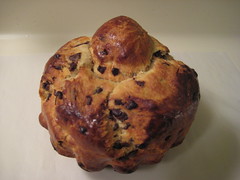
As you can (or actually, can’t tell from the picture), I chose to do the brioche à tête (think round knob on the top of the loaf); my skills are obviously lacking. Also, I dumped in some mini chocolate chips (1/2 cup? 3/4 cup?), because I figured they couldn’t hurt. I mean, I like challah with chocolate chips, so what’s not to like about brioche with chocolate chips, right?
 The recipe itself wasn’t difficult, there’s just lots of do this and wait, then do this and wait some more. And the recipe instructions were kind of vague at times (e.g., Fold it over several times, making it pliable without becoming too soft. What exactly is too soft?) I wasn’t thrilled with the flavor, but then again, I rarely eat brioche plain, usually it’s used for French toast and drenched in syrup. I’ll probably bring it in to my office guinea pigs tomorrow and see what they say.
On a positive note, the silicone mold is really cool. I didn’t have to grease it, and the brioche just popped right out. And it was super easy to clean–there wasn’t even a crumb, which is always a plus!
Photos of the process here.
– – –
Unrelated to the recipe, Nosh With Me is now on Twitter. Feel free to follow.
Ingredients
3 cups plus 2 tablespoons unbleached all-purpose flour
1 packet active dry yeast
1/4 cup lukewarm water
4 large eggs
2 tablespoons sugar
3/4 teaspoon salt (optional)
1 cup (2 sticks) cold, unsalted butter
Preparation
- Pace 2 cups of the flour, the yeast, water, sugar, and eggs into a bowl and whisk until smooth. Cover the mixture and let it sit for 45 minutes
- Add the remaining 1 cup of flour, the salt, and beat with electric mixer for 45 minutes.
- On a loured surface, flatten the butter into a rectangle about 1/4-inch thick with the heel of your hand or on a rolling pin. Fold it over several times, making it pliable without becoming too soft. Add the butter to the dough and beat until it’s fully incorporated.
- Cover the dough and allow it to rise for 1 hour.
- Turn the dough out onto a lightly floured surface and fold it over several times. Place the dough into a greased bowl, cover, and refrigerate it overnight. The chilled dough will be less sticky.
- Remove the dough from the refrigerator and quickly form it into a round loaf. Place loaf into the brioche pan. Cover with a light cloth and allow it to rise for 2 1/2 to 3 hours, or until it’s doubled and is crowned over.
- Beat the egg yolk with 1 tablespoon of water, and brush all exposed surfaces with the egg wash.
- Bake in a preheated 375 degree F (190 degree C) oven until it’s oglden brown, about 45-50 minutes.
- Remove from the oven and cool it in the pan for 10 minutes. Remove from pan, and cool completely on a rack.
For a classic topknot, cut off an egg sized piece of the dough when it is removed from the refrigerator, allow it to rise separately in a small bowl, and add it to the top of the main loaf just before baking.
Recipe (sans chocolate chips) from the brioche mold packaging.
Pecan Sour Cream Biscuits
Print This Recipe
This is my first Tuesdays With Dorie post as well as my first attempt at making biscuits, and I think they both went well! (Photos of the process here.)
First things first–I’m not a huge biscuit person. Growing up, the most popular kind of bread in our house was bagels (you can eat anything on a bagel!) so the majority of my biscuit consumption has been limited to the rare times I have ordered something at a restaurant that comes with a biscuit. (Every Father’s Day it’s chicken, waffles, and biscuits at Roscoe’s in Hollywood, but that’s a story for another time.)
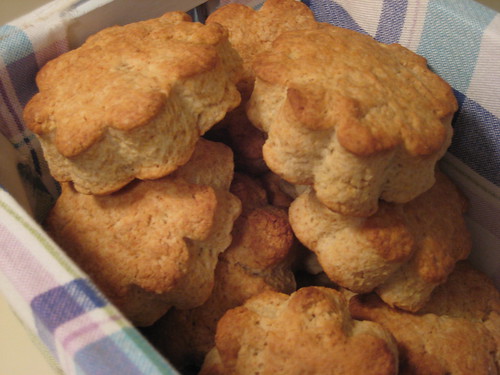
These were good, but not exactly what I imagined them to be. I suppose I should have realized that a biscuit with brown sugar would be a bit sweeter than your everyday biscuit, but for some reason, I ignored that hint. Also, these were definitely a lot denser and browned a lot more than I expected.
And of course, it should be noted I don’t have a round cookie or biscuit cutter, hence the um, flower shaped biscuits. Also, I left out the nuts because nuts in baked goods just ruin everything! (So says my ten-year-old self.)
Ingredients
2 cups all-purpose flour (or 1 3/4 cups all-purpose flour and 1/3 cup cake flour)
1 tablespoon baking powder
1/2 teaspoon salt
1/4 teaspoon baking soda
1/4 cup (packed) light brown sugar
5 tablespoons cold unsalted butter, cut into 10 pieces
1/2 cup cold sour cream
1/4 cold whole milk
1/3 cup finely chopped pecans, preferably toasted
Center a rack in the oven and preheat the oven to 425 degrees F. Get out a sharp 2-inch-diameter biscuit cutter and line a baking sheet with parchment or a silicone mat.
Preparation
Whisk the flour(s), baking powder, salt, and baking soda together in a bow. Stir in the brown sugar, making certain there are no lumps. Drop in the butter and, using your fingers, toss to coat the pieces of butter with flour. Quickly, working with your fingertips (my favorite method) or a pastry blender, cut and rub the butter into the dry ingredients until the mixture is pebbly. You’ll have pea-size pieces, pieces the size of oatmeal flakes and pieces the size of everything in between– and that’s just right.
Stir the sour cream and milk together and pour over the dry ingredients. Grab a fork and gently toss and turn the ingredients together until you’ve got a nice soft dough. Now reach into the bowl with your hands and give the dough a quick gentle kneading– 3 or 4 turns should be just enough to bring everything together. Toss in the pecans and knead 2 to 3 times to incorporate them.
Lightly dust a work surface with flour and turn out the dough. Dust the top of the dough very lightly with flour, pat the dough out with your hands or toll it with a pin until it is about 1/2 inch high. Don’t worry if the dough isn’t completely even– a quick, light touch is more important than accuracy.
Use the biscuit cutter to cut out as many biscuits as you can. Try to cut the biscuits close to one another so you get the most you can out of the first round. By hand or with a small spatula, transfer the biscuits to the baking sheet. Gather together the scraps, working with them as little as possible, pat out to a 1/2-inch thickness and cut as many additional biscuits as you can; transfer these to the sheet. (The biscuits ca be made to this point and frozen on the baking sheet, then wrapped airtight and kept for up to 2 months. Bake without defrosting– just add a couple more minutes to the oven time.)
Bake the biscuits for 14-18 minutes, or until they are tall, puffed and golden brown. Transfer them to a serving basket.
Yields 12 biscuits.
Recipe from Baking: From My Home To Yours by Dorie Greenspan.
Gougères
Print This Recipe
 Last week, Deb posted about these delicious Gougères she made. I took one look at the recipe and thought how could they possibly not be amazing? I mean, pastry and cheese? Yum!
Well…they’re good. The cayenne flavor is pretty nonexistent, but the cheese is definitely sharp and the pastry is flaky on the outside and light and airy on the inside. They ended up a little smaller than I expected. The recipe says to put them two inches apart on the cookie sheet, so I expected them to spread a little; they did, but just barely. They’re pretty small–you could easily eat one in two bites. I think they would be delicious with soup.
Ingredients
1 cup milk
4 tablespoons unsalted butter (1/2 stick)
1/4 teaspoon salt
Dash cayenne pepper
1 cup all-purpose flour
3 large eggs
1/2 teaspoon paprika
1/2 cup grated Parmesan cheese
1 1/2 cups grated Swiss cheese (Emmenthaler or Gruyère)
Coarse salt (fleur de sel or kosher salt) to sprinkle on top
Directions
- Bring the milk, butter, salt, and cayenne to a boil in a saucepan.
- Remove from the heat, add the flour all at once, and mix vigorously with a wooden spatula until the mixture forms a ball.
- Return the pan to the heat and cook over medium heat, stirring occasionally, for about 1 minute to dry the mixture a bit.
- Transfer to the bowl of a food processor, let cool for 5 minutes, then process for about 5 seconds.
- Add the eggs and paprika to the processor bowl, and process for 10 to 15 seconds, until well mixed. Transfer the choux paste to a mixing bowl, and let cool for 10 minutes.
- Preheat the oven to 375°. Line a cookie sheet with a reusable nonstick baking mat or parchment paper. Reserve 1 tablespoon of the grated Parmesan cheese, then add the remainder and all the Swiss cheese to the choux paste. Stir just enough to incorporate.
- Using a tablespoon, scoop out a level tablespoon of the gougère dough, and push it off the spoon onto the cooking mat.
- Continue making individual gougères, spacing them about 2-inches apart on the sheet. Sprinkle a few grains of coarse salt and a little of the reserved Parmesan cheese on each gougère. Bake for about 30 minutes, until nicely browned and crisp.
Serve lukewarm or at room temperature with drinks.
Makes about 30.
Recipe from Food & Wine.