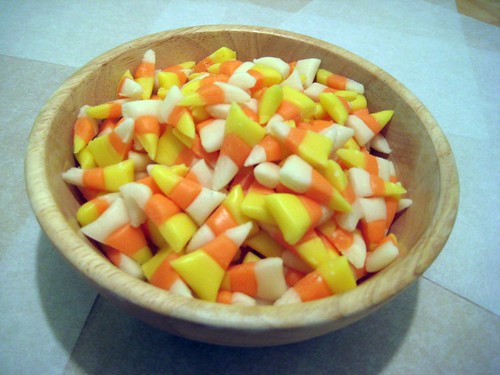
Candy Corn
 Print This Recipe
I saw this recipe over on The Urban Housewife and immediately decided this recipe was a must-try. I have to admit this was my second attempt at making these. The first time, I followed the directions perfectly and ended up with a super stiff ball of dough and was extremely disappointed. After doing some research, I noticed other candy corn recipes said to boil the mixture for five minutes over low heat. This recipe calls for medium-high heat. So, the second time around I boiled the mixture over low heat, and it was a success!
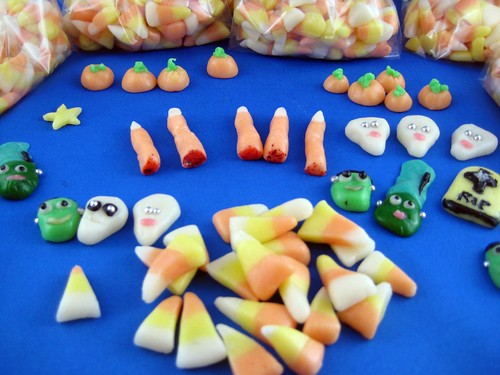
My amazingly talented friend Lauren made the spooky shapes. Aren’t they awesome?
These are good. A slightly different flavor from store-bought candy corn and a completely different texture. I had hoped these would firm up a bit more to get that more solid shell around the outside but that didn’t happen. I’m thinking maybe a medium rather than low boil would do the trick.
Note from Epicurious
When you’re at the grocery store, pick up some plastic gloves. They’ll make it easy to knead the dough without ending up with food-coloring-stained hands.
Photos of the process here.
Ingredients
1 cup sugar
2/3 cup corn syrup
5 tablespoons unsalted butter
1 teaspoon vanilla extract
2 1/2 cups powdered sugar
1/3 cup non fat milk powder
1/4 teaspoon sea salt
Red and yellow food coloring
Preparation
Bring first 4 ingredients to boil over high heat in heavy large saucepan. Reduce heat to medium-high (I reduced to low) and boil 5 minutes, stirring occasionally. Remove from heat. Sift powdered sugar, milk powder, and salt into medium bowl. Add powdered sugar mixture to pan; stir to combine. Let mixture stand until slightly warm to touch, about 20 minutes.
Divide dough into 3 equal pieces; place each piece in small bowl. Add several drops of yellow food coloring to one piece of dough. Using plastic gloves to protect hands, knead food coloring into dough until smooth and color is even, about 15 minutes. Repeat using red and yellow food coloring (to make orange) with second piece. Leave last piece white; knead dough until smooth. Roll each piece into a thin rope (don’t roll too thin or dough will break). Push three ropes together to form long rectangle. Using sharp knife, cut ropes into triangles. Using fingers, shape candy corn as desired. Store at room temperature in airtight container, separating layers with pieces of waxed paper to prevent sticking.
Or: If you’re feeling creative, color dough various colors and shape into spooky shapes!
Yields about five million pieces. OK not really, but a lot.
My notes:
- I boiled at low rather than medium-high like the recipe calls for.
- I separated each of the colors into four ropes rather than one long rope.
- Make sure you have a lot of free time, because these things take forever to cut.
- I got tired of cutting after about the twelve millionth piece, so by the time I got to the third rope, I cut them larger.
- I didn’t have gloves, so I put sandwich size Ziplocs over my hands until the color was somewhat kneaded in.
Recipe from BA Blog on Epicurious via The Urban Housewife.
Comments
29 Responses to “Candy Corn”
These look great! I think that solid shell in commerical candy corn is because they glaze them with a sugar/bees wax mixture at the end.
That makes sense, thanks Rachel!
Rachel is right. Store bought candy corn is tumbled in big drums to round off the edges and at the same time a glucose mixture is tumbled into it in order to give it a hard, shinier glaze. The recipe you provide is nicer because there aren’t so many additives. I think I’ll try this next week! Thanks!
The more people that try this recipe, the more I want to make it!
Um, Candy Corn is my favorite. Save some for me!
Great minds think alike – I was going to mention the glazing process too.
These look adorable but I would never attempt them. I have the worst luck when it comes to making candy.
YOU ARE A ROCK STAR! Following such a tedius recipe and achieving such great results makes you one of my idols. I want to do this (but I’m fearing my result)!
Made these last night…they are SUPER sweet (i was only able to eat a few) but my office LOVED them!! I’m based out of NY so instead of using the traditional candy corn colors (yellow, orange and white) I used NY Giants colors (white red blue). They came out adorable. The only tedious process is the actual shaping of each corn.
They were delicious though 🙂
You’re my hero! I have wnated to make these for a couple of years but never got around to it…now that I see your results I will make sure there are on the candy list for next year!
I just discovered your website and love it. The recipes are great, your photos are fabulous and the organization really is wonderful.
You are a brave woman to work in a kitchen like this — esp. since it’s an electric oven. My kitchen is exactly a duplicate of yours so I know the problems involved. The builders in LA must’ve shared the same plans over and over again — all over town. I made my dining area an extension by adding a big baking table by John Boos that I managed to get for next to nothing…but I digress.
The intent of this missive is to suggest to you that you use one of those new pizza cutters to cut the candy corn in multiple strings. They are about a foot long and would make the chore of cutting soooo much easier.
Thanks for the recipe! My son is allergic to artificial colors so I figured I’d give this a try. I used natural Orange and Yellow colors by Seelect Tea (yes there’s really two e’s) which you can get at WholeFoods or from SelectTea.com.
The colors are much more faded, but it made him so happy. (The white was a bit dull because I only had organic sugar which was unbleached.) Here’s a photo: http://twitpic.com/e511
Boy it sure takes a lot of muscle, but it was worth it! Thankfully, I had help or I would not have gotten it all cut myself.
Thanks again!
~Angela
This is so, so cool, but… where’s the HONEY?
Candy corn is my favorite seasonal treat, but I can’t stand the taste of red food coloring (in the orange section), and I swear they’re using more and more of it as time goes on. (Am I the only one who notices the awful bitter taste in just about everything red-colored?)
Anyway, I’d love to try making my own, but dangit, candy corn is supposed to be honey-flavored! Yet I can’t find a single recipe using honey. Maybe I could replace some of the corn syrup with honey? Hmm…
I did this recipe tonight, and I’m pretty happy with the results – modest changes were made!
I used a little under 2/3 of corn syrup and threw in about a tablespoon of honey – it gave it that nice honey accent that Brach is famous for. The texture still worked out great. We also used extra fine sugar, which made a super smooth final product
Sifting is important ! We didn’t sift and had to knead forever to pick out the small hard balls of dry ingredients. Worked out fine, but was just a little time consuming for something that could have been prevented.
oh – one last thing! My partner in crime had the smart idea of gently rolling a wine bottle over the long strips we had rolled out…it helped stick the layers together a bit before cutting.
I tried this recipe earlier today and I don’t know why it failed. I followed your word of advice and boiled it on med-high for 5 mins. When I mixed all the ingredients together it looked perfectly fine, but after I let it cool and tried to knead it seized up. I couldn’t knead the dough at all. The hardened dough tastes perfectly fine I just can’t do much with it. If anyone has a good advice on how to fix this problem let me know.
Celeste, I had the same problem with medium-high. Try boiling it over low heat…that’s what worked for me.
@Kari –
Yes! I was wondering if anyone else in the world could taste the awful bitterness of red food coloring as well! Atomic fire balls are the worst. I can taste it in Brach’s candy corn, but less so in some other brands. I wonder why so few people can taste it.
Also cute shaping some like pumpkins and ghosts.
Ann
Different Texture is cause of the lack of fondant prolly… i’m gonna try to replace the butter with fondant and see what happens (small batch to see if it works)
Wow!!! I stumbled upon your blog in search of recipes for National Candy Corn Day (Oct 30th) Little did I expect to come across a blog with a real live Candy Corn recipe from scratch!!! I hope you don’t mind if I “grab” this link to include in my post. It’s fun to revive past links and this one is priceless!!!
Thank you so much for sharing. Bookmarked.
P.S. I will of course be linking back to you however, I didn’t want to take your picture without permission:)
Stumbled upon your recipe & could not be more thrilled about it…
Had a bunch of girlfriends over- so we doubled the recipe and used SALTED butter and used kitchen shears for snipping (although towards the end, we gave up and made a bunch of giant Candy CARROTS, instead) …
Since then, I’ve been tweeting it all around town & am even planning to bring the unshaped balls of dough to a Halloween party for a little “Make Your Own Candy Corn Sculpture” action!
Thanks so much!
I made these yummy treats today. I wanted to add a few of my tips. Many people reported difficulty with the boil at medium/boil at low, in terms of the final product, so I popped my candy thermometer in while it boiled – after 5 minutes at it was at 250 degrees or firm ball stage. Also, it was more work kneading the dough than I expected so some of my dough got very hard while waiting to be worked. I put in the microwave for 10-15 seconds to re-soften it. It didn’t seem to effect the final product, although next time I will work with another person to get it rolled out quickly. Thank you for the recipe – it was a lot of fun to make.
i followed your recipe last weekend & my kids have done nothing but talk about how yummy the candy corn turned out! we’re never buying commercially made candy corn again {even though it IS a bit of a pain to cut a bazillion candy corn pieces!}.
thank you for sharing!
I have never made or even really thought to make my own candy corn to be completely honest, but when I saw this recipe I need to try. I was so simple and one of the best Halloween Recipes I have found. I like the idea that by making them myself I can control that amount of artificial flavors and preservatives that are in them. I work with Better Recipes so I am always reviewing recipes but Halloween recipes have to be my favorite. I love seeing all of the different ideas for making spooky treats!
[…] Candy Corn […]
Greetings I am so glad I found your blog, I really found you by error, while I was searching on Bing for something else, Anyways I am here now and would just like to say thank you for a tremendous post and a all round entertaining blog (I also love the theme/design), I don’t have time to look over it all at the minute but I have saved it and also included your RSS feeds, so when I have time I will be back to read a lot more, Please do keep up the excellent work.
just shared your blog on my fb accnt 🙂 nice blog
Thank you so much for posting this! I’ve recently developed a severe honey allergy and can no longer buy candy corn…and it’s my favorite fall treat! Now I can just make my own! 🙂
[…] Homemade Candy Corn […]