Cookbook Giveaway!
 Remember those delicious Barcelona Brownies I posted about recently? Well, they came from the Rose’s Heavenly Cakes cookbook by Rose Levy Beranbaum, and the kind people at SpruceTV.com gave me an extra copy to give away to one of my readers.
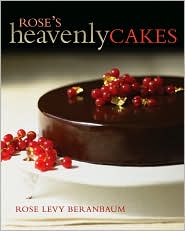
The book is filled with gorgeous photos and delicious recipes, and is one you want to have in your collection, trust me.
To enter, leave a comment below telling me something (anything you want!) about yourself. And if you’ve made anything from my blog, tell me about it!
Contest ends at 11:59 p.m. EST on Thursday, February 4, 2010. One winner will be selected at random on Friday, February 5, 2010 and contacted by email shortly thereafter. Please note this contest is only open to residents of the U.S. and Canada.
***CONTEST IS NOW CLOSED***
Penuche
 Print This Recipe
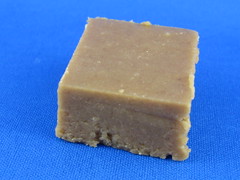 I originally saw this recipe over at Baking With Dynamite and immediately knew I wanted to make it. I love brown sugar, I love fudge, what’s not to like, right? RIGHT. This stuff is good.
And apparently I’m the only person who has never heard of penuche. I brought the reject pieces into the office and one of my coworkers declared, “Dude you just took me to Mexico right now,” and said his grandmother used to make penuche for him when he was younger. Then a coworker from England told me about a little market near where her mother lives, and each time she went there she would buy penuche.
As I’ve mentioned before, I grew up in Michigan and would go to Mackinac Island every summer. Mackinac is known for all of their fudge shops, so I’m pretty sure I must have seen penuche there when I was a kid. Or not, because I’m fairly certain I would have remembered this caramel-y, melt in your mouth sweet. And sweet it is! A tiny little piece goes a long, long way.
Photos of the process here.
Ingredients
1 lb brown sugar (about 2 1/4 cups, firmly packed)
3/4 cup milk
1/8 teaspoon salt
2 1/2 tablespoons unsalted butter
1 teaspoon vanilla
1/2 cup chopped walnuts or pecans (optional)
Preparation
Grease 9x5x2-inch loaf pan; set aside.*
Combine sugar, milk and salt in heavy 2-quart saucepan. Place over medium heat, stirring until sugar dissolves. Wipe sugar crystals from side of pan as necessary. Cook without stirring until candy reaches 238°F or soft ball stage. Remove from heat; add butter. Without stirring, cool to 110°F or lukewarm.
Add vanilla and nuts. Stir continuously until thick and creamy. Spread into prepared pan at once. When firm, cut into squares. Store in airtight container.
Makes 24 pieces or (1 1/4 lbs).
*I would probably use an 8×8-inch pan and line it with parchment paper next time. I had a hard time cutting the fudge in the loaf pan, and parchment would make it easy (or easier) to pull out in one piece and cut on a cutting board.
Recipe from Domino Sugar via Baking With Dynamite.
Barcelona Brownies
Print This Recipe
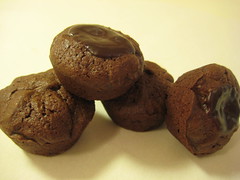 When I was offered a copy of Rose’s Heavenly Cakes, I jumped at the chance to take it. It’s written by Rose Levy Beranbaum (think The Cake Bible) so I knew would be filled with amazing recipes, and each recipe has a photo which is something I love. I hate not knowing what the finished product is supposed to look like. Another perk–she lists both volume and weight measurements in her cookbook!
I’ve already decided the next recipe I’m going to try is the Apple Caramel Charlotte because it is just so stunning. You can see a short video of Rose discussing her book and basic baking tips here. OK, on to the brownies.
If you’re a chocolate fan then these brownies are for you. They’re rich, yet light and moist and the ganache “plugs” are a delicious treat, but totally optional. If you don’t want to fill the inside with ganache you can always use it on top instead. The original recipe calls for a financier mold, but I used a mini muffin tin and it worked out just fine. I ended up with 24 brownies.
Photos of the process here.
Ganache Ingredients
2 ounces bittersweet chocolate, coarsely chopped
1/3 cup heavy cream at room temperature
Brownie Ingredients
2/3 cup pecans, broken or chopped medium-coarse (I omitted these)
9 tablespoons unsalted butter
2 ounces bittersweet chocolate, preferably no higher than 62% cocoa mass
6 scant tablespoons unsweetened cocoa, preferably fine quality Dutch-processed (I used Hershey)
3/4 cup plus 1 1/2 tablespoons sugar
2 large eggs
1 1/2 teaspoons vanilla
2 ounces cream cheese, cut in pieces
1/2 cup all purpose flour
pinch of salt
Ganache Preparation
Melt the chocolate in a microwave, using 15 seconds bursts on high power and stirring several times, or in a double boiler over hot but not simmering water, stirring occasionally. Add the cream and stir gently until the mixture is smooth and dark. If necessary (if the cream was too cold and the mixture not entirely smooth), return it to the heat until totally fluid and uniform in color.
Brownie Preparation
- Prepare financier molds, preferably silicone (I used mini muffin pans), with baking spray with flour or shortening and flour.
- 20 minutes or longer before baking, set an oven rack in the lower third of the oven and preheat the oven to 325°F.
- Place the pecans on a cookie sheet and toast them, stirring occasionally, for about 7 minutes or until very lightly browned. Cool completely.
- In a double boiler over hot water or microwave-proof bowl, melt the butter and chocolate, stirring 2 or 3 times.
- Beat in the cocoa, then the sugar, beating until it is incorporated. (If you are doing this by hand, use a whisk.) Beat in the eggs and vanilla. When incorporated, beat in the cream cheese until only small bits remain. Add the flour and salt and mix only until the flour is fully moistened. Stir in the nuts and scrape the batter into a piping bag or freezer-weight zipseal bag. (You can use a spoon but it’s a lot faster and easier to use a pastry bag or zipseal bag with one corner cut.) (I’m lazy and didn’t feel like cleaning the pastry bag so I used a small cookie scoop.)
- If using a silicone mold, set it on a baking sheet and pipe the batter into the cavities, filling them about three-quarters full (1.5 ounces/45 grams in each). With a small off-set spatula or the back of a spoon, smooth the tops.
- Bake for 12 to 15 minutes or until the batter has set. The batter will puff and rise a little above the top of the cavities but sinks slightly on cooling. An instant read thermometer should register about 194 F. and if pressed lightly with a finger tip they will spring back.
- As soon as the brownies are removed from the oven, grease the end of a wooden chopstick or dowel (1/4 inch diameter) and insert it into the brownie, at 3 evenly-spaced intervals, all the way to the bottom, twisting slightly as you insert and withdraw it. Fill the holes with the ganache until slightly rounded above the surface of the brownie.
- Place the pan on a wire rack and cool completely. The ganache will sink in as it cools and more ganache can be added, to fill in any depressions, as long as the brownie is still warm enough to melt it. (If necessary, you can set the brownies under a lamp to heat the ganache puddles and make them smooth.) If making the optional ganache plugs, allow it to sit at room temperature until the puddles are firm to the touch. Then invert the mold of if using silicone, push each out with your finger pressed against the bottom of the mold. (If not making the ganache the brownies can be removed after 10 minutes of cooling.)
- Store wrapped airtight in plastic wrap and stored in an airtight container: 1 week at room temperature, 1 month refrigerated, or several months frozen. Try eating them frozen or chilled if you like a chewy brownie, room temperature for a softer creamier texture.
Recipe adapted from Rose’s Heavenly Cakes.
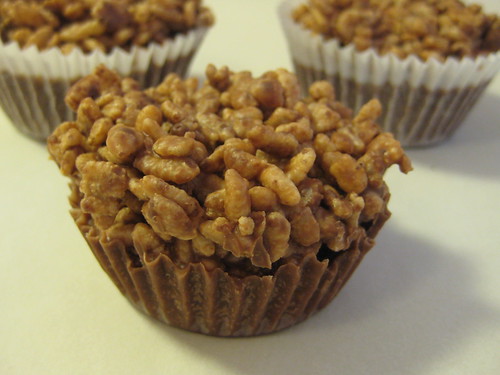
Chocolate Crackles
Print This Recipe
The last time my friend Jess came to visit me from Australia, I introduced her to Rice Krispies Treats. She in turn couldn’t wait to introduce me to Chocolate Crackles (like Rice Krispies Treats, the Chocolate Crackles recipe is on the back of the Rice Bubbles (what Kellogg’s calls Rice Krispies there) box. However, she said they could only be made with Copha, a refrigerated coconut shortening, or something equivalent. We did a bit of research and found that Crisco wouldn’t work, and Copha was nowhere to be found in the United States. I offered up this solid coconut oil I saw at my local grocery store, but Jess had her doubts, and Carly (another Aussie), suggested Palmin, the German equivalent to Copha. After more research, we located a place in LA that sold Palmin.
So earlier this week, Carly and I trekked down to Torrance (a good 30 minutes from Hollywood) to go to the market at Alpine Village (a German village/tourist attraction) to purchase the Palmin. Side note: we also stopped at King’s Hawaiian restaurant. HOT and FRESH King’s Hawaiian bread–YUM! Anyway, since we had to stop at the grocery to purchase Rice Krispies on the way home, I suggested we buy a container of the coconut oil and do a quarter test recipe with that as well.
What did we learn? Chocolate Crackles can now become an American sensation, because the coconut oil worked just as well, perhaps even better, than the Palmin. As for the crackles, they are super easy to make and absolutely delicious and remind me of Star Crunch or the 100 Grand candy bar, just without the caramel. I highly recommend making them NOW. Thank you Jess and Carly!
Photos of the process here.
Ingredients
4 cups Rice Krispies
1 1/2 cups powdered sugar
3 tablespoons cocoa
1 cup shredded coconut, optional (I omitted this)
250 grams solid coconut oil (I used LouAna brand)
Preparation
- In a large bowl, mix the Rice Krispies, powdered sugar, cocoa, and coconut (if using).
- Over low heat, melt the coconut oil in a saucepan and allow to cool slightly.
- Add to Rice Krispies mixture and stir until well combined.
- Spoon mixture into cupcake liners and refrigerate until firm.
Keep refrigerated until ready to serve. I’m not sure how many it’s supposed to make, but I used 12 regular cupcake liners. You could easily make them smaller and get 24, or use mini liners.
Recipe from my friend, but it’s all over the Internet as well.
Chocolate Cupcakes with Salted Caramel Frosting
Print This Recipe
 When I received an invitation to my friend’s New Years Eve party, I immediately knew I wanted to try some sort of chocolate cupcake with salted caramel frosting.
Afterall, everyone loves the salty sweet combination, and even if they didn’t like it, since it’s New Years Eve they should have consumed enough alcohol to pretend to like it. Fortunately for me, there was no pretending, and guests were even asking if they could take cupcakes home with them. Success!
Since I already have the perfect (and one bowl!) chocolate cupcake recipe, I used that. For the frosting, I spent a bit of time Googling different recipes and finally decided on Chockylit’s recipe. It was a little time consuming because you have to make the salted caramel before starting the frosting, but it’s definitely well worth the time it took.
Photos of the process here.
In other news, notice the bright blue background and lack of kitchen sink in the photo? My parents bought me this mini photo studio for Hanukkah, so now I can post photos that don’t include my ugly stained Formica counter top. You can thank me (and my parents) later.
Salted Caramel Ingredients
4 tablespoons water
1 cup sugar
2 tablespoons light corn syrup
1/2 cup heavy cream
2 tablespoons butter
1/2 teaspoon lemon juice
1/2 teaspoon salt, kosher or sea
- Combine the water, sugar, and the corn syrup in a deep saucepan and cook over medium heat.
- Stir together with a wooden spoon until the sugar is incorporated.
- Cover the saucepan and let it cook over medium heat for 3 minutes.
- After 3 minutes, remove the lid, increase the heat to medium-high, and bring to a boil. Do not stir from this point on, but it is important to carefully shake the pan so that one area of the caramel doesn’t burn.
- Continue to cook until the caramel turns an even amber color then remove from the heat and let stand for about 30 seconds.
- Pour the heavy cream into the mixture. Wear oven mitts, stand away from the pan, and be careful. The mixture will bubble up significantly.
- Stir the mixture, again being careful. Add the butter, lemon juice, and salt. Stir until combined.
- Measure 1 cup into a Pyrex measuring cup. Stirring occasionally, allow to cool until thick like molasses and warm to the touch, about 20 minutes.
Salted Caramel Frosting Ingredients
2 sticks butter
8 ounces or 1 package of cream cheese
5 to 6 cups powdered sugar
1 cup salted caramel
- Bring butter to room temperature by letting it sit out for 1 or 2 hours.
- Beat butter and cream cheese at medium speed until creamy.
- Sift 3 cups of powdered sugar into the butter/cream cheese mixture and beat to combine.
- Add 1 cup of the salted caramel and beat to combine.
- Sift 2-3 cups of powder sugar, in 1 cup increments and beating between each, until you arrive at the thickness and sweetness you desire. (I used a total of 6 cups and it was easy to pipe.)
Frosting recipe from Cupcake Bakeshop by Chockylit.