S’mores Pie
 Print This Recipe
Note to self: Make sure you have your pie pans before making a pie. Also, the next time you and mom comment on how many pie pans your mom has, maybe think about how she has YOUR pie pans. So uh, yeah, once again, I made a pie in a cake pan. That’s apparently just how I roll.
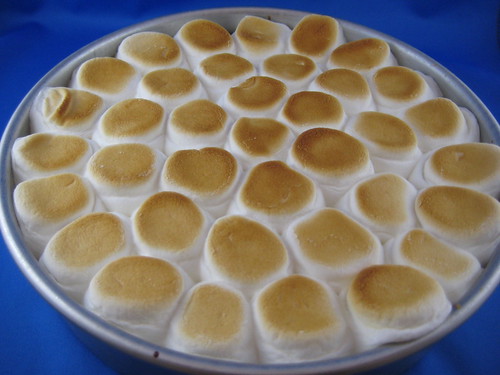
But look at those toasted marshmallows. I mean, who really cares what kind of pan it’s in, right? My coworkers didn’t care, that’s for sure! This pie in a cake pan was devoured quickly (dare I say, for breakfast by many), and when people went back for seconds it was long gone. Side note: It’s a well known fact that the only way to guarantee sweets at the office is to hoard some at your desk. This is true of every office, isn’t it?
Photos of the process.
Crust Ingredients
1 3/4 cups graham cracker crumbs
1 1/4 sticks butter, melted
Crust Preparation
Preheat oven to 325.
Add melted butter and graham cracker crumbs together until a crust forms. Press in to a 9 inch pie pan (or cake pan, whatever).
Filling Ingredients
1 cup heavy cream
1/2 cup milk
10 ounces semisweet chocolate, chopped
2 tablespoons sugar
1/4 teaspoon salt
2 eggs
1 bag of large marshmallows
Filling Preparation
Combine milk and heavy cream in a saucepan and heat over low heat. Watch carefully and once it begins to simmer, remove from heat and add in chocolate. Stir with a spatula until chocolate is melted, then whisk in sugar and salt. In a separate bowl, lightly beat the 2 eggs. Slowly add eggs to chocolate mixture while whisking.
Pour chocolate filling in to graham crust. Bake until the chocolate is no longer liquid, about 30-35, checking after 20 minutes. Remove the pan and top with as many large marshmallows as you can fit. Heat pie under broiler until the tops of marshmallows are golden. (This happens quickly, don’t leave the room.)
Let cool then refrigerate for 1-2 hours before cutting. Spray a knife with non-stick spray before slicing. It’s impossible to get a neat slice, I promise.
Recipe adapted from how sweet it is.
Giveaway: Trudeau Baking Products
Last month, I was asked by the folks at Trudeau if I was interested in reviewing some of their baking products. They sent me a huge box filled with lots of fun stuff, and I was anxious to try it all out!
The package included:
- egg separater
- pot clip
- silicone spatula
- silicone whisk
- silicone cupcake cups
- silicone pinch grips (for lifting hot plates)
- silicone brush
- silicone pinch bowls
- mixing bowls
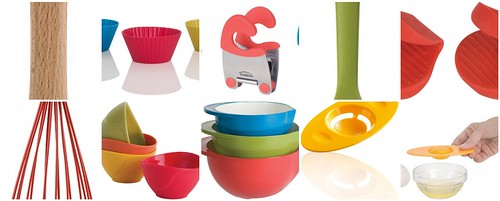
Initially, I thought my favorite product was the flexible pinch bowls because the pinchable material makes it easy to get everything out of the bowl without creating a mess, but then I fell in love with the set of mixing bowls too. Not only do the mixing bowls have a grip on the bottom so they don’t slide across the counter, they are microwave AND dishwasher safe. And they have a pouring spout. I know, how more perfect can they be?
And because I loved the products so much, I asked Trudeau if they would give away a prize pack on my blog, so here’s your chance to win all of the products mentioned above. Just leave a comment telling me which product you are most excited to use and why, and you will be entered to win.
Giveaway ends at 11:59 p.m. EST on Sunday, August 21, 2011. One winner will be selected at random shortly thereafter and contacted by email. Please note this contest is only open to residents of the U.S. and Canada.
***Giveaway is now closed.***
Trudeau sent me these products in exchange for this review.
Peanut Butter Filled Chocolate Cookies
Print This Recipe
 One of the first food blogs I ever read was Culinary in the Desert (now called Culinary in the Country) who regularly shares amazing recipes and photos. This recipe is no exception. Fans of chocolate and peanut butter, pay attention!
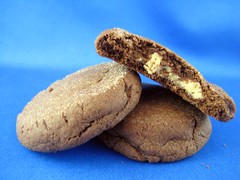
Imagine: A soft, rich, chocolate cookie filled with a peanut butter filling similar to that of a Reese’s peanut butter cup. Plus, tiny specks of sugar on top. Chocolate and peanut butter–the perfect combination. Go make these now.
Photos of the process here.
p.s. Giveaway coming soon: The super nice folks at Trudeau sent me a huge box of amazing baking supplies. (My favorite are the silicone pinch prep bowls.) Stay tuned for your chance to win!
Dough Ingredients
1 1/2 cups all-purpose flour
1/2 cup unsweetened cocoa powder
1/2 teaspoon baking soda
1/4 teaspoon salt
8 tablespoons (1/2 cup or 1 stick) unsalted butter, softened
1/2 cup granulated sugar
1/2 cup packed brown sugar
1/4 cup peanut butter
1 large egg
1 tablespoon milk
1 teaspoon vanilla
Filling Ingredients
3/4 cup sifted confectioners’ sugar
1/2 cup peanut butter
pinch salt
2 tablespoons granulated sugar
Dough Preparation
Preheat oven to 350. In a medium bowl, whisk together the flour, cocoa powder, baking soda and salt.
In a large mixing bowl, beat together butter, sugars and peanut butter until smooth and creamy. Mix in egg, milk and vanilla, beating until well combined. Add dry ingredients and mix just until combined. Form the dough into 32 balls.
Filling Preparation
In a medium bowl, mix together confectioners’ sugar, peanut butter and salt until smooth. Form into 32 balls.
Working on a silpat or piece of parchment, gently flatten each chocolate ball. Top each round with a peanut butter ball, then carefully fold chocolate dough over the peanut butter ball and seal the edges. Roll dough into a ball.
Place balls on a parchment or silpat-lined baking sheet. Lightly flatten with the bottom of a glass dipped in the remaining 2 tablespoons granulated sugar.
Place pans into the oven and bake until the surface of the cookies begins to slightly crack, about 8 minutes. Remove and allow cookies to cool for 1 minute on the baking sheet. Transfer cookies to a wire rack and allow to cool completely.
Makes 32 cookies.
Recipe from Culinary in the Country.