Peanut Butter Fudge
 Print This Recipe
 Four ingredients (plus some chocolate chips thrown on top). And a microwave. Quite possibly the easiest recipe ever.
However.
I brought the fudge into the office yesterday and at least half of it is still uneaten. Definitely not a good sign. It’s not bad tasting, it’s just not wow! either. After reading all of the rave reviews, I was expecting this to be some amazing fudge, and I have to say I’m a little disappointed. I think I’ll be sticking with the other recipe (with marshmallow fluff) I tried a few months ago. Oh well!
Ingredients
1 cup butter, plus more for greasing pan
1 cup peanut butter
1 teaspoon vanilla
1 pound powdered sugar
Preparation
Microwave butter and peanut butter for 2 minutes on high. Stir and microwave on high for 2 more minutes. Add vanilla and powdered sugar to peanut butter mixture and stir to combine with a wooden spoon. Pour into a buttered 8 by 8-inch pan lined with waxed paper. Place a second piece of waxed paper on the surface of the fudge and refrigerate until cool. Cut into 1-inch pieces and store in an airtight container for up to a week.
Recipe from Food Network.
Marshmallows (Dorie Greenspan’s Recipe)
Print This Recipe
 The minute I began making these I had a feeling it was going to be a disaster. As I reviewed the ingredients I was a little surprised by the egg whites the recipe called for. I’ve made marshmallows twice, both times sans eggs (recipes here and here) and they were super easy and delicious. This time however, no such luck.
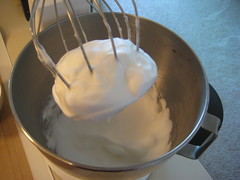 Here’s a quick rundown of my problems. First, I measured out all of my ingredients ahead of time as I always do yet I somehow ended up with an extra tablespoon of sugar and read the recipe about 10 times trying to figure out when and to what I should have added it. I eventually just threw it in with the egg whites. Next, because of the Hot Sugar Blister Incident of 2008, there was no way in hell I going to pour 265 degree boiling sugar into a mixer on medium speed. Adventurous when it comes to recipes, maybe; crazy, I am not.
 So instead, I put the mixer on low and poured the boiling sugar into the egg white and then–I smelled scrambled eggs. I kid you not. By now, I was 99% sure this was going to be a failure but I continued on, committed as always, and followed the rest of the steps. I let the mixture (which somehow looked correct) sit out on the counter overnight but the next morning, it was bad. Gooey and globby and slimey and not what marshmallows should look like. I suppose I should also note that I live in southern California and being as we had record high temps this past weekend (95 degrees in Hollywood, insane!), I didn’t really have a “cool, dry place” to let the marshmallows set. Perhaps that contributed to the disaster?
And so, it is safe to say that the next time I feel the need to use the whisk attachment of my KitchenAid, you better believe I will be using an eggless marshmallow recipe.
Ingredients
About 1 cup potato starch (found in the kosher foods section of supermarkets) or cornstarch
2 tablespoons light corn syrup
2 1/4-ounce packets unflavored gelatin
3 large egg whites, at room temperature
3/4 cup cold water
1 tablespoon pure vanilla extract
1 1/4 cups plus 1 tablespoon sugar*
Preparation
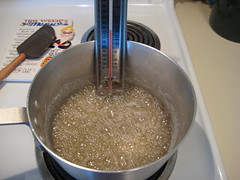
GETTING READY: Line a rimmed baking sheet — choose one with a rim that is 1 inch high — with parchment paper and dust the paper generously with potato starch or cornstarch. Have a candy thermometer at hand.
Put 1/3 cup of the water, 1 1/4 cups of the sugar and the corn syrup in a medium saucepan over medium heat. Bring the mixture to a boil, stirring until the sugar dissolves. Once the sugar is dissolved, continue to cook the syrup — without stirring — until it reaches 265 degrees F on the candy thermometer, about 10 minutes.
While the syrup is cooking, work on the gelatin and egg whites. In a microwave-safe bowl, sprinkle the gelatin over the remaining cold water (a scant 7 tablespoons) and let it sit for about 5 minutes, until it is spongy, then heat the gelatin in a microwave oven for 20 to 30 seconds to liquefy it. (Alternatively, you can dissolve the gelatin in a saucepan over low heat.)
Working in the clean, dry bowl of a stand mixer fitted with the whisk attachment or in another large bowl with a hand mixer, beat the egg whites on medium-high speed until firm but still glossy — don’t overbeat them and have them go dull.
As soon as the syrup reaches 265 degrees F, remove the pan from the heat and, with the mixer on medium speed, add the syrup, pouring it between the spinning beater(s) and the sides of the bowl. Add the gelatin and continue to beat for another 3 minutes, so that the syrup and the gelatin are fully incorporated. Beat in the vanilla.
Using a large rubber spatula, scrape the meringue mixture onto the baking sheet, laying it down close to a short end of the sheet. Then spread it into the corners and continue to spread it out, taking care to keep the height of the batter at 1 inch; you won’t fill the pan. Lift the excess parchment paper up to meet the edge of the batter, then rest something against the paper so that it stays in place (I use custard cups).
Dust the top of the marshmallows with potato starch or cornstarch and let the marshmallows set in a cool, dry place. They’ll need about 3 hours, but they can rest for 12 hours or more.
Once they are cool and set, cut the marshmallows with a pair of scissors or a long thin knife. Whatever you use, you’ll have to rinse and dry it frequently. Have a big bowl with the remaining potato starch or cornstarch at hand and cut the marshmallows as you’d like — into squares, rectangles or even strips (as they’re cut in France). As each piece is cut, drop it into the bowl. When you’ve got 4 or 5 marshmallows in the bowl, reach in with your fingers and turn the marshmallows to coat them with starch, then, one by one, toss the marshmallows from one hand to the other to shake off the excess starch; transfer them to a serving bowl. Cut and coat the rest of the batch.
*Where does this extra tablespoon go?!
SERVING: Put the marshmallows out and let everyone nibble as they wish. Sometimes I fill a tall glass vase with the marshmallows and put it in the center of the table — it never fails to make friends smile. You can also top hot chocolate or cold sundaes with the marshmallows.
STORING: Keep the marshmallows in a cool, dry place; don’t cover them closely. Stored in this way, they will keep for about 1 week — they might develop a little crust on the outside or they might get a little firmer on the inside, but they’ll still be very good.
Playing Around
RASPBERRY MARSHMALLOWS: Fruit purees are excellent for flavoring these candies. For raspberry marshmallows, you’ll need a generous 1/3 cup of puree; reduce the vanilla extract to 1/4 teaspoon. After the batter is mixed, gently fold in the puree with a rubber spatula. You can use the same measurements and technique for other purees, such as strawberry, mango and passion fruit.
CAPPUCCINO MARSHMALLOWS: Sift 1/4 cup unsweetened cocoa powder, 2 tablespoons instant espresso powder and 1/2 teaspoon ground cinnamon together into a small bowl. Stir in 1/3 cup boiling water and mix until smooth. Reduce the vanilla extract to 1/2 teaspoon, and add it to the espresso mix. After you add the sugar syrup and gelatin to the meringue, beat in the espresso mixture and continue.
LIGHT CHOCOLATE MARSHMALLOWS: Melt 3 ounces bittersweet or semisweet chocolate and stir in 2 1/2 tablespoons unsweetened cocoa powder. Reduce the vanilla extract to 1/4 teaspoon, and after the marshmallow batter is mixed, fold in the chocolate mixture with a large rubber spatula.
PUMPKIN SPICE MARSHMALLOWS: Whisk together 1/2 cup canned unsweetened pumpkin puree, 1 teaspoon ground cinnamon, 1/2 teaspoon ground ginger, a pinch of freshly grated nutmeg and a pinch of ground allspice. After the marshmallow batter is mixed, fold in the spiced pumpkin with a large rubber spatula.
Makes about 1 pound marshmallows.
Recipe from Baking: From My Home To Yours by Dorie Greenspan.
Peanut Butter and Chocolate Fudge
Print This Recipe
When I think of fudge, memories of summers up north in Michigan immediately come to mind. Every year, my family and our friends would rent a place in Harbor Springs where we would play whiffle ball, relax, eat, and inevitably, find our way to Mackinac Island.
And Mackinac Island meant one thing–fudge. Even though we left Michigan in 1985, I still have very vivid memories of the multiple fudge shops, with their marble slabs and long spatula/scraper tools. And every time I go back to Detroit for a visit, I hunt down Mackinac fudge to put in my suitcase and bring back to LA. It’s just that good.
(Photos of the process here.)
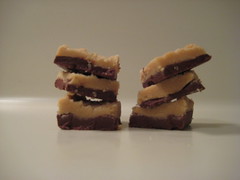
Until yesterday, I had never made fudge before. I suppose because really, I know nothing will ever come close to Mackinac fudge. But as I was browsing food blogs, a photo caught my eye and I knew I had to give this recipe a go. What could possibly be bad about chocolate and peanut butter?
In this case, absolutely nothing! The fudge is good. Not Mackinac good, but good. The recipe was easy, and the only problem I ran into was the chocolate and peanut butter layers separating, making it difficult to cut. But this also gave us the chance to taste the flavors individually, and I have to say, I think the peanut butter part is my favorite.
Ingredients
3 cups sugar
3/4 cup margarine
2/3 cup evaporated milk
1 tsp vanilla
6 oz package semi sweet chocolate pieces
7 oz. jar Marshmallow Creme
1/2 cup peanut butter
Preparation
- Combine 1 1/2 cups sugar, 6 tablespoons margarine and 1/3 cup evaporated milk in a medium pot.
- Bring to full rolling boil, stirring constantly.
- Reduce heat to medium and continue boiling for 4 minutes, stirring constantly to prevent scorching.
- Remove from heat and stir in chocolate pieces until melted.
- Add 1 cup (1/2 jar) marshmallow creme and 1/2 teaspoon vanilla. Beat until well blended.
- Pour into greased 13 X 9 pan.
- Repeat with remaining ingredients substituting peanut butter and spread over chocolate.
- Cool at room temperature and cut into squares.
Recipe from Bakerella.
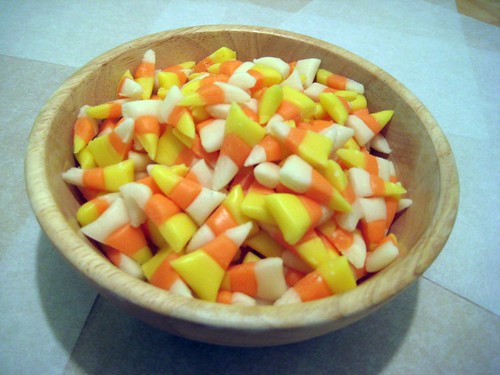
Candy Corn
Print This Recipe
I saw this recipe over on The Urban Housewife and immediately decided this recipe was a must-try. I have to admit this was my second attempt at making these. The first time, I followed the directions perfectly and ended up with a super stiff ball of dough and was extremely disappointed. After doing some research, I noticed other candy corn recipes said to boil the mixture for five minutes over low heat. This recipe calls for medium-high heat. So, the second time around I boiled the mixture over low heat, and it was a success!
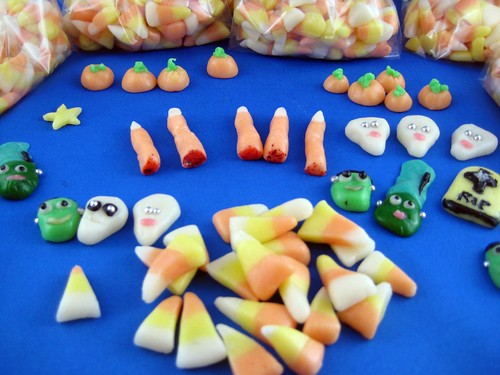
My amazingly talented friend Lauren made the spooky shapes. Aren’t they awesome?
These are good. A slightly different flavor from store-bought candy corn and a completely different texture. I had hoped these would firm up a bit more to get that more solid shell around the outside but that didn’t happen. I’m thinking maybe a medium rather than low boil would do the trick.
Note from Epicurious
When you’re at the grocery store, pick up some plastic gloves. They’ll make it easy to knead the dough without ending up with food-coloring-stained hands.
Photos of the process here.
Ingredients
1 cup sugar
2/3 cup corn syrup
5 tablespoons unsalted butter
1 teaspoon vanilla extract
2 1/2 cups powdered sugar
1/3 cup non fat milk powder
1/4 teaspoon sea salt
Red and yellow food coloring
Preparation
Bring first 4 ingredients to boil over high heat in heavy large saucepan. Reduce heat to medium-high (I reduced to low) and boil 5 minutes, stirring occasionally. Remove from heat. Sift powdered sugar, milk powder, and salt into medium bowl. Add powdered sugar mixture to pan; stir to combine. Let mixture stand until slightly warm to touch, about 20 minutes.
Divide dough into 3 equal pieces; place each piece in small bowl. Add several drops of yellow food coloring to one piece of dough. Using plastic gloves to protect hands, knead food coloring into dough until smooth and color is even, about 15 minutes. Repeat using red and yellow food coloring (to make orange) with second piece. Leave last piece white; knead dough until smooth. Roll each piece into a thin rope (don’t roll too thin or dough will break). Push three ropes together to form long rectangle. Using sharp knife, cut ropes into triangles. Using fingers, shape candy corn as desired. Store at room temperature in airtight container, separating layers with pieces of waxed paper to prevent sticking.
Or: If you’re feeling creative, color dough various colors and shape into spooky shapes!
Yields about five million pieces. OK not really, but a lot.
My notes:
- I boiled at low rather than medium-high like the recipe calls for.
- I separated each of the colors into four ropes rather than one long rope.
- Make sure you have a lot of free time, because these things take forever to cut.
- I got tired of cutting after about the twelve millionth piece, so by the time I got to the third rope, I cut them larger.
- I didn’t have gloves, so I put sandwich size Ziplocs over my hands until the color was somewhat kneaded in.
Recipe from BA Blog on Epicurious via The Urban Housewife.
Caramels
Print This Recipe
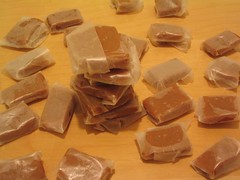 These are good. But…I had to try the recipe twice. The first time, I followed the directions exactly and I couldn’t get the mixture to heat past 200 degrees. Frustrated (but determined), I tried it again. This time, instead of heating it on low like the directions stated, I heated it on medium-high. I know, I’m such a rebel. But it worked.
Ingredients
4 tablespoons unsalted butter, plus some for greasing the pan
1 1/2 cups heavy cream
2 cups sugar
1/2 cup light corn syrup
Pinch salt
1 1/2 teaspoons vanilla extract
Preparation
- Grease a 9-inch square baking pan.
- Combine all ingredients except vanilla in a small saucepan and turn the heat to low. Cook, stirring constantly, until the sugar dissolves, then cook, stirring only occassionally, until the mixture measures 245 degrees.
- Stir in the vanilla and pour into the prepared pan. When the mixture has cooled to room temperature, remove the block of caramel from the pan and use a sharp knife to cut it into small squares. Wrap each square in waxed paper or plastic wrap. These keep for weeks, but are best eaten fresh.
Note: I used a pizza cutter instead of a knife to cut the squares.
Recipe from How to Cook Everything by Mark Bittman.