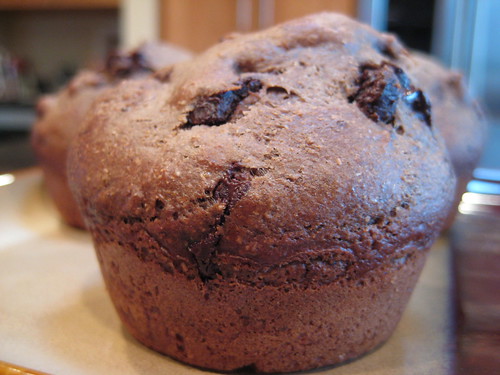
Low Fat Chocolate Chunk Muffins
 Print This Recipe
Usually when you hear the words low fat you think of bland, dry, or flavorless baked goods. I’m happy to report that is not the case with these muffins. These are moist, chocolately, and flavorful! And as an added bonus, they are easy to make and don’t even require a mixer.
Photos of the process here.
Since it’s Mother’s Day weekend and I’m down in San Diego at my parents’ house, I wanted to make these for my mom. After going through her cupboards, I realized she doesn’t have a mini muffin tin so I decided to double the recipe and make a dozen regular size muffins rather than 18 mini muffins. (From my experience, three minis usually equal one regular size muffin.) I also used whole wheat baking flour instead of all-purpose flour and Splenda instead of sugar. You can’t even tell I made any substitutions.
Ingredients
1 cups all-purpose flour
1/3 cup sugar or 1/2 cup sugar if you like your muffins sweeter
2 Tablespoons cocoa powder
1/2 teaspoon baking soda
1/4 teaspoon baking powder
1/8 teaspoon salt
1/4 cup light sour cream
scant 1/2 cup 2% milk
1 Tablespoon canola oil
1 egg white
3.5 ounces chopped dark chocolate
Preparation
Preheat the oven to 350 degrees F and position a rack in the center of the oven. Measure all of the dry ingredients in a medium sized bowl, and whisk together. In a separate bowl, combine all of the wet ingredients and whisk to combine, trying to get as many lumps as possible out of the sour cream. Pour the wet ingredients into the dry ingredients all at once and stir to incorporate. Once mixture in combined, fold in the chocolate chunks.
Grease a mini muffin pan. Scoop the muffin batter into a tin with a tablespoon measuring spoon, using one tablespoon of batter per muffin cup. Bake for 10-12 minutes or until a cake tester inserted in the center comes out clean. Let cool in the muffin tins for 5 minutes then transfer to a wire rack to cool.
Recipe from Joy The Baker.
Diet Coke Cupcakes With Vanilla Glaze
Print This Recipe
 Yes, seriously, Diet Coke. And no, you can’t taste it whatsoever.
I went back to Weight Watchers (about ten pounds from goal!) a few weeks ago and have since heard a zillion people gushing about these cupcakes and decided I had to give them a try. And well, they’re not too bad. Definitely a different texture than cupcakes with the regular ingredients, but nothing to complain about.
If I ever find myself with a major cupcake craving, I might make them again. Of course, they’re not as good as the real thing.
Cake Ingredients
1 box cake mix
1 egg white
1 can Diet Coke
Cake Preparation
Remember, you are substituting the Diet Coke and egg white for the ingredients the box mix calls for–do not add the eggs, oil, etc.
- Preheat oven as directed on box.
- Beat cake mix, egg white, and one can of Diet Coke.
- Fill lined cupcake trays.
- Bake as directed on box. (I set the timer for a couple minutes less and checked on them. They were done.)
- Remove cupcakes from tray and let cool.
- Drizzle glaze over cupcakes, allow glaze to set.
Glaze Ingredients
1 cup powdered sugar
2 tablespoons milk
1/2 teaspoon vanilla
Glaze Preparation
Mix powdered sugar, milk, and vanilla. If glaze is too thick, add more milk.
Note: If you’re using a white or yellow mix, use Diet 7-Up or another clear diet soda.
Cinnamon-Sugar Cookies
Print This Recipe
After stepping on the scale, I decided it was time to start making desserts that don’t call for Crisco as an ingredient. So, when I ran across this low-fat cookie recipe, I decided I must try it. I mean, how can you go wrong with cinnamon and sugar?

The cookie is light, crunchy, and delicious. And, my apartment smelled so good while they were in the oven! I will definitely be making these again.
Ingredients
1 cup granulated sugar
6 tablespoons butter, softened
1 tablespoon light corn syrup
1 teaspoon vanilla extract
1 large egg
1 cup cake flour (about 4 ounces)
3/4 cup all-purpose flour (about 3 1/3 ounces)
1 teaspoon baking powder
1 teaspoon baking soda
1/4 teaspoon salt
1/4 teaspoon ground cinnamon
1/4 cup turbinado sugar
1/2 teaspoon ground cinnamon
Preparation
Place granulated sugar and butter in a bowl; beat with a mixer at medium speed until well blended (about 3 minutes). Add corn syrup, vanilla, and egg; beat 3 minutes or until well blended.
Lightly spoon cake flour and all-purpose flour into dry measuring cups; level with a knife. Combine flours, baking powder, baking soda, salt, and 1/4 teaspoon cinnamon. Add flour mixture to butter mixture; stir until just combined. Wrap in plastic wrap; chill 1 hour.
Preheat oven to 375°.
Combine turbinado sugar and 1/2 teaspoon cinnamon in a small bowl. Shape dough into 48 balls, about 1 teaspoon each. Roll balls in cinnamon-sugar mixture. Place 2 inches apart on ungreased baking sheets. Bake at 375° for 12 minutes or until golden on bottom. Cool on wire racks.
Yield: 48 cookies
Notes:
- Turbinado sugar is commonly known by the brand name Sugar In The Raw.
- After rolling the dough in the sugar mixture, I pressed the ball down with my palm to flatten it a bit.
- For a chewier cookie, reduce the baking time by a couple of minutes.
Recipe from Cooking Light.