Low(er) Fat Oatmeal Chocolate Chip Cookies
 Print This Recipe
 Earlier this week I did something I should have done months ago. I cleaned out my freezer. Why I continually put this task off is beyond me, but it took my fridge making a horrid noise for me to finally to do it. (Alas, the noise did not stop, even with the cleaner freezer.)
What did I find between the freezer burned edamame from Trader Joe’s and super old something wrapped in layers and layers of foil? My homemade applesauce that I had glorious plans to use in cookies and brownies last year. Oh yeah, that applesauce.
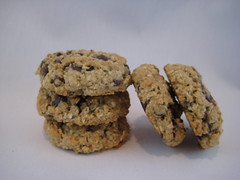
I immediately put a container of it in the fridge to defrost and started Googling low-fat oatmeal cookie recipes with applesauce. There are a ton of them! I quickly discovered this four-and-a-half star recipe and decided to give it a shot. I am happy to report these cookies are delicious–moist and chewy inside with a bit crisp on the outside, which to me is the perfect texture for oatmeal cookies. And there is no way you can tell they are missing all that butter! In fact, I think the next time I make them I may replace the two tablespoons of butter with two additional tablespoons of applesauce. Maybe even use some whole wheat flour and see what happens. I know, I live on the edge.
Photos of the process here.
Ingredients
1 cup all-purpose flour
1 teaspoon baking powder
1/2 teaspoon baking soda
1/2 teaspoon salt
1/2 teaspoon ground cinnamon
2 tablespoons butter, room temperature
1/2 cup white sugar
1/2 cup brown sugar
1 large egg
1/4 cup plain unsweetened applesauce
1/2 teaspoon vanilla extract
2 cups quick-cooking oats
1 cup chocolate chips
Preparation
- Preheat oven to 350F and line a baking sheet with parchment paper.
- In a medium bowl, whisk together flour, baking powder, baking soda, salt and cinnamon.
- In a large bowl, cream together the butter and the sugars. Beat in the egg, followed by the applesauce and the vanilla extract. Working by hand, stir in the flour mixture and the oats until just combined and no streaks of flour remain. Stir in the chocolate chips.
- Drop tablespoonfuls of the dough onto the prepared baking sheet, flattening each cookie slightly. Bake for about 10-12 minute Cookies will be light brown at the edges when done.
- Let cool on sheet for 3 or 4 minutes, then transfer to a wire rack to cool completely.
Yields about two dozen cookies.
Recipe from RecipeZaar.
Chocolate Peanut Butter Candy Cookies
Print This Recipe
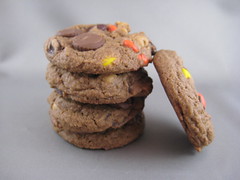 Last week I asked on Facebook what everyone’s favorite cookies were. My friend Jami suggested a few different recipes, including this chocolate/peanut butter cookie that has not only chocolate chips, peanut butter chips, and Reese’s Pieces, but peanut butter cups as well. Hello peanut butter! I couldn’t wait to make these.
Since I’ve been working from home lately, I’ve lost my coworker guinea pigs and am now always looking for opportunities to try new recipes. Fortunately for me, every few weeks, my friends and I have been meeting up at a local bar for a night of pub trivia. Yes, it’s what it sounds like–trivia at a bar. It’s fun, I swear!
Anyway, the last couple of trivia nights I baked cookies and shared them with my team (aptly named, “Don’t toss the cookies”). We’ve even been sharing with the waitress who declared these cookies her favorite thus far (she even liked them more than the brown sugar cookies!). I thought they were good, but not my favorite. The chocolate is pretty subtle, but if you’re a peanut butter fan, these are definitely the cookies for you!
Photos of the process here.
Ingredients
1 c. unsalted butter, softened
3/4 c. peanut butter
3/4 c. white sugar
3/4 c. packed brown sugar
2 eggs
1 tsp. vanilla extract
2 1/3 cups all-purpose flour
1/3 c. cocoa powder
1 tsp. baking soda
1 c. semisweet chocolate chips
1 c. peanut butter chips
1 package mini Reese’s peanut butter cups, frozen and cut into halves (I used Trader Joe’s mini peanut butter cups)
1 c. Reese’s Pieces
Preparation
Preheat oven to 350 degrees.
In a large bowl, cream together the butter, peanut butter, white sugar, and brown sugar until smooth. Beat in the eggs one at a time, then stir in the vanilla. Combine the flour, cocoa, and baking soda; stir into the peanut butter mixture. Mix in the chocolate chips, peanut butter chips, and Reese’s Pieces.
Drop by tablespoonfuls onto ungreased cookie sheets. Push one peanut butter cup half (I used two mini Trader Joe’s peanut butter cups) into the center of each ball of dough. Bake for 8 to 10 minutes. Let cool for 1 or 2 minutes on sheet before removing, or they will fall apart.
Yields 3-4 dozen cookies.
Recipe adapted from Cookie Madness via Night Baking.
Conversation Hearts
Print This Recipe
Do you ever wonder what those little conversation hearts you eat around Valentine’s Day would say if they were written by someone deep in the trenches of online dating? TEXT ME! would be CALL ME! I HATE TEXTING! and KISS would become HE GOT CHEEK/CHIN/LIP, WAS THAT A KISS? You get the idea. So when I saw a recipe for homemade conversation hearts, I knew I had to make them and write more practical and current sayings on them.

And I wanted to like them. I really tried. But they taste nothing like the store bought conversation hearts, and while the outside is hard, the inside is kind of soft. In fact, they kind of reminded me of fondant, both in taste and texture. Disappointing.

However, a few months ago I bought markers made specifically to write on food, and figured I’d find sometime to use them. I’m so glad I bought them, because the hearts were loads of fun to decorate. I just wish my handwriting was neater. While the marker has a fine point, the part just above the tip is really round which made it difficult. It was still fun though!
Photos of the process here.
Ingredients
1 packet (1/4 oz, or 2 tsp) unflavored gelatin
1/2 cup water
2 tsp light corn syrup
2 lbs powdered sugar, plus additional for dusting
Assorted flavoring extracts of your choice
Assorted food colors of your choice
Heart-shaped cutters
Food coloring markers
Preparation
- Place the corn syrup, gelatin, and water in a small microwave-safe bowl. Stir until the gelatin is well-distributed. Microwave the mixture for 30 seconds, so the gelatin dissolves, and stir well.
- Pour the gelatin mixture into the bowl of a large stand mixer fitted with a paddle attachment. Alternately, if you are using a hand mixer, pour the gelatin mixture into a large bowl. Add 1 cup of powdered sugar and turn the mixer to low, mixing until the sugar is incorporated.
- Once the sugar is mixed in, add another cup of sugar, again mixing on low until it liquefies. Continue to add the remaining powdered sugar, one cup at a time, pausing in between additions to allow the sugar to mix in, until the full two pounds of powdered sugar is added. Periodically, stop the mixer and scrape down the bottom and sides of the bowl. The candy will progress from a thin, watery liquid to a very stiff dough.
- Once all of the sugar is incorporated, dust a work surface (counter or large cutting board) with powdered sugar and scrape the candy out onto the work surface. The candy will be very sticky and stiff. Generously dust the top of the ball of candy with powdered sugar, and begin to knead the candy like bread dough: fold the ball of dough over onto itself, then use the heel of your hand to push it down. Give the candy a quarter-turn, and repeat the process, dusting it with more powdered sugar as often as necessary to prevent it from sticking to the board or your hands. Knead until the candy is satiny and not sticky.
- Decide how many colors/flavors of conversation hearts you want to make, and divide the candy dough into that many portions. To flavor and color the candy, take one of the balls and flatten it into a palm-sized disc. Add a few drops of food coloring and flavoring extract to the center of the disc, and fold it over on itself. (It is a good idea to wear disposable plastic gloves during this step to keep your hands free of colors and odors.) Knead the dough ball, just as you did before, until the color is evenly dispersed throughout the candy, and all streaks have disappeared. Repeat this process with remaining candy balls and colors/flavors, until all of your candy is colored and flavored. (My dough was starting to dry out as it was sitting on the counter so I wrapped each ball in plastic wrap.)
- Dust your work surface and a rolling pin with powdered sugar, and roll out one of the candy balls to your desired thickness. Small store-bought conversation hearts tend to be fairly thick, generally over 1/4” thick. I find that this thickness works well for small hearts (under 1”), but it makes larger heart sizes very substantial and a little overwhelming. However, the thickness is entirely a matter of personal preference and does not affect the taste of the final candy.
- Use heart-shaped cutters to cut hearts out of the rolled candy, and transfer the hearts to a baking sheet lined with parchment paper. Smaller hearts are more realistic, but larger hearts are easier to write messages on. Once you have cut out your hearts, you can re-roll the scraps to get more shapes out of the candy. Repeat with remaining candy balls.
- Allow your hearts to air-dry for at least 24 hours before you write on them. This step is VERY important, because the extra moisture in the hearts will cause the ink to run if you do not let them dry properly.
- After the hearts have dried for a day, use the food writing markers to write messages or draw designs on the hearts. Store your conversation hearts in an airtight container at room temperature.
Recipe from About.com: Candy.
Salted Butter Caramels
Print This Recipe
 As we’ve discussed before, salt and caramel are one of the best combinations ever. Ever. Ever. Ever. EVER. And these caramels may just be the best ever. You should go make them now. Seriously.
I know what you’re saying, “I don’t want to use corn syrup, blah blah blah.” Well, David has some alternatives to corn syrup in his post so go read it, make the caramels, then tell David and myself how much you love us. Ignore what your thighs say, they’re not allowed to have an opinion about this.
Photos of the process here.
Ingredients
3/4 cup (180 ml) heavy cream
1/2 teaspoon vanilla extract, bean paste, or powder
rounded 1/2 teaspoon + 1/4 teaspoon flaky sea salt, preferably fleur de sel
1/2 cup (160 g) light corn syrup, golden syrup (such as Lyle’s) or rice syrup*
1 cup (200 g) sugar
4 tablespoons (60 g), total, salted butter, cubed, at room temperature
Preparation
- Line a 9-inch (23 cm) loaf pan with foil and spray the inside with cooking spray. (I used non-stick foil–that stuff is incredible!)
- Heat cream, two tablespoons butter, vanilla, and 1/2 teaspoon sea salt in a small saucepan until the mixture begins to boil. Remove from heat, cover, and keep warm while you cook the syrup.
- In a medium, heavy duty saucepan (4 quarts, 4l), fitted with a candy thermometer, heat the corn syrup with the sugar and cook, stirring gently, to make sure the sugar melts smoothly. Once the mixture is melted together and the sugar is evenly moistened, only stir as necessary to keep it from getting any hot spots.
- Cook until the syrup reaches 310ºF (155ºC). To get an accurate reading while the syrup is cooking, tilt the saucepan to make sure the bulb of the thermometer is fully submerged in the syrup. (I had never done this before, and that could easily explain why I’ve burned sugar in the past. Good tip from David!)
- Turn off the heat and stir in the warm cream mixture until smooth.
- Turn the heat back on and cook the mixture to 260F (127C).
- Remove the pan from the heat, lift out the thermometer, and stir in the cubes of butter until they’re melted and the mixture is smooth.
- Pour the mixture into the prepared loaf pan and wait ten minutes, then sprinkle 1/4 teaspoon of the sea salt over the top. Set on a cooling rack and let cool completely. Once cool, lift out the foil with the caramel, peel away the foil, and slice the bar of caramel with a long, sharp knife into squares or rectangles.
Storage: These caramels can be individually-wrapped in cellophane or waxed paper. Once cut, they may stick together if not wrapped. Store in an air-tight container, and they’ll keep for about one month.
Recipe from David Lebovitz.