2012 in Pictures
Happy New Year from Nosh With Me!
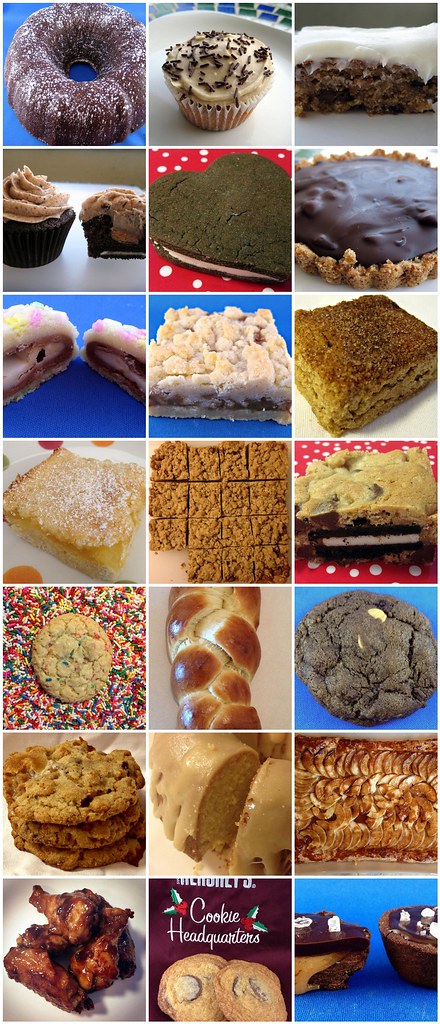
Cheers to more deliciousness in 2013!
Apple Tart with Salted Caramel
 Print This Recipe
I first made this tart for an office Thanksgiving potluck so I could test it out before Thanksgiving and it was an enormous hit. Everyone was raving about it and asked for the recipe, which is always a good sign. Because it uses packaged puff pastry, it’s pretty much no-fail, and super quick to whip up.
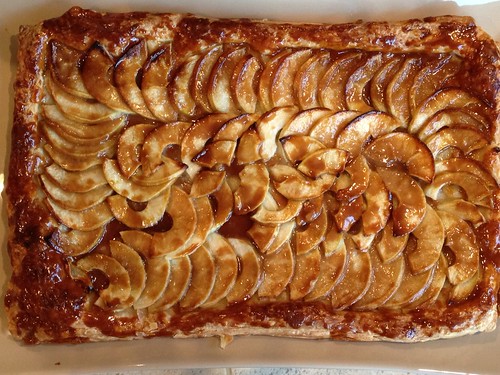
I kept calling the tart “rustic,” because while the quasi-mosaic part is pretty, the crust isn’t exactly picture perfect. But what it lacks in looks, it definitely makes up for in buttery, flaky, salty, sweet goodness.
Note: I used one package of Pepperidge Farm puff pastry and put the two sheets on top of each other before rolling.
Tart Base Ingredients
14-ounce package puff pastry, defrosted in fridge overnight
3 large or 4 medium apples (about 1 1/4 pounds)
2 tablespoons granulated sugar
2 tablespoons unsalted butter, cold, cut into small bits
Salted Caramel Glaze Ingredients
1/4 cup granulated sugar
2 tablespoons unsalted butter (or salted, but then ease up on the sea salt)
1/4 teaspoon flaky sea salt (or half as much table salt)
2 tablespoons heavy cream
Preparation
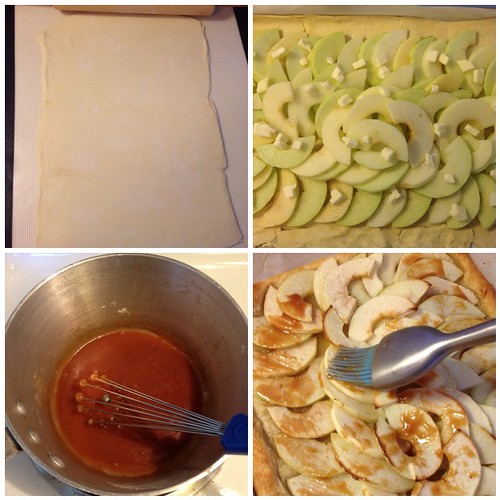
Heat your oven to 400°F. Line a rimmed baking sheet or jelly roll pan with parchment paper. Ideally you would use a 10×15-inch jelly roll pan. A smaller pan will make a thicker tart (and you might need fewer apples).
Lightly flour your counter and lay out your pastry. Flour the top and gently roll it until it fits inside your baking sheet, and transfer it there. If you roll it bigger, just trim the edges.
Peel, core, and slice the apples. (Deb suggested using a mandolin but I used one of those all in one peel/core/slice thingies and it worked just fine.) Leaving a 1/2-inch border, fan the apples around the tart in slightly overlapping concentric rectangles — each apple should overlap the one before so that only about 3/4-inch of the previous apple will be visible — until you reach the middle. Sprinkle the apples evenly with the first two tablespoons of sugar then dot with the first two tablespoons butter.
Bake for 30 minutes, or until the edges of the tart are brown and the edges of the apples begin to take on some color. If you sliced your apples by hand and they were on the thicker side, you might need a little more baking time to cook them through. The apples should feel soft, but dry to the touch. If your puffed pastry bubbles dramatically in any place during the baking time, simply poke it with a knife or skewer so that it deflates.
Meanwhile, about 20 minutes into the baking time, make your glaze. In a small saucepan over medium-high heat, melt your last 1/4 cup sugar; this will take about 3 minutes. Cook the liquefied sugar to a nice copper color, another minute or two. Off the heat, add the sea salt and butter and stir until the butter melts and is incorporated. Add the heavy cream and return to the stove over medium heat. Cook, stirring constantly, until you have a lovely, bronzed caramel syrup, just another minute, two, tops. Set aside until needed. You may need to briefly rewarm it to thin the caramel before brushing it over the tart.
After the tart has baked, transfer it to a cooling rack, but leave the oven on. Using very short, gentle strokes, and brushing in the direction that the apples fan to mess up their design as little as possible, brush the entire tart, including the exposed pastry, with the salted caramel glaze.
Return the apple tart to the oven for 5 to 10 more minutes, until the caramel glaze bubbles. Let tart cool complete before cutting into 12 squares.
Recipe from Smitten Kitchen.
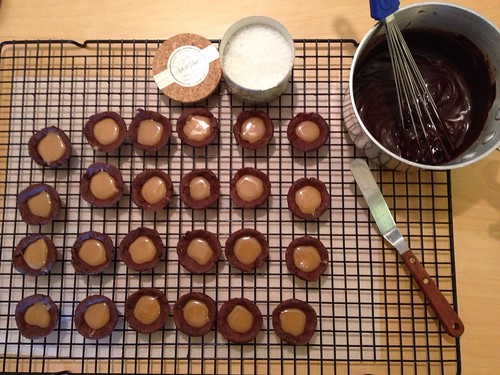
Chocolate Salted Caramel Tartlets
Print This Recipe
And…my obsession with chocolate and salted caramel continues.
When David Lebovitz posted this recipe, my aunt immediately asked me if I had been to the bakery (Little Flower Cafe) he referenced in his post. Sadly, I have not, but it is now on my list of places to try. Since David shared a recipe adapted from one of the Little Flower Cafe recipes, I figured making the recipe could tide me over until I find a friend willing to schlep to Pasadena with me.
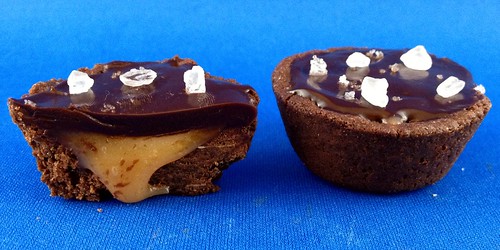
While these tartlets are a bit time consuming, they are not only delicious but absolutely gorgeous. My coworkers were oohing and aahing over them at the office, and their small size makes it perfectly acceptable to have one or two. Or three. Or um, maybe four. They’re a great party dessert too, because they’re easy to hold and won’t last for more than a few bites. In fact, I may bring these to my friends’ annual New Years Eve party.
Chocolate Dough Ingredients
4 ounces (115g) unsalted butter, at room temperature
1/2 cup (100g) sugar
1 large egg, at room temperature
1/2 teaspoon salt
1/2 teaspoon vanilla extract
3/4 cup (110g) all-purpose flour
1/4 cup (35g) rice flour (or use 1 cup, 140g, all-purpose flour, total)
6 tablespoons (50g) cocoa powder, natural or Dutch-process
Salted Caramel Filling Ingredients
4 ounces (115g) soft, salted butter caramels
3 tablespoons (45ml) heavy cream
Ganache Ingredients
4 1/2 ounces (130g) bittersweet chocolate, chopped
6 tablespoons (90ml) heavy cream
flaky sea salt
Preparation
- To make the tartlet dough, beat the butter and the sugar just until smooth in the stand mixer with the paddle attachment, or by hand. Add the egg, salt, and vanilla, and beat until smooth. In a separate bowl, whisk together the all-purpose flour, rice flour, and cocoa powder, then mix it into the creamed butter.
- Butter the indentations of two mini-muffin tins with 12 places in each, or one mini-muffin tin with 24 places. Pinch off pieces of dough and roll each into a 3/4-inch (2cm) ball. As you work, put the dough balls in the indentations of the muffin tins. Take your thumb and press the dough down in the center of each indentation, then use your thumb to press the dough up the sides. (If the dough is sticky, dampen your thumb very lightly with water or oil.) Freeze the pans of dough for 20 minutes.
- Preheat the oven to 350ºF (180ºC).
- Bake the tartlet shells for 8 to 10 minutes, until the dough appear dry and cooked. Remove from oven and use the handle of a wooden spoon to widen and smooth the inside of the little tartlet shells, pressing the dough that’s puffed up somewhat firmly against the sides. Let cool completely, then remove the tartlet shells from the muffin tins – the tip of a paring knife might be needed to help aid them out – and set them on a wire cooling rack.
- Make the caramel filling by warming the cream with the caramels in a small saucepan over low heat, stirring, until the caramels are melted and the mixture is smooth. Divide the caramel into each of the tartlet shells.
- Make the chocolate ganache by heating the cream in a small saucepan. Remove from heat and add the chopped chocolate. Let it sit for a minute, then whisk the chocolate into the cream until the mixture is smooth.
- Top each tartlet with some of the ganache and take a butter knife or small metal spatula and swipe off the excess. Sprinkle each tartlet with a few grains of sea salt.
Recipe by David Lebovitz.
Baking Soda + Hydrogen Peroxide = Wow!
Months ago, I repinned a pin about using baking soda and hydrogen peroxide to clean the gunk off of baking sheets. You know what I’m talking about, the sticky gross residue leftover from before you discovered parchment sheets rather than Pam.
Since I’m skeptical about, well, everything, I didn’t have high hopes for this project. But I’m happy to report that the concoction works and it’s easy to make and use! Simply mix baking soda and hydrogen peroxide until it forms a paste, then apply it with a sponge or brillo pad and lightly scrub. The ick comes off with minimal elbow grease and your baking sheets will look like almost new.
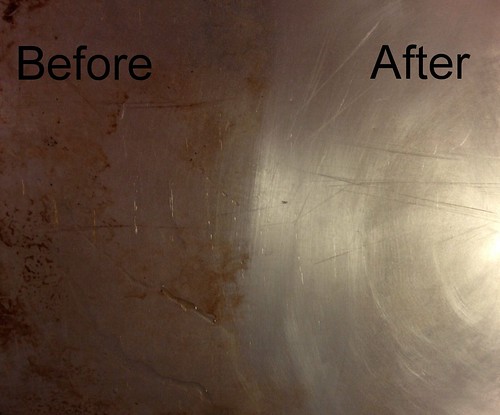
Impressive, eh?
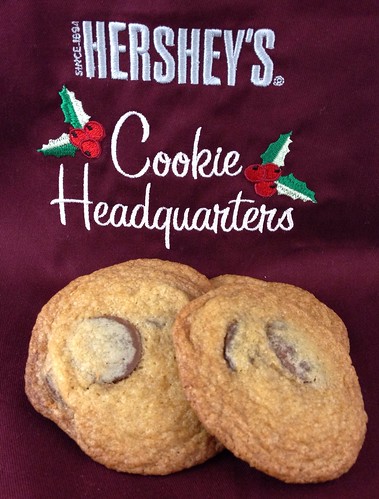
Hershey’s Baking Melts Cookies & Giveaway
Print This Recipe
Before we get into the recipe, look what I got in the mail from Hershey’s!
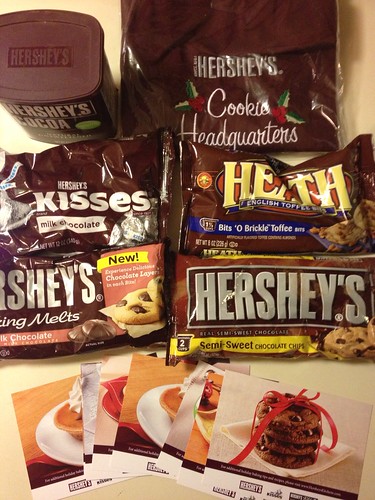
Yep, that’s a Hershey’s® Cookie Headquarter Apron, one package of Hershey’s® Baking Melts Chocolates, one package of Hershey’s® Bits ‘o’ Brickle® Toffee Chips, one package of Hershey’s® Semi-Sweet Chocolate Chips, one package of Hershey’s® Kisses® Chocolates, one canister of Hershey’s® Cocoa, and one set of recipe cards featuring the core Hershey’s® holiday recipes.
I know, it’s amazing. And I couldn’t wait to try out some of the chocolate, including Hershey’s new Baking Melts. The Baking Melts are these cute little discs that can be mixed into batters or even sandwiched between two cookies. The best thing about using them in this cookie recipe is that you get more chocolate in every bite. And how can you go wrong with more chocolate?
Ingredients
1 cup (2 sticks) butter , softened
3/4 cup granulated sugar
3/4 cup packed light brown sugar
1 teaspoon vanilla extract
2 eggs
2-1/4 cups all-purpose flour
1 teaspoon baking soda
1 teaspoon salt
1-3/4 cups (9.5-oz. pkg.) HERSHEY’S BAKING MELTS Milk Chocolate or (10-oz.-pkg.) HERSHEY’S BAKING MELTS Semi-Sweet Chocolate
Preparation
Heat oven to 325°F. Line cookie sheets with parchment paper.
Beat butter, granulated sugar, brown sugar and vanilla in large bowl until well blended. Add eggs, one at a time, beating well after each addition. Stir together flour, baking soda and salt; gradually beat into butter mixture. Stir in chocolate pieces and nuts. Drop by rounded tablespoons onto prepared cookie sheet.
Bake 13 to 15 minutes or until golden brown. Cool 2 minutes; slide parchment paper and cookies to wire rack. Cool completely. 3 dozen cookies.
Recipe from Hershey’s.
And because Hershey’s is so awesome, they’ve given me a holiday baking prize back to give away to one of you! Leave a comment below stating which Hershey’s product you are excited to bake with this holiday season.
Hershey’s provided me with a holiday baking pack and will ship a second pack directly to a winner. Giveaway ends at 11:59 p.m. EST on Sunday, December 9, 2012. One winner will be selected at random shortly thereafter and contacted by email. Please note this giveaway is only open to residents of the U.S.