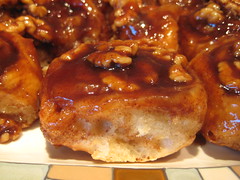
Sticky Buns
 Print This Recipe
 My first ever job was working at a Mrs. Fields bakery called La Petite Boulangerie while I was in high school. During the summer and on weekends, I would arrive at the bakery at 6:30 in the morning (can you believe they trusted a 16-year-old with keys to the place?) and along with the baker, prepare all the muffins, cookies, and breads for sale. The last thing out of the oven was always the cinnamon rolls and sticky buns, and the smell of cinnamon would permeate the bakery for hours.
On the rare occasion we didn’t sell out of these goodies, I’d bring them home to my family and we’d microwave them before gobbling them up. And every so often, I’d put one aside in the morning and my dad would stop by the bakery for a sticky bun fresh out of the oven. They quickly became one of his favorite treats. So, when I found this recipe I bookmarked it and knew I had to bake them the next time I was at my parents’ house, and I’m so glad I did. The buns are soft and flavorful, and the sticky sauce is the perfect combination of maple and cinnamon. In fact, you may even be tempted to eat it by the spoonful.
Photos of the long yet not difficult process here.
Dough Ingredients
1 large egg yolk
1 c. whole milk (I used lowfat)
1 tsp. pure vanilla extract
Zest of 1 orange (I omitted this)
2 1/2 to 2 3/4 c. all-purpose flour
2 Tbsp. unsalted butter, softened
2 1/4 tsp. (1 package) active dry yeast
1 1/2 tsp. kosher salt
1/4 c. sugar
Sticky Sauce Ingredients
1/2 lb. (2 sticks) unsalted butter
3/4 c. firmly packed light brown sugar
1/2 c. pure maple syrup
1 1/2 tsp. ground cinnamon
Egg Wash
1 large egg
2 Tbsp. whole milk or heavy cream (I used low fat milk)
Cinnamon Sugar
1 Tbsp. plus 1 1/2 tsp. freshly ground cinnamon
1/2 c. sugar
Finishing
1 c. whole natural almonds, lightly toasted and coarsely chopped (I used walnuts and put them in the pan with the sticky sauce at the beginning)
First Rise
- In the bowl of an electric mixer fitted with the whip attachment, combine the egg yolk, milk, vanilla, zest, and one-third of the flour. Mix on medium speed until it is a smooth paste. Add the butter in pieces and mix to combine.
- Change the mixer attachment to a dough hook. Add the remaining flour, the yeast, salt, and sugar and mix on low speed to combine. Increase the speed to medium and beat for 10 to 15 minutes, or until the dough forms a ball and is no longer sticking to the sides of the bowl. The dough should be nice and elastic. If it is very sticky, slowly add up to 1/2 cup more flour. (I used the additional 1/2 cup.)
- Place the dough in a lightly greased bowl and cover with plastic wrap. Set aside in a warm place to rise until doubled in volume, 1 1/2 to 2 hours.
Sticky Sauce Preparation
- Generously butter a 9×13 inch baking pan.
- In a medium saucepan, combine the butter, brown sugar, maple syrup, and cinnamon, stirring until it reaches a rolling boil.
- Remove from heat and pour into the prepared pan. Set aside to cool.
Second Rise
- When the dough has doubled in volume, punch it down and turn it out onto a lightly floured work surface. Roll out the dough into a rectangle that is 12 inches wide by 18 inches long.
- For the egg wash: In a small bowl, using a fork, whisk together the egg and milk. Using a pastry brush, brush it over the surface of the dough.
- For the cinnamon sugar: In a small bowl, combine the cinnamon and sugar. Sprinkle over the dough, leaving unsugared the bottom 1 inch of one long side of the rectangle.
- Starting at the top edge of the rectangle, roll the dough toward you jelly-roll style and pinch the bottom seam closed. Slice the roll into 12 pieces approximately 1 1/2 inches thick, and place them cut side up about 2 inches apart on top of the sticky sauce in the pan. Spray the buns lightly with nonstick vegetable cooking spray and cover with plastic wrap (or lighly butter one side of the plastic wrap). Refrigerate overnight.
Complete the Buns
- When you are ready for the final rise, remove the buns from the refrigerator. Bring about 3 quarts of water to a boil. Place an empty roasting pan large enough to hold the water on the bottom of your cold oven. Pour the boiling water into the pan.
- Remove the plastic wrap from the buns. Position a rack in the center of your oven. Place the pan on the rack in the oven (do not turn it on!) and shut the door. The steam of the water will help the buns in their final rise. The buns will just about double in size in 30 to 45 minutes. (If your fridge is on a super-cold setting, the buns may need a little longer to rise. If they need more time, just boil some more water and refill the roasting pan.) When the buns have doubled in volume, remove them (and the roasting pan filled with water) from the oven.
- Preheat the oven to 350 degrees.
- Bake for 20 to 25 minutes, or until golden brown. Remove to a wire rack to cool for about 10 minutes. Using tongs, turn the buns over onto a serving dish. Pour the sticky sauce in the pan over the buns and sprinkle with the chopped almonds.
Recipe adapted from Not Microwave Safe.
Halloween and Autumn Recipes
Looking for fun Halloween and autumn recipes? Here’s a few:
- Candy Corn
- Finger Cookies
- Tarantula Cookies
- Apple Pie
- Brown Sugar Pound Cake with Caramel Glaze
- Brown Sugar Cookies
- Brown Sugar Shortbread
- Cinnamon-Sugar Cookies (lowfat)
- Double Layer Pumpkin Cheesecake
- Pecan Sour Cream Biscuits
- Vegan Pumpkin Muffins
Enjoy!
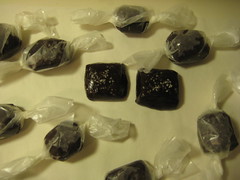
Salted Chocolate Caramels
Print This Recipe
 I was slightly terrified when I first started this recipe, for two reasons: 1. Hot sugar and I have gotten into fights many times in the past, and I usually end up burned (literally); and 2. The reviews were all over the place. Yet I still made them; I guess I was feeling brave.
And fortunately for me, the caramels were a success. I heeded the advice of some of the reviewers and boiled the mixture to soft ball stage rather than 255 °F like the recipe states, as people were ending up with a glass-like texture by heating that high. (Mine were a little soft after they cooled, but seemed to firm up a bit overnight.) The caramels are chewy but not sticky, and have a nice bite as they don’t stick to your teeth. Flavorwise, the chocolate is not overpowering, and the salt makes these a perfect salty/sweet treat!
(Yes, a thermometer is required to make these. There’s no need for an expensive one, I’ve been using this model for years.)
Photos of the process here.
Ingredients
2 cups heavy cream
10 1/2 oz fine-quality bittersweet chocolate (no more than 60% cacao if marked), finely chopped
1 3/4 cups sugar
1/2 cup light corn syrup
1/4 cup water
1/4 teaspoon salt
3 tablespoons unsalted butter, cut into tablespoon pieces
2 teaspoons flaky sea salt such as Maldon (I used coarse sea salt because that’s all I had)
Vegetable oil for greasing
Preparation
- Line bottom and sides of an 8-inch straight-sided square metal baking pan with 2 long sheets of crisscrossed parchment.
- Bring cream just to a boil in a 1- to 1 1/2-quart heavy saucepan over moderately high heat, then reduce heat to low and add chocolate. Let stand 1 minute, then stir until chocolate is completely melted. Remove from heat.
- Bring sugar, corn syrup, water, and salt to a boil in a 5- to 6-quart heavy pot over moderate heat, stirring until sugar is dissolved. Boil, uncovered, without stirring but gently swirling pan occasionally, until sugar is deep golden, about 10 minutes. Tilt pan and carefully pour in chocolate mixture (mixture will bubble and steam vigorously). Continue to boil over moderate heat, stirring frequently, until mixture registers soft ball stage (235-240°F) on thermometer, about 15 minutes. Add butter, stirring until completely melted, then immediately pour into lined baking pan (do not scrape any caramel clinging to bottom or side of saucepan). Let caramel stand 10 minutes, then sprinkle evenly with sea salt. Cool completely in pan on a rack, about 2 hours.
- Carefully invert caramel onto a clean, dry cutting board, then peel off parchment. Turn caramel salt side up. Lightly oil blade of a large heavy knife and cut into 1-inch squares.
Notes:
- If desired, additional sea salt can be pressed onto caramels after cutting.
- Caramels keep, layered between sheets of parchment or wax paper, in an airtight container at cool room temperature 2 weeks.
- Caramels can be wrapped in 4-inch squares of wax paper; twist ends to close.
Recipe adapted from Epicurious.
Napoletana Pizza
Print This Recipe
 I love pizza. Thin crust, thick crust, deep dish, whatever. I love it all. This is my second attempt at pizza dough (the first time I made this yummy recipe) and I’m still amazed at how easy it is.
Although this recipe looks daunting with the multiple steps, don’t be scared! It’s fairly simple to make, worth the time, and yields a thin crust with a nice crunch is spots. Top it with whatever you want (I used homegrown green peppers from my balcony garden, among other things), and enjoy your delicious pizza!
Photos of the process here.
Some notes:
- I used a mixer (first the paddle attachment then the dough hook) and froze all of the dough balls so that I can pull them out and put them in the fridge the night before I want to make pizza. Talk about convenient!
- I don’t have a pizza stone so I used a regular cookie sheet and baked the pizza at 450F for 7-8 minutes.
- I had trouble tossing the dough so I rolled it out with a rolling pin.
Ingredients
4 1/2 c unbleached high-gluten, bread, or all-purpose flour, chilled (I used bread flour)
1 3/4 tsp salt
1 tsp instant yeast
1/4 c olive oil
1 3/4 c water, ice cold (40°F)
Semolina flour or cornmeal for dusting (I used cornmeal)
Preparation, Day One
- Using an electric mixer fitted with the paddle attachment, stir together the flour, salt, and instant yeast in a 4-quart bowl. On low speed, stir in the oil and the cold water until the flour is all absorbed. Switch to the dough hook and mix on medium speed for 5 to 7 minutes, or as long as it takes to create a smooth, sticky dough. The dough should clear the sides of the bowl but stick to the bottom of the bowl. If the dough is too wet and doesn’t come off the sides of the bowl, sprinkle in some more flour just until it clears the sides. If it clears the bottom of the bowl, dribble in a teaspoon or two of cold water. The finished dough will be springy, elastic, and sticky, not just tacky, and register 50 to 55F.
- Sprinkle flour on the counter and transfer the dough to the counter. Prepare a sheet pan by lining it with baking parchment and misting the parchment with spray oil (or lightly oil the parchment). Using a metal dough scraper, cut the dough into 6 equal pieces (or larger if you are comfortable shaping large pizzas), You can dip the scraper into the water between cuts to keep the dough from sticking to it. Sprinkle flour over the dough. Make sure your hands are dry and then flour them. Lift each piece and gently round it into a ball. If the dough sticks to your hands, dip your hands into the flour again. Transfer the dough balls to the sheet pan. Mist the dough generously with spray oil and slip the pan into a food-grade plastic bag.
- Put the pan into the refrigerator overnight to rest the dough, or keep for up to 3 days. (Note: If you want to save some of the dough for future baking, you can store the dough balls in a zippered freezer bag. Dip each dough ball into a bowl that has a few tablespoons of oil in it, rolling the dough in the oil, and then put each ball into a separate bag. You can place the bags into the freezer for up to 3 months. Transfer them to the refrigerator the day before you plan to make pizza.)
Preparation, Day Two
- On the day you plan to make the pizza, remove the desired number of dough balls from the refrigerator two hours before making the pizza. Dust the counter with flour, and then mist the counter with spray oil. Place the dough balls on top of the floured counter and sprinkle them with flour; dust your hands with flour. Gently press the dough into flat disks about 1/2 inch thick and 5 inches in diameter. Sprinkle the dough with flour, mist it again with spray oil, and cover the dough loosely with plastic wrap or a food-grade plastic bag. Let rest for 2 hours.
- At least 45 minutes before making the pizza, place a baking stone either on the floor of the oven (for gas ovens), or on a rack in the lower third of the oven. Preheat the oven as hot as possible, up to 800F (most home ovens will go only to 500 to 550F, but some will go higher). If you do not have a baking stone, you can use the back of a sheet pan, but do not preheat the pan.
- Generously dust a peel or the back of a sheet pan with semolina flour or cornmeal. Make the pizzas one at a time. Dip your hands, including the backs of your hands and knuckles, in flour and lift I piece of dough by getting under it with a pastry scraper. Very gently lay the dough across your fists and carefully stretch it by bouncing the dough in a circular motion on your hands, carefully giving it a little stretch with each bounce. If it begins to stick to your hands, lay it down on the floured counter and reflour your hands, then continue shaping it. Once the dough has expanded outward, move to a full toss. If you have trouble tossing the dough, or if the dough keeps springing back, let it rest for 5 to 20 minutes so the gluten can relax, and try again. You can also resort to using a rolling pin, though this isn’t as effective as the toss method.
- When the dough is stretched out to your satisfaction (about 9 to 12 inches in diameter for a 6-ounce piece of dough), lay it on the peel or pan, making sure there is enough semolina flour or cornmeal to allow it to slide. Lightly top it with sauce and then with your other toppings, remembering that the best pizzas are topped with a less-is-more philosophy. The American “kitchen sink” approach is counterproductive, as it makes the crust more difficult to bake. A few, usually no more than 3 or 4 toppings, including sauce and cheese is sufficient.
- Slide the topped pizza onto the stone (or bake directly on the sheet pan) and close the door. Wait 2 minutes, then take a peek. If it needs to be rotated 180 degrees for even baking, do so. The pizza should take about 5 to 8 minutes to bake. If the top gets done before the bottom, you will need to move the stone to a lower self before the next round. if the bottom crisps before the cheese caramelizes, then you will need to raise the stone for subsequent bakes.
- Remove the pizza from the oven and transfer to a cutting board. Wait 3 to 5 minutes before slicing and serving, to allow the cheese to set slightly.
Makes six 6-ounce pizza crusts.
Adapted from The Bread Baker’s Apprentice via Perry’s Plate.
– – –
Also, just a reminder that Nosh is participating in the Donor’s Choose social media challenge. Please donate!