Passover Recipes
In case you’re on the lookout for some good Passover dessert recipes (sorry not all of them have pictures), I can help you out:
Also, I’m going to try a recipe for chocolate brownies topped with toffee, then topped with chocolate chips, then sprinkled with almonds, then sprinkled with sea salt. If it’s a success I’ll add it to this list.
Now, to answer questions that I always get: Yes, you can use margarine rather than butter to keep the recipe pareve. Yes, you can make the brownies in advance and freeze them. Yes, you should keep the matzo brittle in the fridge because the chocolate isn’t tempered and it tends to melt a little. And yes, you can use imitation vanilla instead of real vanilla.
Stayed tuned for a cookbook giveaway in the next couple of weeks!
Hamantaschen II
 Print This Recipe
I almost didn’t write this post because my Hamantaschen are so ugly.  In fact, they’re even uglier than last year’s which I didn’t think was possible. And you wouldn’t know it from looking at my photos, but Hamantaschen are triangular shaped cookies, representative of Purim‘s villain Haman’s triangular ears/pocket/hat depending on whom you ask. I think in Hebrew school we learned it was either Haman’s hat (remember the song?) or ears, but really–triangular ears?
Anyway, Hamantaschen are soft cookies, traditionally with a poppy seed filling, but we grew up eating apricot ones, hence my apricot filling. I used the same apricot filling recipe (yum!) from last year but decided to give this new dough recipe a shot, and it’s good! However, I ran into one weird problem–I baked some on parchment and some on Silpats. The ones on parchment tended to open more and the ones on Silpats stayed sealed. Weird, huh?
Ingredients
1/2 cup vegetable shortening
1/2 cup (1 stick) unsalted butter or margarine
1 1/4 cups sugar + a pinch for the egg wash
3 eggs + 1 for the egg wash
1/4 cup orange juice or milk
1 1/2 teaspoons vanilla extract
Approximately 4 to 4 1/2 cups of flour
1/2 teaspoon salt
2 1/2 teaspoons baking powder
Fruit preserves. (Not jam.) You can also use Nutella.
Preparation
Preheat the oven to 350 degrees F.
In a mixing bowl, cream the shortening, butter and sugar together. Add the eggs and blend until smooth. If the mixture is too hard to blend or seems curdled, add about 1 tbs of flour to bind it.
Stir in the orange juice or milk and the vanilla. Fold in 4 cups of flour, salt and baking powder. Mix to make a firm but soft dough. Cover and let the dough rest for 10 minutes to give the flour time to absorb all the moisture. If the dough is too sticky to handle after ten minutes have passed, add extra flour up to 1/2 cup. The dough will be sticky when it’s ready, but you should be able to handle it without it getting stuck to your fingers.
Line a large baking sheet with parchment paper. Divide the dough into 2 or 3 flattened discs and work with one portion at a time. Roll out the dough onto a lightly floured board to a thickness of 1/8 inch. Use a 3-inch cookie or biscuit cutter and cut as many rounds as you can.
In a small bowl mix 1 egg, 1 tablespoon of water and a pinch of sugar to make an egg glaze. Brush the rounds with the wash, then fill each with a generous 1/2 teaspoonful of your desired filling. Fold 3 sides of each circle together, creating triangles. I like to leave a little space in the center so you can see what the filling is (plus it looks pretty), but you can also seal your hamantaschen completely.
Brush the cookies with additional egg wash. If desired, sprinkle with regular or coarse sugar, and bake in the center of the preheated oven until golden brown, 18 to 25 minutes. Cool on the baking sheets.
Tips
Bake your hamantaschen in the upper third of the oven – usually the bottom part of the oven is too hot and may also cause premature bottom-browning. If you want to use leftover scraps to make more cookies, only roll them out once more because a lean dough like this one can only be rolled a couple times before becoming really tough.
This dough can be frozen for about 2 months or refrigerated (wrapped well in plastic) for one to three days. Just give it time to warm up before rolling it out. You can also freeze or refrigerate the filled triangles before baking. If you do this, just bake them without defrosting.
More photos here.
My notes
- I used orange juice rather than milk.
- I skipped the egg wash.
- Mine baked in about 15 minutes.
- I used a regular old glass rather than a cookie cutter and got about four dozen cookies.
Recipe from A Treasury of Jewish Holiday Baking by Marcy Goldman via Baking and Books.
– – –
In other news, what do you think of the site redesign? The amazingly talented Maria designed the header image and I think it’s just adorable!
Please bear with me as I work out the kinks of the new template and let me know if you notice anything funky. I’m currently trying to figure out why the live comment preview works in IE but not Firefox, so if you’re familiar with WordPress, now would be a great time to show off your expertise!
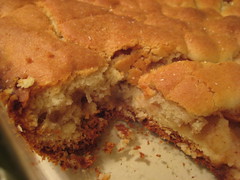
Russian Grandmothers’ Apple Pie-Cake
Print This Recipe
 I’m not a huge fruit dessert person. In fact, my favorite part of a pie is the crust. I am all about the crust. So when I saw this week’s Tuesdays With Dorie recipe I thought well, even if the filling sucks, at least there’s lots of crust! Why yes, I am the queen of pessimism. (Blame it on Internet dating.) Anyway, I suppose the negative thoughts began early on, when I tried to shape the dough into rectangles and it was sticky. And I mean sticky. (Photos of the process here. I have no idea if mine looks the way it’s supposed to because the book didn’t have a picture.)
 Then, I read and reread the recipe and realized I don’t have a 9×12″ baking dish, and oh no what am I going to do because I won’t have enough dough for my 9×13″ dish. Oh, did I not mention I’m also a worrier? Well, I conferred with my mom who didn’t think 9×12″ was a standard size and said just to use the 9×13″, then I did some research and found the 9×12″ to be a typo (phew!). Much happier, I got to slicing my apples. Speaking of apples, if you don’t have one of these gadgets that cores, peels, and slices, you must go out and buy it. What a time saver! (We use it every year for Passover apple crisp and the best ever apple pie for Thanksgiving.)
Back to the pie-cake. I bought 10 apples (half Granny Smith, half Fiji) like the recipe says, and I needed only half of them. Not sure how that happened (maybe the Granny Smiths were large?), but whatever. Aside from the extra apples, that part of the recipe was no problem. The dough however, oh, the dough. I tried rolling it out and it didn’t want to roll, so I ended up taking small pieces and flattening them between my palms then pressing them together in the dish to create the crust. It worked. It’s not attractive, but it worked.
Finally, I got the sucker in the oven and watched it brown in about five minutes. I quickly covered it with foil, let it bake for an hour, and listened for the sound of bubbling apples and cinnamon-sugar, which never happened. But my apartment smelled so good!
OK so, after all that rambling, the verdict: Eh. While the smell is fantastic (and there’s nothing like waking up the following day to the scent of apple pie), I just didn’t find this anything special. Of course, I’m not big on fruit desserts, so I’ll let you know what my coworkers say when I bring it into the office this morning. If it’s gone by lunchtime, we know it’s a hit. Stay tuned.
p.s. I omitted the raisins, because just like nuts, raisins ruin baked goods. Hah.
Dough Ingredients
2 sticks (8oz) unsalted butter, at room temperature
1 c sugar
2 large eggs
1 T baking powder
½ tsp salt
juice of 1 lemon
3¼-3½ c all-purpose flour
Filling Ingredients
10 medium apples, all one kind or a mix (Fuji, Golden Delicious, Ida Reds, Cortland, or Rome, etc)
Squirt of fresh lemon juice
1 c moist, plump raisins (dark or golden)
¼ c sugar
1¼ tsp ground cinnamon
Sugar, preferably decorating (coarse) sugar for dusting
Preparation
Working with a stand mixer, preferably fitted with a paddle attachment, or with a hand mixer in a large bowl, beat the butter and sugar together on medium speed until smooth, about 2 minutes. Add the eggs and continue to beat until the mixture is light and fluffy, about 3 minutes more. Reduce the mixer speed to low, add the baking powder and salt and mix just to combine. Add the lemon juice—the dough will probably curdle, but don’t worry about it. Still working on low speed, slowly but steadily add 3¼ cups of the flour, mixing to soft, but if you think it looks more like a batter than a dough at this point, add the extra ¼ cup flour. (The dough usually needs the extra flour.) When properly combined, the dough should almost clean the sides of the bowl.
Turn the dough out onto a work surface, gather it into a ball and divide it in half. Shape each half into a rectangle. Warp the dough in plastic wrap and refrigerate for at least 2 hours, or for up to 3 days. (The dough can be wrapped airtight and frozen for up to 2 months; defrost overnight in the refrigerator.)
Peel and core the apples and cut into slices about ¼ inch thick; cut the slices in half crosswise if you want. Toss the slices in a bowl with a little lemon juice—even with the juice, the apples may turn brown, but that’s fine—and add the raisins. Mix the sugar and cinnamon together, sprinkle over the apples and stir to coat evenly. Taste an apple and add more sugar, cinnamon and/or lemon juice if you like.
Getting ready to bake
Center a rack in the oven and preheat the oven to 375?F. Generously butter a 9×12 inch baking pan (Pyrex is good) and place it on a baking sheet lined with parchment or a silicone mat.
Remove the dough from the fridge. If it is too hard to roll and it cracks, either let it sit at room temperature for about 15 minutes or give it a few bashes with your rolling pin to get it moving. Once it’s a little more malleable, you’ve got a few choices. You can roll it on a well-floured work surface or roll it between sheets of plastic wrap or wax paper. You can even press or roll out pieces of the dough and patch them together in the pan—because of the baking powder in the dough, it will puff and self-heal under the oven’s heat. Roll the dough out until it is just a little larger all around than your pan and about ¼ inch thick—you don’t want the dough to be too thin, because you really want to taste it. Transfer the dough to the pan. If you the dough comes up the sides of the pan, that’s fine; if it doesn’t, that’s fine too.
Give the apples another toss in the bowl, then turn them into the pan and, using your hands, spread them evenly across the bottom. Roll out the second piece of dough and position it over the apples. Cut the dough so you’ve got a ¼-½ inch overhang and tuck the excess into the sides of the pan, as though you were making a bed. (If you don’t have that much overhang, just press what you’ve got against the sides of the pan.) Brush the top of the dough lightly with water and sprinkle sugar over the dough. Using a small sharp knife, cut 6 to 8 evenly spaced slits in the dough.
Bake for 65-80 minutes, or until the dough is a nice golden brown and the juices from the apples are bubbling up through the slits. Transfer the baking pan to a cooling rack and cool to just warm or to room temperature. You’ll be tempted to taste it sooner, but I think the dough needs a little time to rest.
Recipe from Baking: From My Home To Yours by Dorie Greenspan.
Pecan Sour Cream Biscuits
Print This Recipe
This is my first Tuesdays With Dorie post as well as my first attempt at making biscuits, and I think they both went well! (Photos of the process here.)
First things first–I’m not a huge biscuit person. Growing up, the most popular kind of bread in our house was bagels (you can eat anything on a bagel!) so the majority of my biscuit consumption has been limited to the rare times I have ordered something at a restaurant that comes with a biscuit. (Every Father’s Day it’s chicken, waffles, and biscuits at Roscoe’s in Hollywood, but that’s a story for another time.)
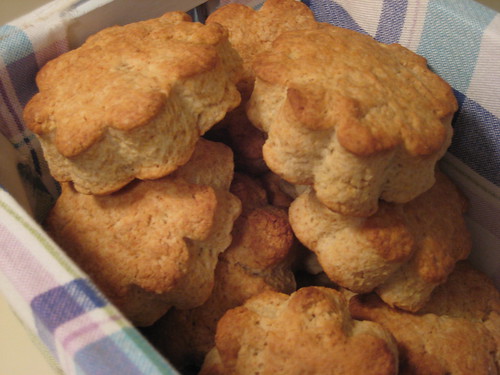
These were good, but not exactly what I imagined them to be. I suppose I should have realized that a biscuit with brown sugar would be a bit sweeter than your everyday biscuit, but for some reason, I ignored that hint. Also, these were definitely a lot denser and browned a lot more than I expected.
And of course, it should be noted I don’t have a round cookie or biscuit cutter, hence the um, flower shaped biscuits. Also, I left out the nuts because nuts in baked goods just ruin everything! (So says my ten-year-old self.)
Ingredients
2 cups all-purpose flour (or 1 3/4 cups all-purpose flour and 1/3 cup cake flour)
1 tablespoon baking powder
1/2 teaspoon salt
1/4 teaspoon baking soda
1/4 cup (packed) light brown sugar
5 tablespoons cold unsalted butter, cut into 10 pieces
1/2 cup cold sour cream
1/4 cold whole milk
1/3 cup finely chopped pecans, preferably toasted
Center a rack in the oven and preheat the oven to 425 degrees F. Get out a sharp 2-inch-diameter biscuit cutter and line a baking sheet with parchment or a silicone mat.
Preparation
Whisk the flour(s), baking powder, salt, and baking soda together in a bow. Stir in the brown sugar, making certain there are no lumps. Drop in the butter and, using your fingers, toss to coat the pieces of butter with flour. Quickly, working with your fingertips (my favorite method) or a pastry blender, cut and rub the butter into the dry ingredients until the mixture is pebbly. You’ll have pea-size pieces, pieces the size of oatmeal flakes and pieces the size of everything in between– and that’s just right.
Stir the sour cream and milk together and pour over the dry ingredients. Grab a fork and gently toss and turn the ingredients together until you’ve got a nice soft dough. Now reach into the bowl with your hands and give the dough a quick gentle kneading– 3 or 4 turns should be just enough to bring everything together. Toss in the pecans and knead 2 to 3 times to incorporate them.
Lightly dust a work surface with flour and turn out the dough. Dust the top of the dough very lightly with flour, pat the dough out with your hands or toll it with a pin until it is about 1/2 inch high. Don’t worry if the dough isn’t completely even– a quick, light touch is more important than accuracy.
Use the biscuit cutter to cut out as many biscuits as you can. Try to cut the biscuits close to one another so you get the most you can out of the first round. By hand or with a small spatula, transfer the biscuits to the baking sheet. Gather together the scraps, working with them as little as possible, pat out to a 1/2-inch thickness and cut as many additional biscuits as you can; transfer these to the sheet. (The biscuits ca be made to this point and frozen on the baking sheet, then wrapped airtight and kept for up to 2 months. Bake without defrosting– just add a couple more minutes to the oven time.)
Bake the biscuits for 14-18 minutes, or until they are tall, puffed and golden brown. Transfer them to a serving basket.
Yields 12 biscuits.
Recipe from Baking: From My Home To Yours by Dorie Greenspan.
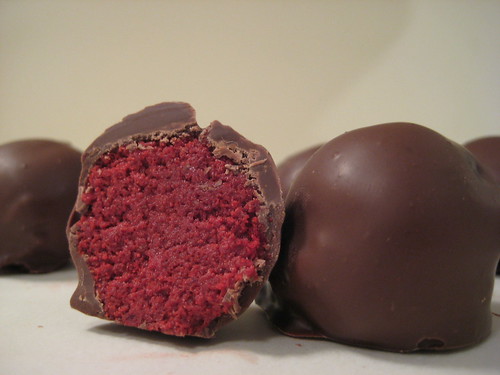
Red Velvet Cake Balls
Print This Recipe
Pictures of the process here.
First of all, YUM. Secondly, YUM. Thirdly, YUM.
Now that I’ve gotten that out of the way, I have to tell you that I have a newfound respect for people who dip chocolate by hand. What a pain in the ass. Lesson learned: Spend the extra money and buy the dipping chocolate in the little containers you find next to the strawberries in the produce section of the market. The one I used is called Dolci Frutta Fruit Dip Chocolate and it was delicious and you will thank me for it later! I got it at Pavilions which is owned by Safeway, in case you have a hard time finding it. This chocolate is so cool, once you dip the balls in it (yes, you may giggle) it hardens sorta like Magic Shell (please don’t tell me you’re not old enough to remember Magic Shell) and about five seconds later they are ready to eat.
So, not only are these good, they are easy! And I’ll even admit to using a box mix and canned frosting. I know, for shame! Am I still allowed to have a baking blog? Perhaps we can keep this admission on the down low. Thanks.
Ingredients
1 box red velvet cake mix (cook as directed on box for 13 X 9 cake)
1 can cream cheese frosting (16 oz.)
chocolate for dipping
Preparation
- After cake is cooked and cooled completely, crumble into large bowl.
- Mix thoroughly with 1 can cream cheese frosting. (It may be easier to use fingers to mix together, but be warned it will get messy.)
- Roll mixture into quarter size balls and lay on cookie sheet. (Should make 45-50.)
- Chill for several hours. (You can speed this up by putting in the freezer.)
- Melt chocolate in microwave per directions on package.
- Roll balls in chocolate and lay on wax paper until firm. (Use a spoon to dip and roll in chocolate and then tap off extra.)
My notes:
- I used a small cookie scoop.
- Buy the dipping chocolate!
- I made the balls then refrigerated them overnight (covered with Press N Seal) and dipped them the next day with no problems.
Recipe from Bakerella.