Passover Desserts
If you’re looking for tried and true Passover desserts, you’ve come to the right place: 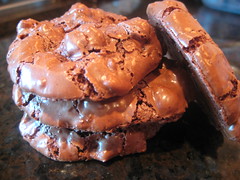
- Flourless Chocolate Walnut Cookies
- Passover Mandelbrot
- Chocolate Chip Meringues
- Flourless Chocolate Cake
- Matzo Brittle
- Apple Crisp
- Brownies
- Lemon Chiffon Cake
My family’s faves are the matzo brittle and chocolate walnut cookies, they are both delish!
Malted Milk Blondies
 Print This Recipe
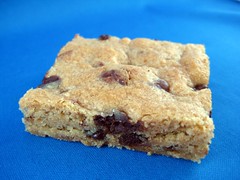 Friday night, I made a bunch of mini malted milk cookie tarts for a Bake Sale for Japan and had some malted milk powder and Whoppers leftover. I immediately thought of the Brewer’s Blondies recipe in the Baked cookbook that I flagged the first time I skimmed the book and knew they had to be made.
The blondies are buttery, rich, and not too sweet. I cut the Whoppers into quarters and they gave the blondies a little bit of texture which was nice. I didn’t find the malted flavor very noticeable, but that may be because I ate salt and vinegar Pop Chips before I tried the blondies and my taste buds were dead. However, I brought the bars into the office today and received a ton of compliments on them. Apparently they make a very good breakfast.
Ingredients
2 1/3 cups all-purpose flour
1 1/2 teaspoons baking powder
1 teaspoon salt
2 tablespoons malted milk powder
14 tablespoons unsalted butter, softened, cut into 1-inch cubes
1 3/4 cups firmly packed dark brown sugar
2 large eggs
2 teaspoons pure vanilla extract
3/4 cup malted milk balls (like Whoppers or Maltesers), coarsely chopped in a food processor
3/4 cup semisweet chocolate chips
Preparation
Preheat the oven to 350 degrees F. Butter the bottom and sides of a 9-by-13-inch baking pan.
In a medium bowl, whisk the flour, baking powder, salt and malted milk powder together.
In the bowl of an electric mixer fitted with the paddle attachment, beat the butter and brown sugar on medium speed until completely combined. Scrape down the bowl, add the eggs and vanilla, and beat until combined.
Add the flour mixture in two batches until just combined. Add the malted milk balls and chocolate chips and beat until just combined, about 10 seconds. The mixture will be thick. Turn the mixture out into the prepared pan and use an offset spatula to spread it evenly.
Bake in the center of the oven for 25 to 30 minutes, or until a toothpick inserted into the center of the blondie comes out clean.
Transfer to a wire rack and let cool for 20 minutes.
Recipe adapted from Baked: New Frontiers in Baking.
Frosted Brownies Topped with Chocolate Peanut Butter Krispies
 Print This Recipe
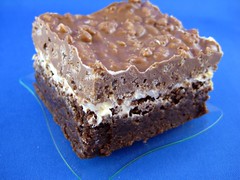 When I saw this recipe I immediately thought I would love these brownies, because really, what’s not to love? Brownies, frosting, chocolate, peanut butter, Rice Krispies. YUMMY, right? Well, I don’t know what’s wrong with me because I thought they were too sweet. I know, I didn’t think that was possible either.
With that said, the brownies were enormously popular at my office. Everyone loved and raved about them all day, so I have to declare them a hit. If I were to make them again (stranger things have happened), I may try subbing marshmallow fluff for the frosting because the frosting seemed a little out of place.
Finally, this recipe is great for scratch bakers or those who are BFFs with Betty Crocker. I used a fabulous brownie recipe (minus the salted caramel part) but if you are in a rush, you can use a mix. Since I hate making frosting (I end up with powdered sugar everywhere), I used store bought. Easy enough.
Ingredients
Brownies (9×13 pan, homemade or from a mix)
Vanilla frosting (homemade or from a can)
3 cups crisp rice cereal
1 cup cup Peanut Butter
12 ounces chocolate chips
Preparation
Bake brownies and let cool completely. Frost brownies and refrigerate.
In a saucepan over low heat, melt peanut butter and chocolate, stirring constantly. Add chocolate mixture to cereal. Spread mixture over frosted brownies. Refrigerate for one hour until set. Cut into bars.
Recipe adapted from Hoosier Homemade.
Chocolate-Chunk Caramel Cookies
 Print This Recipe
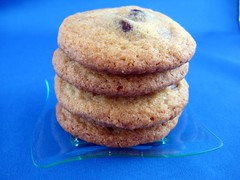 I’ve missed you guys! Between business travel and the flu, I haven’t been able to spend time in the kitchen lately. It sucked. Fortunately the flu is gone (save for the annoying cough that always seems to linger) and the kitchen has been calling my name! And to make things even sweeter, I discovered three bags of Kraft Caramel Bits in my pantry.
I searched for recipes using these caramely bits of yumminess, and finally discovered this one. At first glance, these cookies are very unassuming. In fact, they’re even a little ugly. But when you take a bite, you realize these are no ordinary chocolate chip cookies. In addition to chocolate, there’s a rich buttery caramel that takes you by surprise.
Now, before you run to your pantry to make sure you have ingredients to make these, I do have one gripe. If the cookies aren’t eaten straight from the oven, the caramel gets kind of hard. OK fine, really hard. And it sticks to your teeth in that super annoying way. Fortunately, this can all be easily remedied by putting the cookies in the microwave for a few seconds, but who wants to have to do that? And for those of you wondering if I would make these again, let me just say this: At 5:00 half of the cookies were still in the kitchen at the office, and we all know what that means.
Totally unrelated to the cookie recipe: The nice folks at restaurantware.com must have known that the butter in cookies is ruining the backdrops for my photo studio because they sent me a bunch of different mini serving pieces to use for my food photo shoots. How cool is that? You should check out their site, they have some fun pieces!
Ingredients
2 1/2 cups all-purpose flour
1 teaspoon baking soda
1/2 teaspoon baking powder
1 teaspoon salt
2 sticks (1 cup) unsalted butter
1 cup granulated sugar
1/2 cup firmly packed brown sugar
2 large eggs
6 ounces fine-quality bittersweet chocolate, chopped coarse
18 caramels (about 1 cup), I used Kraft Caramel Bits
Preparation
- Preheat oven to 325°F.
- In a bowl whisk together flour, baking soda, baking powder, and salt. In another bowl with an electric mixer cream butter and sugars until light and fluffy. Beat in eggs, one at a time, beating well after each addition, and beat in flour mixture.
- Lightly dust chocolate and caramel with flour then stir into dough. Drop rounded tablespoons about 2 inches apart onto baking sheets. Bake cookies in batches in middle of oven 12 to 15 minutes, or until golden. Cool cookies on baking sheets on racks until firm. Cookies keep in airtight containers 5 days.
Yields approximately 50 cookies.
Recipe adapted from Epicurious.
Peppermint Whoopie Pies
 Print This Recipe
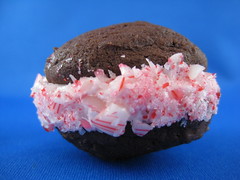 When I received the invitation for my friends’ annual Vodka Latke party (yes, there was a lot of vodka and latkes), I knew I had to bake something. But what goes with vodka and latkes? I couldn’t make cupcakes because they ordered some from Magnolia Bakery, so I asked the hosts and one of them suggested…peppermint whoopie pies of course. I mean, what else does a Jew bring to a Hanukkah party?
So, off to the store I went to buy candy canes. I think this was probably the first time I’ve ever bought candy canes, and I have no idea if some are better than others, but I did learn these things are a huge pain to crush. I put them in a Ziploc bag and used a rolling pin only to discover doing so created holes in the bag and consequently, crushed candy cane all over my kitchen. Next time, food processor.
Anyway, these are good. I don’t know what whoopie pies are supposed to taste like, but these were a hit so apparently they tasted like a whoopie pie. The cookie (which was kind of cakey) was soft and not too chocolately or sweet. The sweetness came from the filling and of course, the not-so-crushed candy canes on the outside. If you have some leftover candy canes, I recommend making these!
Whoopie Pie Ingredients
1 3/4 cups (230 grams) all purpose flour
3/4 cup (75 grams) Dutch-processed cocoa powder
1 teaspoon baking powder
1/4 teaspoon baking soda
1/4 teaspoon salt
3/4 cup (170 grams) unsalted butter, room temperature
3/4 cup (150 grams) granulated white sugar
1 large egg, room temperature
1 teaspoon pure vanilla extract
1/4 cup (60 ml) buttermilk
1/2 cup (120 ml) lukewarm water
Filling Ingredients
1 cup (226 grams) unsalted butter, room temperature
1 teaspoon pure vanilla extract
1 – 7 ounce (198 grams) jar of marshmallow creme or fluff
2 cups (230 grams) confectioners sugar, sifted
6-8 drops of red liquid food coloring
1/3 cup (80 ml) crushed candy canes
Whoopie Pie Preparation
Preheat oven to 375 degrees F (190 degrees C) and place oven rack in the center of the oven. Line two baking sheets with parchment paper.
In a large bowl sift together the flour, cocoa powder, baking powder, baking soda, and salt.
In the bowl of your electric mixer, fitted with the paddle attachment (can also use a hand mixer), beat the butter and sugar until light and fluffy. Add the egg beating well. Beat in the vanilla extract. In a small measuring cup, mix the buttermilk and coffee (or water). With the mixer on low speed, alternately add the flour mixture and buttermilk/coffee mixture, in three additions, beginning and ending with the flour. Drop heaping tablespoons (can also use a small ice cream scoop) of the batter onto the prepared baking sheets, spacing about 2 inches (5 cm) apart. With moistened fingers or with the back of a spoon, smooth the tops of the cookies.
Bake for about 9-10 minutes or until the tops of the cookies, when lightly pressed, spring back. Remove from oven and transfer to a wire rack to cool completely.
Filling Preparation
In the bowl of your electric mixer, or with a hand mixer, beat the butter until smooth and well blended. Beat in the vanilla extract and marshmallow creme. With the mixer on low speed, gradually beat in the sugar. Scrape down the sides of the bowl as needed. Then, on high speed, beat filling until it is light and fluffy (about 3-5 minutes). Add a little cream (if filling is too thick) or confectioners sugar (if filling is too thin) to get the right spreading consistency. Stir in crushed candy canes.
To Assemble: Take one cookie and spread a heaping tablespoon of the filling on the flat side of the cookie. Top with another cookie.
The assembled cookies can be stored, covered, in the refrigerator for several days. Bring to room temperature before serving.
Makes about 15 sandwich cookies.
Recipe from Joy of Baking.