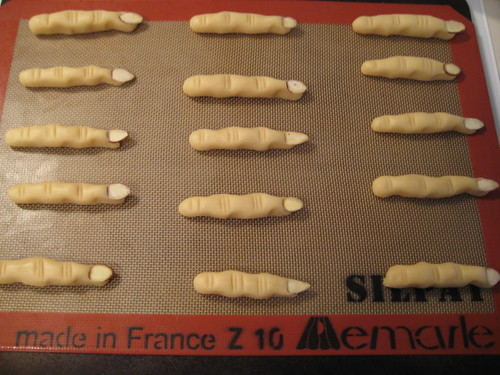
Halloween Finger Cookies
 Print This Recipe
I’ve been seeing these scary finger cookies all over the Internet and knew I had to bring them into the office. The cookie itself tastes like a cross between a sugar and a butter cookies. Not too sweet, yet not bland either.

By the second cookie sheet, I realized I needed to make the fingers a little skinnier, otherwise I’m pretty happy with the way they turned out. I’ll probably be making these again next year.
Photos of the process here.
Ingredients
1 cup butter, softened
1 cup white sugar
1 egg
2 2/3 cups all-purpose flour
1/4 teaspoon salt
2 teaspoons vanilla extract (or 1 teaspoon vanilla extract and 1 teaspoon almond extract)
Almond slices
Red decorating gel
Preparation
Preheat oven to 325° F. Combine dry ingredients. Lightly grease a cookie sheet.
In a large bowl, beat together butter, sugar, egg, and vanilla, beat in dry ingredients. Cover and refrigerate dough for 30 minutes.
Working with one-quarter of the dough at a time and keeping remaining dough refrigerated, roll heaping teaspoons full of dough into finger shape for each cookie. Press an almond firmly into one end for nail. Squeeze in center to create a knuckle shape and use a paring knife make slashes in several places to form knuckle.
Place cookies on the prepared cookie sheet and bake for 20-25 minutes or until pale golden. Let cool for three minutes. If desired, lift up almond and squeeze red decorator gel onto nail bed and press almond back in place so gel oozes out from underneath. (I skipped this part.)
Remove from cookie sheet and let cool on a wire rack. Repeat with remaining dough.
Yields 3-4 dozen.
Notes
- You can paint the nails by using some red food coloring that’s been diluted with water and brushing it on with a clean artist’s brush. Or, color frosting red and dilute it with water, then dip the bottom of the finger in it.
- Awesome step by step instructions for creating finger shapes here.
Recipe from Fabulous Foods.
Happy (Early) Halloween
Sorry for the lack of new recipes, it’s been crazy here lately! I’ve been out a lot, and when I wasn’t out, I was glued to the TV and worried about my parents and friends down in San Diego who had to evacuate because of the fires. Everyone’s fine, but it’s been a super scary week.
Speaking of scary…

OK, not so scary. And yes, I forgot to add the mouths. Oops. Happy Halloween!
Your Turn
So I’m a little curious about the people who visit this blog regularly. Tell me about yourselves! Where do you live? What do you do? Are you married? Have kids? Have you tried any recipes on my blog? If so, what did you think? And finally, do you have a recipe (or a nice Jewish boy) for me?
Oatmeal Sandwich Cookies
Print This Recipe
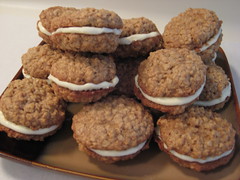 When I came across this recipe, I was hoping they would be like the Little Debbie Oatmeal Creme Pies. Sadly, they’re not. And they’re just OK, definitely nothing special. The cookie is sort of blah and the icing is way too sweet–and I’m someone who loves all things sweet.
I’m going to bring them into the office tomorrow so I’ll you know what my guinea pigs say. Update: Huge hit with the coworkers. Maybe I’m just picky.
Photos of the process here.
Ingredients
Cookies
3/4 cup butter flavor Crisco, plus additional for greasing
1 1/4 cups firmly packed light brown sugar
1/3 cup milk
1 egg
1 1/2 teaspoons vanilla
3 cups quick oats, uncooked
1 cup all-purpose flour
1/2 teaspoon baking soda
1/2 teaspoon salt
Icing
2 cups confectioner’s sugar
1/4 cup butter flavor Crisco
1/2 teaspoon vanilla
Preparation
- Heat oven to 350 F. Grease baking sheets.
- For cookies, combine shortening, brown sugar, milk, egg and vanilla in large bowl. Beat at medium speed of electric mixer until well blended.
- Combine oats, flour, baking soda, and salt. Mix into creamed mixture at low speed just until blended.
- Drop rounded measuring tablespoonfuls of dough 2 inches apart onto prepared baking sheets.
- Bake one sheet at a time at 350 for 0 to 12 minutes or until lightly browned. Do not overbake. Cool 2 minutes on baking sheet. Remove cookies to foil to cool completely.
- For frosting, combine confectioner’s sugar, shortening, and vanilla in medium bowl. Beat at low speed, adding enough milk for good spreading consistency. Spread on bottoms of half the cookies. Top with remaining cookies.
Makes about 16 sandwich cookies.
My notes:
- I ended up with more than 16 sandwiches since I used a smaller cookie scoop.
- I flattened the tops of the cookies after scooping them, in an attempt to get a flatter cookie.
Recipe from The Baking Bible.
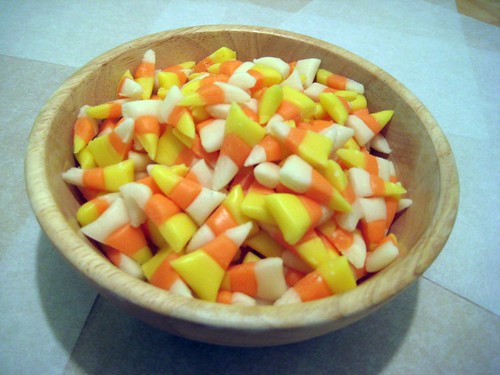
Candy Corn
Print This Recipe
I saw this recipe over on The Urban Housewife and immediately decided this recipe was a must-try. I have to admit this was my second attempt at making these. The first time, I followed the directions perfectly and ended up with a super stiff ball of dough and was extremely disappointed. After doing some research, I noticed other candy corn recipes said to boil the mixture for five minutes over low heat. This recipe calls for medium-high heat. So, the second time around I boiled the mixture over low heat, and it was a success!
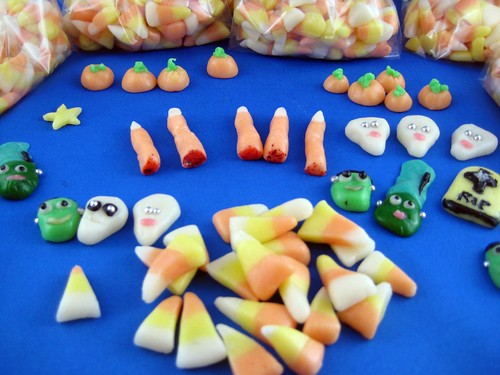
My amazingly talented friend Lauren made the spooky shapes. Aren’t they awesome?
These are good. A slightly different flavor from store-bought candy corn and a completely different texture. I had hoped these would firm up a bit more to get that more solid shell around the outside but that didn’t happen. I’m thinking maybe a medium rather than low boil would do the trick.
Note from Epicurious
When you’re at the grocery store, pick up some plastic gloves. They’ll make it easy to knead the dough without ending up with food-coloring-stained hands.
Photos of the process here.
Ingredients
1 cup sugar
2/3 cup corn syrup
5 tablespoons unsalted butter
1 teaspoon vanilla extract
2 1/2 cups powdered sugar
1/3 cup non fat milk powder
1/4 teaspoon sea salt
Red and yellow food coloring
Preparation
Bring first 4 ingredients to boil over high heat in heavy large saucepan. Reduce heat to medium-high (I reduced to low) and boil 5 minutes, stirring occasionally. Remove from heat. Sift powdered sugar, milk powder, and salt into medium bowl. Add powdered sugar mixture to pan; stir to combine. Let mixture stand until slightly warm to touch, about 20 minutes.
Divide dough into 3 equal pieces; place each piece in small bowl. Add several drops of yellow food coloring to one piece of dough. Using plastic gloves to protect hands, knead food coloring into dough until smooth and color is even, about 15 minutes. Repeat using red and yellow food coloring (to make orange) with second piece. Leave last piece white; knead dough until smooth. Roll each piece into a thin rope (don’t roll too thin or dough will break). Push three ropes together to form long rectangle. Using sharp knife, cut ropes into triangles. Using fingers, shape candy corn as desired. Store at room temperature in airtight container, separating layers with pieces of waxed paper to prevent sticking.
Or: If you’re feeling creative, color dough various colors and shape into spooky shapes!
Yields about five million pieces. OK not really, but a lot.
My notes:
- I boiled at low rather than medium-high like the recipe calls for.
- I separated each of the colors into four ropes rather than one long rope.
- Make sure you have a lot of free time, because these things take forever to cut.
- I got tired of cutting after about the twelve millionth piece, so by the time I got to the third rope, I cut them larger.
- I didn’t have gloves, so I put sandwich size Ziplocs over my hands until the color was somewhat kneaded in.
Recipe from BA Blog on Epicurious via The Urban Housewife.